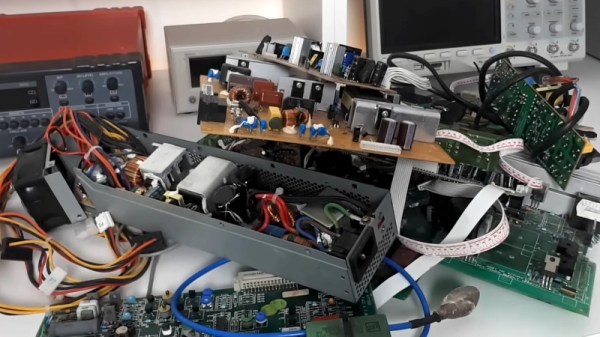
Intel’s Chips Light The Way To Faster Processor Arrays

It’s very likely indeed that whatever you are reading this on will have a multi-core processor. They’re now the norm, but the path to they octa-or-more-core chip in your phone has gone from individual processors with PCB interconnects through many generations of ever faster on-chip ones.

But what if your power needs are so high-end that you need more cores that can be fitted on one chip, but without the slow PCB interconnect to another? If you’re Intel, you develop a multi-core processor with an on-chip photonic interconnect. It talks to the neighboring ones in its cluster at full speed, via light.

The chip in question isn’t one you’ll see in a machine near you, instead it’s inspired by the extremely demanding requirements for DARPA’s HIVE graph analytics program. So this is a machine for supercomputers in huge data centers rather than desktop computers, it will be assembled into multi-die packages with that chip-to-chip optical networking built in. But your computer today is the equal of a supercomputer from not that many years ago, so never say you won’t one day be using its descendant technologies.

If You Aren’t Making Your Own Relays…

We’ve all been there. Someone will say something like, “I remember when we had to put our programs on a floppy disk…” Then someone will interrupt: “Floppy disk? We would have killed for floppy disks. We used paper tape…” After a few rounds, someone is talking about punching cards with a hand stylus or something. Next time someone is telling you about their relay computer, maybe ask them if they are buying their relays already built. They will almost surely say yes, and then you can refer them to [DiodeGoneWild], who shows how he is making his own relays.

While we don’t seriously suggest you make your own relays, there are a lot of fun techniques to pick up, from the abuse of a power drill to the calculation of the coil parameters. Even if you don’t learn anything, we get the desire to make as much as you can.

Continue reading “If You Aren’t Making Your Own Relays…”

A Hobson’s Coupler Leads To A Weird Engine

You want to join two shafts. What do you need? A coupler, of course. If the shafts don’t line up, you might consider an Oldham coupler. But what if the shafts are at a 90-degree angle to each other? Then you need a Hobson’s coupler. [Robert Murray-Smith] has the 3D printed hookup for you and a video that you can see below.

The part isn’t all 3D printed, though. You do need some bearings and steel rods. [Robert] proposes using this to couple a windmill’s blades to a generator, although we assume some loss is involved compared to a standard shaft. However, we’ve heard that the coupler, also called a Hobson’s joint or a stirrup joint, is actually pretty efficient. However, you rarely see these in practice because most applications will use a gear train employing a bevel gear.

While it may not be practical, the second video below shows an elbow engine that would look undeniably cool on your desk. By making some changes, you can create a Cardan joint which happens to be half of what you think of as a universal joint. The Hobson coupler and the Cardan joint seem to be made for each other, as you’ll see in the video.

We aren’t sure what we want to make with all these mechanisms, but as [Robert] points out, with new materials and techniques, these mechanisms might have a role to play in future designs, even though they have been mostly discarded.

There are, of course, many kinds of couplings. Then again, not all useful joints have to move.

Continue reading “A Hobson’s Coupler Leads To A Weird Engine”

Easyeda2KiCad: Never Draw A Footprint Again

What if I told you that you might never need to draw a new footprint again? Such is my friend’s impression of the tool that she’s shown me and I’m about to show you in turn, having used this tool for a few projects, I can’t really disagree!

We all know of the JLCPCB/LCSC/EasyEDA trio, and their integration makes a lot of sense. You’re expected to design your boards in EasyEDA, order the components on LCSC, and get the boards made by JLCPCB. It’s meant to be a one-stop shop, and as you might expect, there’s tight integration between all three. If there wasn’t, you’d be tempted to step outside of the ecosystem, after all.

But like many in this community, I use KiCad, and I don’t expect to move to a different PCB design suite — especially not a cloud one. Still, I enjoy using the JLCPCB and LCSC combination in the hobby PCB market as it stands now, and despite my KiCad affinity, it appears that EasyEDA can help me after all!

Continue reading “Easyeda2KiCad: Never Draw A Footprint Again”

The Simplest Curve Tracer Ever

To a lot of us, curve tracing seems to be one of those black magic things that only the true wizards understand. But as [DiodeGoneWild] explains, curve tracing really isn’t all that complicated, and it doesn’t even require specialized test instruments — just a transformer, a couple of resistors, and pretty much whatever oscilloscope you can lay your hands on.

True to his handle, [DiodeGoneWild] concentrates on the current-voltage curves of Zener diodes in the video below, mainly as a follow-up to his recent simple linear power supply project, where he took a careful look at thermal drift to select the best Zener for the job. His curve tracer is super simple — just the device under test in series with a bunch of 10-ohm resistors and the secondary winding of a 12-volt transformer. The probes of his oscilloscope — a no-frills analog model — go across the DUT and the resistor, and with the scope in X-Y mode, the familiar current-voltage curve appears. Sure, the trace is reversed, but it still provides a good visualization of what’s going on. The technique also works on digital scopes; just be ready for a lot of twiddling to get into X-Y mode and to get the trace aligned.

Of course it’s not just diodes that can be tested with a curve tracer, and [DiodeGoneWild] showed a bunch of other two-lead components on his setup. But for our money, the neatest trick here was using a shorted bridge rectifier to generate a bright spot on the curve to mark the zero crossing point. Clever indeed, and pretty useful on a scope with no graticule.

Continue reading “The Simplest Curve Tracer Ever”

Vacuum Chamber Gets Automation

[Nick Poole] does a lot of custom work with vacuum tubes — so much so that he builds his own vacuum tubes of various shapes, sizes, and functions right on his own workbench. While the theory of vacuum tubes is pretty straightforward, at least to those of us who haven’t only been exposed to semiconductors, producing them requires some specialized equipment. A simple vacuum won’t get you all the way there, and the complexity of the setup that’s needed certainly calls for some automation.

The vacuum system that [Nick] uses involves three sections separated by high-vacuum valves in order to achieve the pressures required for vacuum tube construction. There’s a rough vacuum section driven by one pump, a high vacuum section driven by a second pump, and a third section called the evac port where the tube is connected. Each second must be prepared properly before the next section can be engaged or disengaged. An Arduino Pro is tasked with all of this, chosen for its large amount of ADC inputs for the instrumentation monitoring the pressures in each section, as well as the digital I/O to control the valves and switches on the system.

The control system is built into a 19-inch equipment rack with custom faceplates which outline the operation of the vacuum system. A set of addressable LEDs provide the status of the various parts of the system, and mechanical keyboard switches are used to control everything, including one which functions as an emergency stop. The automation provided by the Arduino reduces the chances for any mistakes to be caused by human error, allows the human operator to focus on other tasks like forming the glass, and can also react much faster to any potentially damaging situations such as the high-pressure pump being exposed to atmospheric pressure.

As you can probably tell, [Nick] is pretty passionate about this stuff — last year he gave a talk at the Hackaday Supercon that went over all the intricacies of building one’s own vacuum tubes.

Continue reading “Vacuum Chamber Gets Automation”

Magnetic Gearbox, Part 2: Axial Flux Improves Performance

The number of interesting and innovative mechanisms that 3D printing has enabled always fascinates us, and it’s always a treat when one of them shows up in our feeds. This axial flux magnetic gearbox is a great example of such a mechanism, and one that really makes you think about possible applications.

The principles of [Retsetman]’s gearbox are simple for anyone who has ever played with a couple of magnets to understand, since it relies on that powerful attractive and repulsive force you feel when magnets get close to each other. Unlike his previous radial flux gearbox, which used a pair of magnet-studded cylindrical rotors nested one inside the other, this design has a pair of disc-shaped printed rotors that face each other on aligned shafts. Each rotor has slots for sixteen neodymium magnets, which are glued into the slots in specific arrangements of polarity — every other magnet for the low-speed rotor, and groups of four on the high-speed rotor. Between the two rotors is a fixed flux modulator, a stator with ten ferromagnetic inserts screwed into it.

In operation, which the video below demonstrates nicely, the magnetic flux is coupled between the rotors by the steel inserts in the stator so that when one rotor moves, the other moves at a 4:1 (or 1:4) ratio in the opposite direction. [Retsetman] got the gearbox cranked up to about 8,500 RPM briefly, but found that extended operation at as little as 4,000 RPM invited disaster not due to eddy current heating of the inserts or magnets as one might expect, but from simple frictional heating of the rotor bearings.

Torque tests of the original gearbox were unimpressive, but [Retsetman]’s experiments with both laminated stator inserts and more powerful magnets really boosted the output — up to a 250% improvement! We’d also like to see what effect a Halbach array would have on performance, although we suspect that the proper ratios between the two rotors might be difficult to achieve.

Continue reading “Magnetic Gearbox, Part 2: Axial Flux Improves Performance”