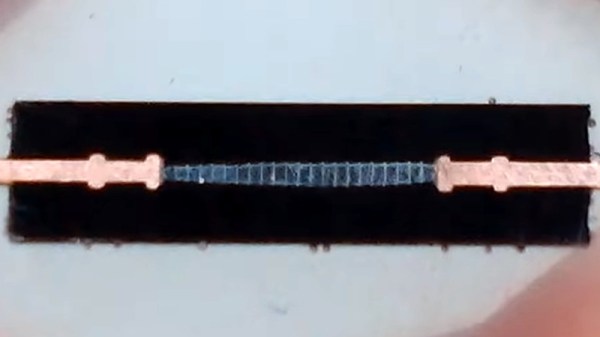
When we use an electronic component, we have some idea of what goes on inside it. We know that inside a transistor there’s a little piece of semiconductor with a junction made from differently doped regions etched into it, and in a capacitor, there will be metalized plates on the surface of some kind of dielectric. Reverse engineering has given us extensive die photography of integrated circuits, but there remain a few component mysteries to be uncovered. One is laid bare by [WizardTim], as he cross-sections a 20KV high-voltage diode.
A conventional low-voltage silicon diode has a forward voltage drop of about 0.7V and a relatively low maximum reverse voltage, for example with the 1N4001 rectifier it’s 50V. For the higher-spec 1N4007, the reverse voltage rating is 700V. This diode has a 25KV reverse voltage, and a clue to its construction comes in its quoted 45V forward voltage. Sure enough, when mounted in resin and carefully sanded and polished flat it reveals its interior as a stack of diodes in series to increase the reverse voltage at the expense of forward voltage.
Revealing the inner workings of an unusual component is fascinating, and the lapping technique used is definitely worth a look. It’s something we’ve seen before, for example in reducing CPU thickness for increased performance.
Those of us who have followed the Raspberry Pi over the years will be familiar with the various revisions of the little board, with their consequent new processors. What may be less obvious is that within the lifetime of any chip there will often be minor version changes, usually to fix bugs or to fine-tune production processes. They’re the same chip, but sometimes with a few extra capabilities. [Jeff Geerling] didn’t miss this when the Raspberry Pi 400 had a BCM2711 with a newer version number than that on the Pi 4, and now he’s notices the same chip on Pi 4 boards.
Why might they run two different revisions of the chip in parallel? It seems that the update changes the amount of memory addressable by the eMMC and the PCIe bus, the former could only see the first 1GB and the latter the first 3Gb. For the lower-spec Pi 4 boards this doesn’t present a problem, but for those with 8 gigabytes of memory it could clearly be an issue. Thus the Pi 400 and the top spec Pi 4 now have a newer BCM2711 version. This will almost certainly pass unnoticed for the average Raspberry Pi OS user, but the extra memory addressing space should be of interest for hardware experimenters wishing to expose that PCIe bus and talk to peripherals such as a GPU. That said, though he suggests the Compute Module 4 has the newer revision, his own experiments were unsuccessful.
[Editor’s Note: our own overclocking experiments show the C-version SOCs to run cooler/faster than their B counterparts, so it’s nice to have the better chips in the “normal” Pi form factor and not just the Pi 400 and compute modules.]
Sometimes you just get lucky. I had a project on my list for a long time, and it was one that I had been putting off for a few months now because I loathed one part of what it entailed — sensitive, high-accuracy analog measurement. And then, out of the blue I stumbled on exactly the right trick, and my problems vanished in thin air. Thanks, Internet of Hackers!
The project in question is a low-vacuum regulator for “bagging” fiberglass layups. What I needed was some way to read a pressure sensor and turn on and off a vacuum pump accordingly. The industry-standard vacuum gauges are neat devices, essentially a tiny little strain gauge on a membrane between the vacuum side and the atmosphere side, in a package the size of a dime. (That it’s a strain gauge is foreshadowing, but I didn’t know that at the time.) I bought one for $15 ages ago, and it sat on my desk, awaiting its analog circuitry.
See, the MPX2100 runs on 12 V and puts out a signal around 40 mV on top of a 6 V offset. That voltage level is inconvenient for modern 3.3 V microcontroller ADCs, and the resolution would get clobbered by the 6 V signal if I just put a voltage divider on it. This meant whipping together some kind of instrument amplifier circuit to null out the 6 V and amplify the 40 mV for the ADC. The circuits I found online all called for 1% resistors in values I didn’t have, and mildly special op-amps. No fun, for me at least. So there it sat.
Cut the blue wire or the red wire? HX711 module and pressure sensor on the left.
Until I ran into this project that machetes through the analog jungle with one part, and it happened to be one I had on hand. A vacuum pressure sensor is a strain gauge, set up like a Wheatstone bridge, just like you would use for weighing something with a load cell. The solution? A load-cell ADC chip, the HX711, found in every cheap scale or online for under a buck. The only other trick was finding a low-voltage pressure sensor to work with it, but that turns out to be easy as well, and I had one delivered in two days.
In all, this project took months of foot-dragging, but only a few clicks and five minutes of soldering once I got the right idea. The industrial applications and manufacturers’ app notes all make sense if you are making hundreds or millions of these devices, where the one-time cost of prototyping up the hard bits gets amortized, but the hacker solution of using a weight-scale chip was just the ticket for a one-off. That just goes to show how useful sharing our tips and tricks can be — you won’t get this from the industry. So send us your success stories, and your useful failures too, and Read More Hackaday!
This article is part of the Hackaday.com newsletter, delivered every seven days for each of the last 200+ weeks. It also includes our favorite articles from the last seven days that you can see on the web version of the newsletter.
Want this type of article to hit your inbox every Friday morning? You should sign up!
Low Earth orbit was already relatively crowded when only the big players were launching satellites, but as access to space has gotten cheaper, more and more pieces of hardware have started whizzing around overhead. SpaceX alone has launched nearly 1,800 individual satellites as part of its Starlink network since 2019, and could loft as many as 40,000 more in the coming decades. They aren’t alone, either. While their ambitions might not be nearly as grand, companies such as Amazon and Samsung have announced plans to create satellite “mega-constellations” of their own in the near future.
At least on paper, there’s plenty of room for everyone. But what about when things go wrong? Should a satellite fail and become unresponsive, it’s no longer able to maneuver its way out of close calls with other objects in orbit. This is an especially troubling scenario as not everything in orbit around the Earth has the ability to move itself in the first place. Should two of these uncontrollable objects find themselves on a collision course, there’s nothing we can do on the ground but watch and hope for the best. The resulting hypervelocity impact can send shrapnel and debris flying for hundreds or even thousands of kilometers in all three dimensions, creating an extremely hazardous situation for other vehicles.
One way to mitigate the problem is to design satellites in such a way that they will quickly reenter the Earth’s atmosphere and burn up at the end of their mission. Ideally, the deorbit procedure could even activate automatically if the vehicle became unresponsive or suffered some serious malfunction. Naturally, to foster as wide adoption as possible, such a system would have to be cheap, lightweight, simple to integrate into arbitrary spacecraft designs, and as reliable as possible. A tall order, to be sure.
But perhaps not an impossible one. Boeing subsidiary Millennium Space Systems recently announced it had successfully deployed a promising deorbiting device developed by Tethers Unlimited. Known as the Terminator Tape, the compact unit is designed to rapidly slow down an orbiting satellite by increasing the amount of drag it experiences in the wispy upper atmosphere.
Atomic force microscopy, laser ablation, and etching with a witches brew of toxic chemicals: sounds like [Zachary Tong] has been playing in the lab again, and this time he found a way to fabricate arrays of microscopic lenses as a result.
Like many of the best projects, [Zach]’s journey into micro-fabrication started with a happy accident. It happened while he was working on metal-activated chemical etching (MACE), which uses a noble metal catalyst to selectively carve high-aspect-ratio features in silicon. After blasting at a silver-coated silicon wafer with a laser, he noticed the ablation pits were very smooth and uniform after etching. This led him to several hypotheses about what was going on, all of which he was able to test.
The experiments themselves are pretty interesting, but what’s really cool is that [Zach] realized the smooth hemispherical pits in the silicon could act as a mold for an array of microscopic convex lenses. He was able to deposit a small amount of clear silicone resin into the mold by spin-coating, and (eventually) transfer the microlens array to a glass slide. The lenses are impressively small — hundreds of them over only a couple hundred square microns — and pretty well-formed. There’s always room for improvement, of course, but for an initial attempt based on a serendipitous finding, we’d call it a win. As for what good these lenses are, your guess is as good as ours. But novel processes like these tend to find a way to be useful, and the fact that this is coming out of a home lab doesn’t change that fact.
You’ve likely seen many tutorials on making silicone parts using 3D printed molds online. The vast majority of these methods use a simple pour method to fill the mold. This relies on careful degassing and gentle pouring to reduce the presence of bubbles in the final result. [Jan Mrázek] has been working on an alternative method however, that allows for injection molding at low cost in the home shop.
The process relies on the use of printed resin molds. [Jan] notes that this generally necessitates the use of condensation-cure silicones, as additive types don’t cure well in resin molds. The condensation silicone is mixed up, degassed, and poured into a standard cartridge. From there, it’s installed in a silicone delivery air gun, which uses compressed air to force the silicone out of the nozzle and into the waiting mold.
It’s basically using a bunch of home DIY gear to create a cheap injection molding solution for silicone parts. [Jan] notes that there are a few mods needed to mold design to suit the process, and that 400-800 kPa is a good pressure to inject the silicone at.
Having the silicone injected under pressure is great for complex mold designs, as it forces the material into all the little difficult nooks and crannies. Of course, we’ve seen other methods for making silicone parts before, too. Be sure to sound off in the comments with your own favored techniques for producing quality silicone parts. Video after the break.
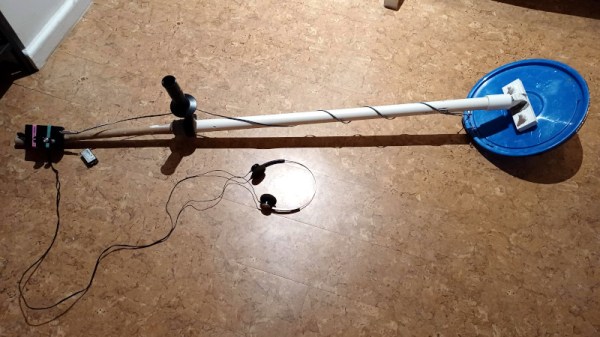
Have you ever found yourself suddenly in need of finding a small metal object hidden in the woods? No? Well, neither have we. But we can’t say the same thing for [zaphod], who’s family was hoping to settle a dispute by finding the surveyor stakes that marked the corners of their property. It was a perfect job for a metal detector, but since they didn’t own one, a serviceable unit had to be assembled from literal garbage.
To start with, [zaphod] had to research how a metal detector actually works. After reviewing the pros and cons of various approaches, the decision was made to go with a beat frequency oscillator (BFO) circuit. It’s not the greatest design, it might even be the worst, but it could be built with the parts on hand and sometimes that’s all that matters. After packing a 2N3904 transistor, an LM386 amplifier, and every Hackaday reader’s favorite chip the 555 timer into an enclosure along with some of their closest friends, it was time to build the rest of the metal detector.
Look ma, no MCU!
The sensor coil was made by salvaging the wire from an old fluorescent lamp ballast and winding it around the lid of a bucket 27 times. This was mounted to the end of a broom handle with some angle pieces made from PVC sheet material, being careful not to use any metal fasteners that would throw off the detector. With the handle of an old drill in the middle to hold onto, the metal detector was complete and actually looked the part.
So did [zaphod] save the day by finding the surveyor stakes and reconnoitering the family’s plot? Unfortunately, no. It wasn’t a technical failure though; the metal detector did appear to work, although it took a pretty sizable object to set it off. The real problem was that, after looking more closely into it, the surveyors only put down one stake unless they are specifically instructed otherwise. Since they already knew where that one was…
If your homemade metal detector can’t find something that was never there, did it really fail? Just a little something to meditate on. In any event, when even the cheapest smart bulb is packing a microcontroller powerful enough to emulate early home computers, we’re always happy to see somebody keep the old ways alive with a handful of ICs.