Customize All The Fan Covers You Never Knew You Needed

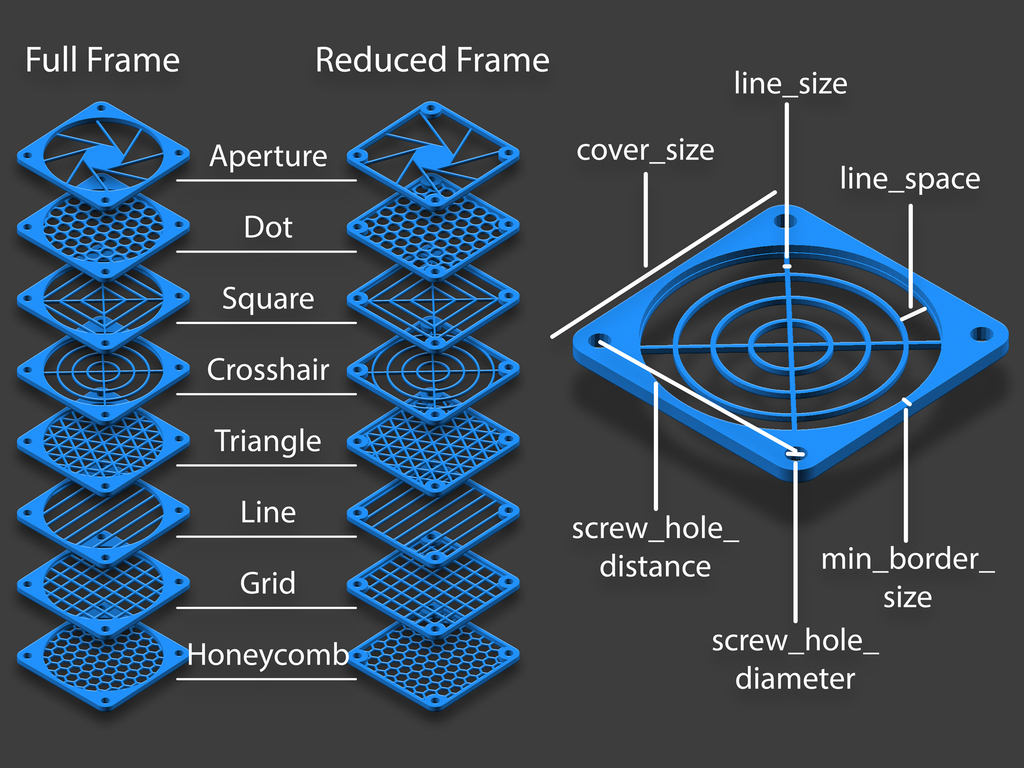
Do you need a fancy fan cover with precisely specified attributes, but have no desire to design one from scratch? If you answered yes (or no) then [mightynozzle] has the answer. The Customizable Fan Grill Cover is a parametric design in OpenSCAD that allows adjusting the frame style, size, and grill pattern for any fan cover one may possibly need. [mightynozzle] also went the extra mile to provide a large number of pre-made STL files for a variety of designs in a wide range of sizes, so those who don’t want to fuss with customizing can simply download and print.

Normally Thingiverse would allow customizing this model’s attributes with their built-in Customizer, but the functionality and availability of that feature is spotty. Luckily it’s always an option to download the source and do the customizing directly in OpenSCAD. For those who may be intrigued but are not sure where to start, here’s a reminder that we covered how to make a thing with OpenSCAD that demonstrates the whole process.

Mechanisms: The Spring

Most people probably don’t think about springs until one kinks up or snaps, but most of the world’s springs are pretty crucial. The ones that aren’t go by the name Slinky.

We all use and encounter dozens of different types of springs every day without realizing it. Look inside the world of springs and you’ll find hundreds of variations on the theme of bounce. The principle of the spring is simple enough that it can be extended to almost any shape and size that can be imagined and machined. Because it can take so many forms, the spring as a mechanism has thousands of applications. Look under your car, take apart a retractable pen, open up a stapler, an oven door, or a safety pin, and you’ll find a spring or two. Continue reading “Mechanisms: The Spring”

Printed It: Custom Enclosure Generator

You’ve written your firmware code, etched your own PCB, and now it’s time to put that awesome new project of yours into an enclosure. Unfortunately, all you have is a generic Radio Shack project box that you picked up when they were clearing out their inventory. If you put your project in that, it’ll have all the style and grace of a kid wearing hand-me-down clothes. Your project deserves a tailor-made enclosure, but the prices and lead time on custom plastic enclosures are prohibitive for one-off projects.

In Ye Olde Olden Days, the next step might have been to start bending some sheet metal. But it’s the 21st century, and we’ve got mechanization on our side. The “Ultimate Box Maker” by [Heartman] is a fully parametric OpenSCAD design which allows you to generate professional looking enclosures by simply providing your desired dimensions and selecting from a few optional features. In a couple of hours, you’ll have a custom one-of-a-kind enclosure for your project for a few cents worth of filament.

That’s the idea, at least. For this edition of “Printed It”, I’ll be taking a look at the “Ultimate Box Maker” by generating and printing a basic enclosure. As somebody whose Radio Shack was out of enclosures by the time I got there and who doesn’t want to slice his hand open folding sheet metal, I’m very interested in seeing how well this design works.

Continue reading “Printed It: Custom Enclosure Generator”

Chopper And Chopper-Stabilised Amplifiers, What Are They All About Then?

One of my first jobs as a freshly minted graduate engineer involved the maintenance of a set of analogue chart recorders. They were museum pieces by the early 1990s: a motorized roll of graph paper across which a pen would traverse in proportion to the voltage on the input terminals. Inside was a simple servo, with a differential amplifier comparing the feedback via a potentiometer from the mechanism with the amplified input.

The recorders dated from the early 1960s, and internally their electronics were from the germanium transistor era: many Mullard OC-series devices, black-painted glass tubes with a red dot, and, unexpectedly, a large electromagnet connected to the 50 Hz AC supply with a reed switch through its middle, something completely new to an overconfident youngster who thought she knew everything.

What I’d stumbled upon was a chopper amplifier, a slightly ungainly and long superseded solution to the problem of DC amplification from the days before ubiquitous integrated circuit op-amps. We have become so used to DC amplifiers that just work, that we have forgotten that there was a time when such devices were an impossibility. The close matching of properties between devices on the same wafer allowed integrated circuit op-amps to achieve stable DC amplification in a way that the best attempts at the same circuits with discrete transistors had failed, but before they happened some desperate measures were called for. Continue reading “Chopper And Chopper-Stabilised Amplifiers, What Are They All About Then?”

Skull Cane Proves Bondo Isn’t Just For Dents

[Eric Strebel] is quickly becoming a favorite here at Hackaday. He’s got a fantastic knack for turning everyday objects into something awesome, and he’s kind of enough to document his builds for the viewing pleasure of hackers and makers everywhere. It also doesn’t hurt that his voice and narration style gives us a real Bob Ross vibe.

The latest “Happy Accident” out of his workshop is a neat light-up cane made from a ceramic skull found at a local store. But while the finished cane itself might not be terribly exciting, the construction methods demonstrated by [Eric] are well worth the price of admission. Rather than using Bondo like the filler we’re all accustomed to, he shows how it can be used to rapidly build free-form structures and components.

After building up layers of Bondo, he uses a cheese grater to smooth out the rough surface and a hobby knife to clean up the edges. According to [Eric], one of the benefits of working with Bondo like this is that it’s very easy to shape and manipulate before it fully hardens; allowing you to really make things up as you go.

[Eric] also shares a little secret about how he makes his gray Bondo: he mixes some of the toner from a laser printer cartridge into it. This allows you to very cheaply augment the color of the filler, and is definitely something to file away for future reference.

If the video below leaves you hungry for more [Eric Strebel], check out his fantastic series on working with foam core, which should lead you right down the rabbit hole to his DIY foam core spray painting booth.

Continue reading “Skull Cane Proves Bondo Isn’t Just For Dents”

Deconstructing A Simple Op-Amp

Maybe you are familiar with the op-amp as an extremely versatile component, and you know how to quickly construct a huge variety of circuits with one. Maybe you even have a favorite op-amp or two for different applications, covering many possible niches. Standard circuits such as an inverting amplifier are your bread and butter, and the formula gain=-Rf/Ri is tattooed on your forearm.

But you can know how to use op-amps without really knowing how they work. Have you ever peered under the hood of an op-amp to find out what’s going on in there? Would you like to? Let’s take a simple device and examine it, piece by piece.

Continue reading “Deconstructing A Simple Op-Amp”

Invasion Of The Tiny Magnetic PCB Vises

[Proto G] recently wrote in to share a very slick way of keeping tabs on all the tiny PCBs and devices that litter the modern electronics workbench. Rather than a big bulky PCB vise for each little board, he shows how to make tiny grippers with magnetic bases for only a couple bucks each. Combined with a sheet metal plate under an ESD mat, it allows him to securely position multiple PCBs all over his workspace.

The key to this hack is the little standoffs that are usually used to mount signs to walls. These already have a clamping action by virtue of their design, but the “grip” of each standoff is improved with the addition of a triangular piece of plastic and rubber o-ring.

With the gripping side of the equation sorted, small disc magnets are glued to the bottom of each standoff. With a suitable surface, the magnets are strong enough to stay upright even with a decently large PCB in the jaws.

An especially nice feature of using multiple small vises like this is that larger PCBs can be supported from a number of arbitrary points. It can be difficult to clamp unusually shaped or component-laden PCBs in traditional vises, and the ability to place them wherever you like looks like it would be a huge help.

We’ve recently covered some DIY 3D printed solutions for keeping little PCBs where you want them, but we have to say that this solution looks very compelling if you do a lot of work on small boards.

Continue reading “Invasion Of The Tiny Magnetic PCB Vises”