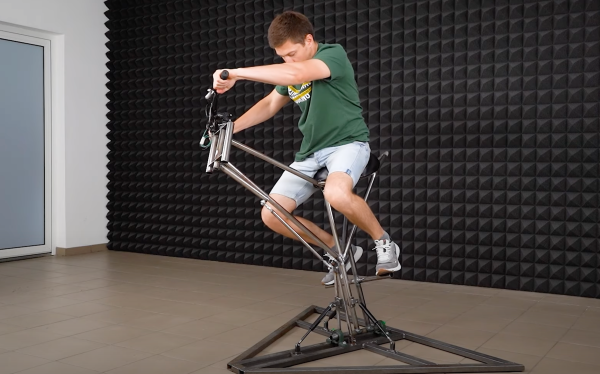
Transparent Hard Drive Gives Peek At The Platters

Solid-state drives (SSDs) are all the rage these days, and for good reason. But that doesn’t mean the era of the spinning disk is over, as traditional mechanical hard drives still offer a compelling value for mass storage applications where access times aren’t as critical. But the components inside these “slow” mechanical drives are still moving at incredible speeds, which [The Developer Guy] has nicely illustrated with his transparent hard drive.

Now unfortunately the technology to produce a fully transparent hard drive doesn’t exist, but laser cutting a new top plate out of acrylic is certainly within the means of the average hacker. The process is pretty straightforward: cut out a piece of clear plastic in the same shape and size as the drive’s original lid, put the appropriate mounting holes in it, and find some longer screws to accommodate the increased thickness.

Because this is just for a demonstration, [The Developer Guy] doesn’t need to worry too much about dust or debris getting on the platters; but we should note that performing this kind of modification on a drive you intend on actually using would be a bad idea unless you’ve got a cleanroom to work in.

In the videos below [The Developer Guy] records the drive while it’s in use, and at one point puts a microscope on top of the plastic to get a close-up view of the read/write head twitching back and forth. We particularly liked the time-lapse of the drive being formatted, as you can see the arm smoothly moving towards the center of the drive. Unfortunately the movement of the platters themselves is very difficult to perceive given their remarkably uniform surface, but make no mistake, they’re spinning at several thousand RPM.

Have an old mechanical drive of your own that you’re not sure what to do with? We’ve seen them turned into POV clocks, impromptu rotary encoders, and even surprisingly powerful blower fans.

Continue reading “Transparent Hard Drive Gives Peek At The Platters”

Improved Graphics-to-Drawing Tablet Conversion

[Akaki Kuumeri] had an old Wacom Intuos digitizing graphics tablet collecting dust, and figured out how to non-destructively transform it into a drawing tablet. He was inspired by an old Hackaday post of a similar hack, but it required literally hacking a big hole into your Wacom tablet. Not wanting to permanently ruin the Wacom tablet,  [Akaki] instead designed a 3D printed frame which he holds in place with a pair of straps. The design files are available on Thingiverse. He names the project, incorrectly as he later points out, WacomOLED (it rhymes with guacamole, we think).

As for the screen, he buys an old third-generation iPad and removes its Retina display panel and the foil backing, which would otherwise block the stylus’s connection to the tablet. Toss in an HDMI driver board to connect the display to your computer, and presto — you have made your own a drawing tablet. Even if you don’t need a drawing tablet, [Akaki]’s hack is still interesting, if only to remind us that we can put custom HDMI displays into any project for $65 using this technique.

In the end, [Akaki] notes that unless you already have a non-graphical digitizing tablet laying around, it’s probably cheaper to just buy a iPad. This is not [Akaki]’s first go at user input devices — we wrote about his Smash Brothers game controller and flight controller yoke project last year.

Do any of you use a graphics tablet in your day to day workflow? Let us know in the comments below.

Continue reading “Improved Graphics-to-Drawing Tablet Conversion”

TypeMatrix EZ-Reach 2030 Is Better Than Your Laptop Keyboard

Maybe you’re not ready to take the leap into a full-on ergonomic split keyboard. That’s okay, that’s cool, that’s understandable. They’re weird! Especially ones like my Kinesis Advantage with the key bowls and such. But maybe your poor pinkies are starting to get tired and you’re ready to start using your thumbs for more than just the space bar. Or you want to be able to type ‘c’ properly, with your middle finger.

In that case, the TypeMatrix could be the keyboard for you. Or maybe for travel you, because it’s designed as a quasi-ergonomic, orthonormal layout travel keyboard to pair with your laptop, and as such it sits directly over a laptop keyboard without blocking the track pad. (How do people use those things, anyway?)

Of course, you could use this as a desktop keyboard as well, although it’s unfortunate that Control and Shift are stuck on the pinkies. More about that later.

First Impressions

When I saw this keyboard on eBay, I was attracted by two things: the layout, and the dedicated Dvorak light. (And, let’s be honest — the price was right.) I’ve always found myself generally turned off by chocolate bar-style ortholinear keebs because they’re so incredibly cramped, but this one seemed a more acceptable because of the slight split.

The first thing I noticed was the fantastic number pad integration. The different colored keycaps are a nice touch, because the gray makes the number pad stand out, and the red Delete is easy to find since Num Lock is squatting in the upper right corner. Why does Delete always feel like an afterthought on compact keebs? I also like the location of the arrows, and it makes me think of the AlphaSmart NEO layout. Unfortunately, it comes at the cost of burying the right hand Enter down in no-man’s land where you can’t exactly hit it blindly with great accuracy right away. If only you could swap Shift and Enter without messing up the number pad!

Continue reading “TypeMatrix EZ-Reach 2030 Is Better Than Your Laptop Keyboard”

Where We’re Going, We Don’t Need Keycaps

Just when we thought we’d seen the peak of ergonomic, split keyboards, along comes [Peter Lyons] with the Squeezebox — an adjustable, column-staggered, streamlined beauty with 21 keys per hand. Much like the Kinesis Advantage and the Dactyl, the user’s fingers are allowed to dangle comfortably and stay in their naturally curled position, moving as little as possible between keys, rows, and columns. But the Squeezebox goes a few steps farther to reduce finger travel.

For starters, each column of keys is adjustable on the fly in the Y-direction by loosening the screw and sliding it until it’s just right. The columns are also adjustable in the Z-direction, but for now, this requires reprinting a few parts. In case you didn’t notice, the grid is pretty tightly packed, and those low-profile Kailh choc switches are naked to the world, mostly because keycaps wouldn’t fit anyway.

At that angle, there’s no reaching required at all between the middle and bottom rows. The 100° corner that they form both invites and supports chording — that’s pressing multiple keys simultaneously to do some action. There’s no real need to reach for the top row, either, because [Peter] merely moves his finger upward in the Z-direction a little bit to hit those. The similarly-angled thumb clusters are chord-able as well, and their position relative to the mainland is adjustable thanks to a grid of holes that are meant for threaded inserts. Genius!

For the next version, [Peter] plans to bring the three sets of thumb cluster switches closer together, and arrange them like a tri-fold science fair display board. Be sure to check out the super cool but somewhat impossible-to-solder prototypes in the build log, and stay for more stuff in the huge build gallery. Typing demo is after the break.

Still too much travel for your taste? How about a 5-way for each finger?

Continue reading “Where We’re Going, We Don’t Need Keycaps”

The Beat Goes On With This ESP32 Page Turner

Looking for a hands-free way to page through sheet music on an iPad, [The_Larch] came up with this simple Bluetooth input device based on the ESP32. The microcontroller just needed to have two switches wired into the GPIO pins, in this case the same heavy-duty plungers you’d find on a guitar pedal, and a USB bulkhead pass-through to provide power. Thanks to the excellent ESP32-BLE-Keyboard library, it only took a few lines of code to fire off the appropriate key strokes when the left or right button was pressed.

While undeniably a simple project from an electronics standpoint, the wooden enclosure [The_Larch] built is an interesting change of pace from the 3D printed fare we normally see around these parts. It started life as strips of oak reclaimed from an old kitchen table, which were laminated together to make a solid block. A large spade bit was then used to bore into the block to make a void for the electronics, and a second flat piece of oak was fashioned into a front panel.

Creating Bluetooth input devices with the ESP32 is so incredibly straightforward that we’re honestly a little surprised we don’t see the trick used more often. Especially when you consider all of the custom made keyboards that have graced these pages over the last couple of years. The tools are available for anyone who wants them, so you have to wonder if hackers just aren’t fond of using Bluetooth for something as important as a keyboard?

Open Source Motion Controller For DIY Drones

DJI recently introduced a slick motion controller that eschews the traditional dual-stick transmitter and allows you to fly their new “FPV Drone” with just one hand. The fact that it looks like it could double as the control stick for an X-Wing is just an added bonus. Unfortunately, that single model is the only thing the $199 USD controller is currently compatible with. Unwilling to get locked into the DJI ecosystem, [Paweł Spychalski] has developed an open source work-alike motion controller that brings gesture flying to home-built quadcopters and airplanes.

Now to be clear, you’ll still need a traditional transmitter to use this device. Rather than trying to reinvent the wheel, [Paweł] decided to implement his motion controller as an add-on for OpenTX hardware like the RadioMaster TX16S. It simply plugs into the trainer port on the back of the transmitter and acts as a secondary input. This greatly simplifies the design, as it essentially just needs to read angle data from its MPU-6050 gyro/accelerometer and forward it along to OpenTX over the serial port. Plus the fact that it’s connected to the trainer port means you can disable it and return to traditional controls in an instant if anything goes wrong.

Outside of the motion sensing gear, the ESP32-powered peripheral also has a thumb stick and a pair of push buttons nestled into its 3D printed frame. An OLED display provides some user feedback, and a holder for a 18650 cell is mounted to the back side as the controller will need its own power source when [Paweł] gets around to making its connection to the transmitter wireless.

In the video below, [Paweł] takes the motion controller for a test flight and comes away largely satisfied with the results. Some tweaks are in the works as you might expect for a first attempt, but nothing that would prevent you from building your own version today and experiencing what might be the next evolution of RC flying.

Continue reading “Open Source Motion Controller For DIY Drones”

Inputs Of Interest: Marsback M1 Is A Portable Party Peripheral

Again, let’s just get this out of the way up front: I got this lovely little 75% keyboard for free from a gaming accessories company called Marsback. It’s a functioning prototype of a keyboard that they have up on Kickstarter as of March 2nd. It comes in three color schemes: dark, white and sakura pink, which is white and pink with cherry blossoms.

This illustration of the lube points is from my email string with Marsback.

Marsback found me through my personal website and contacted me directly to gauge my interest in this keyboard. I’ll admit that I wasn’t too excited about it until I scrolled further in the email and saw that they are producing their own switches in-house.

I think that’s a really interesting choice given that Cherry MX and other switches exist, and there so many Cherry MX clones out there already. Naturally, I had to investigate, so following a short review, I’ll take it apart.

Continue reading “Inputs Of Interest: Marsback M1 Is A Portable Party Peripheral”