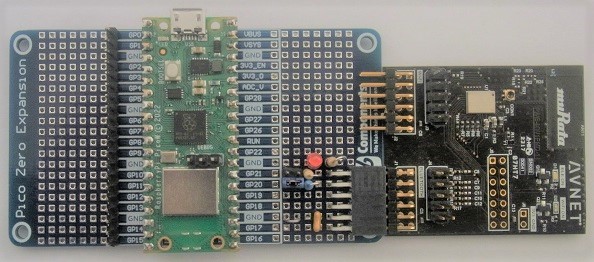
Sketch of the two proprietary carriers showing their differences - one of them has a cutout under the antenna, while the other one does not.

Design Your CM4 Carrier With WiFi Performance In Mind

The Raspberry Pi Compute Module 4 has a built-in WiFi antenna, but that doesn’t mean it will work well for you – the physical properties of the carrier board impact your signal quality, too. [Avian] decided to do a straightforward test – measuring WiFi RSSI changes and throughput with a few different carrier boards. It appears that the carriers he used were proprietary, but [Avian] provides sketches of how the CM4 is positioned on these.

There’s two recommendations for making WiFi work well on the CM4 – placing the module’s WiFi antenna at your carrier PCB’s edge, and adding a ground cutout of a specified size under the antenna. [Avian] made tests with three configurations in total – the CMIO4 official carrier board which adheres to both of these rules, carrier board A which adheres to neither, and carrier board B which seems to be a copy of board A with a ground cutout added.

Graph plotting WiFi RSSI for each of the three carriers in each of the six locations. CMIO4 consistently outperforms both, while carrier B outperforms the carrier A, but by a more narrow margin.After setting up some test locations and writing a few scripts for ease of testing, [Avian] recorded the experiment data. Having that data plotted, it would seem that, while presence of an under-antenna cutout helps, it doesn’t affect RSSI as much as the module placement does. Of course, there’s way more variables that could affect RSSI results for your own designs – thankfully, the scripts used for logging are available, so you can test your own setups if need be.

If you’re lucky to be able to design with a CM4 in mind and an external antenna isn’t an option for you, this might help in squeezing out a bit more out of your WiFi antenna. [Avian]’s been testing things like these every now and then – a month ago, his ESP8266 GPIO 5V compatibility research led to us having a heated discussion on the topic yet again. It makes sense to stick to the design guidelines if WiFi’s critical for you – after all, even the HDMI interface on Raspberry Pi can make its own WiFi radio malfunction.

picture of a brambling (a small bird), with "BirdNET-Pi" written above it

Neural Network Identifies Bird Calls, Even On Your Pi

Recently, we’ve stumbled upon the extensive effort that is the BirdNET research platform. BirdNET uses a neural network to identify birds by the sounds they make, and is a joint project between the Cornell Lab of Ornithology and the Chemnitz University of Technology. What strikes us is – this project is impressively featureful and accessible for a variety of applications. No doubt, BirdNET is aiming to become a one-stop shop for identifying birds as they sing.

There’s plenty of ways BirdNET can help you. Starting with likely the most popular option among us, there are iOS and Android apps – giving the microphone-enabled “smart” devices in our pockets a feature even the most app-averse hackers can respect. However, the BirdNET team also talks about bringing sound recognition to our browsers, Raspberry Pi and other SBCs, and even microcontrollers. We can’t wait for someone to bring BirdNET to a RP2040! The code’s open-source, the models are freely available – there’s hardly a use case one couldn’t cover with these.

Screenshot of the BirdNET-Pi interface, showing a chart of bird chirp occurences, and a spectrogram below itAbout that Raspberry Pi version! There’s a sister project called BirdNET-Pi – it’s an easy-to-install software package intended for the Raspberry Pi OS. Having equipped your Pi with a USB sound card, you can make it do 24/7 recording and analysis using a “lite” version of BirdNET. Then, you get a web interface you can log into and see bird sounds identified in real-time. Not just that – BirdNET-Pi also processes the sounds and creates spectrograms, keeps the sound in a database, and can even send you notifications.

The BirdNET-Pi project is open, too, of course. Not just that – the BirdNET-Pi team emphasizes everything being fully local, unless you choose otherwise, and perhaps decide to share it with others. Many do make their BirdNET-Pi instances public, and there’s a lovely interactive map that shows bird sounds all across the world!

BirdNET is, undoubtedly, a high-effort project – and a shining example of what a dedicated research team can do with a neural network and an admirable goal in mind. For many of us who feel joy when we hear birds outside, it’s endearing to know that we can plug a USB sound card into our Pi and learn more about them – even if we can’t spot them or recognize them by sight just yet. We’ve covered bird sound recognition on microcontrollers before – also using machine learning.

LMN-3: Putting The ‘OP’ In Open Source Synthesizers

Some projects you come across simply leave you in awe when you look at the thought and the resulting amount of work that went into it, not only for the actual implementation, but everything around it. Even more so when it’s a single-developer open source project. [Stone Preston]’s synth / sampler / sequencer / DAW-in-a-box LMN-3 absolutely fits the description here, and it seems like he has set his heart on making sure everyone can built one for themselves, by providing all the design files from case down to the keycaps.

The LMN-3 (LMN as in “lemon”, not “comes before the OP“) is intended as a standalone, portable digital audio workstation, and is built around a Raspberry Pi 4 with a HyperPixel display for the user interface. The UI itself, and with it the core part of the software, was created using the Tracktion Engine, which itself uses the JUCE framework and combines your typical synthesizer, sequencer, and sampler features with the DAW part to handle recording, editing, and mixing. The remaining hardware is a custom-designed PCB with a set of function and keyboard buttons, along with a pitch bend joystick and four rotary encoders with push buttons that serve as main input handlers. Oh yes, and a Teensy board.

The UI is actually entirely controlled via MIDI commands, and custom firmware on the Teensy is translating the input events from buttons, encoders, and joystick accordingly. This essentially decouples the hardware from the software, and using a cross-platform framework underneath, you can also run the UI standalone on your computer and use any 3rd-party MIDI controller you like. Or then, as [Stone] thought really about everything, use a hardware emulator he created in addition. You could even leave out the Raspberry Pi and software altogether and turn this into a pure MIDI controller. If that sounds tempting, but you’re looking for something with more knobs and sliders instead of buttons, check out the Traktorino. And if you actually prefer a mouse as input device, there’s always something running in a browser.

Continue reading “LMN-3: Putting The ‘OP’ In Open Source Synthesizers”

Another Rubik’s Cube Robot Is Simple But Slow

[AndreaFavero] says that the CuboTino emphasizes simplicity and cost-savings over speed. However, solving the puzzle in about 90 seconds is still better than we can do. The plucky solver uses a Pi and a camera to understand what the cube looks like and then runs it through a solver to determine how to move.

Watching the video below, we were impressed with the mechanics. The titled surface solves a few problems and makes manipulation easier. The way the mechanics are arranged, it only takes a pair of servos to flip the cube around as you like. Continue reading “Another Rubik’s Cube Robot Is Simple But Slow”

A Breath Of Fresh Air For Some Arcade Classics

It’s said that good things come in small packages, which is hard to deny when we look at all the nifty projects out there that were built into an Altoids tin. Now, if that’s already true for the regular sized box, we can be doubly excited for anything crammed into their Smalls variety ones, which is what [Kayden Kehe] decided to use as housing for his mintyPico, a tiny gaming console running homebrew versions of Snake, Breakout, Pong, and a few more.

As the “Pico” might have already given away, the project is built around a Raspberry Pi Pico board, and being intended as portable device, [Kayden] went with a version that also houses LiPo battery charging circuitry. A set of 3d-printed parts pack the board along with a matching battery and a button panel neatly into the tin itself, while a size-appropriate SSH1106 OLED goes into the lid. All design files along with the MicroPython code of the games can be found on the project’s GitHub page.

You may have felt this strange sense of familiarity when you read the project’s name, and indeed, the mintyPi gaming console was a major inspiration for [Kayden] here, as was the Pico Snake project. Considering this was his junior year high school project, this is certainly an impressive and nice mash-up of those two projects.

Continue reading “A Breath Of Fresh Air For Some Arcade Classics”

Console Macropad Uses SD Cards For Stylin’ And Profilin’

Macropads are great to have around for hotkey input, but things can get out of hand pretty quickly when you realize just how many shortcuts are in your life. To avoid ending up with another keyboard-sized keyboard, some hackers will use a handful of switches and a lot of layers to turn a few keys into many. And instead of worrying about legends, they use blank keys and leave the labels to be displayed on some kind of screen.

Among them is [QCJ3], who built this nifty little console-style macropad. Uninterested in managing microcontroller memory, [QCJ3] went the tangible route and loaded various profiles onto a micro SD card. Each text file on a given card holds a label, a color for the keyswitch LED, and of course, the keystrokes that make up the macro itself.

There are myriad ways to build a macro pad, from designing with bare chips (if you can get them) to programming a pre-built key matrix.  Grab the files if you like the console look and call it a day, or build a completely new enclosure that fits your hand exactly. Whatever you build, consider entering it in our brand spankin’ new Odd Inputs and Peculiar Peripherals Contest, which runs now through July 4th. If you need more inspiration, just peep the projects under macropad tag, or peruse the much heftier keyboard tag.

Via KBD

HAL 9000 Becomes A Helpful Voice Assistant

There have been many robots and AIs in science fiction over the years, from Astro Boy to Cortana, or even Virgil for fans of the long-forgotten Crash Zone. However, all these pale into insignificance in front of the cold, uncaring persona of the HAL 9000. Thus, [Jürgen Pabel] thought the imposing AI would make the perfect home assistant.

The build is based on a Raspberry Pi Zero 2, which boasts more grunt than the original Pi Zero while still retaining good battery life and a compact form factor. It’s hooked up with a 1.28″ round TFT display which acts as the creepy glowing eye through which HAL is supposed to perceive the world. There’s naturally a speaker on board to deliver HAL’s haunting monotone, and it’s all wrapped up in an tidy case that really looks the part. It runs on the open-source voice assistant Kalliope to help out with tasks around the home.

[Jürgen]’s page shares all the details you need to make your own, from the enclosure construction to the code that laces everything together. It’s not the first HAL 9000 we’ve seen around these parts, either. Video after the break.

Continue reading “HAL 9000 Becomes A Helpful Voice Assistant”