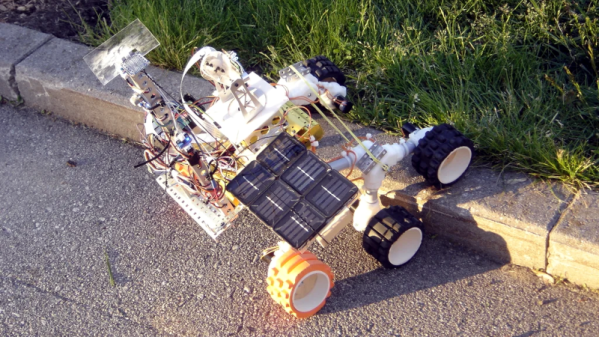
Building A Faux Retro Portable Computer

The modern laptop has its origins in the mid to late 1980s, when shrinking computer hardware and improvements to battery technology finally made mobile computing practical. But before the now iconic clamshell form factor became the standard, there was a market for so-called “portable” computers. These machines often resembled pieces of luggage with keyboards attached, and even at their peak, they were nowhere near as practical as today’s ultra-thin notebook computers. But for the more nostalgic among us, these vintage portables do have a special sort of charm about them.

Looking to recapture some of that magic with modern components, [davedarko] has started working on his own Raspberry Pi portable computer. Just like those machines of yore, his build is designed to be a self-contained computing experience that you can lug around, but not exactly something you’d be popping open on the train. Its extruded aluminum frame holds the display, power supply, and audio hardware, with plenty of room to spare for additional hardware should he decide to pack in a couple hard drives or something more exotic.

The skeletal frame has plenty of room for activities.

We particularly like the 3D printed hinge and lock mechanism he designed that holds the keyboard closed against the front of the frame. Sufficiently old experienced readers will recall this particular feature being a defining characteristic of portables such as the Osborne 1 and Compaq Portable, and it’s great to see it included here. All it needs now is a leather handle on the side to complete the look.

[davedarko] still has some work ahead of him, as ultimately he’d like to completely enclose his computer’s frame with laser cut panels. But the build is certainly progressing nicely, and frankly, it’s already at the point where we’d have no problem pulling it out at the next hackerspace meetup. Between builds like this and the growing collection of cyberdecks we’ve covered recently, it looks as though 1980s design aesthetic is alive and well within the hacker community.

Continue reading “Building A Faux Retro Portable Computer”

Raspberry Pi 4 HDMI Is Jamming Its Own WiFi

Making upgrades to a popular product line might sound like a good idea, but adding bigger/better/faster parts to an existing product can cause unforeseen problems. For example, dropping a more powerful engine in an existing car platform might seem to work at first until people start reporting that the increased torque is bending the frame. In the Raspberry Pi world, it seems that the “upgraded engine” in the Pi 4 is causing the WiFi to stop working under specific circumstances.

[Enrico Zini] noticed this issue and attempted to reproduce exactly what was causing the WiFi to drop out, and after testing various Pi 4 boards, power supplies, operating system version, and a plethora of other variables, the cause was isolated to the screen resolution. Apparently at the 2560×1440 setting using HDMI, the WiFi drops out. While you could think that an SoC might not be able to handle a high resolution, WiFi, and everything else this tiny computer has to do at once. But the actual cause seems to be a little more interesting than a simple system resources issue.

[Mike Walters] on a Twitter post about this issue probed around with a HackRF and discovered a radio frequency issue. It turns out that at this screen resolution, the Pi 4 emits some RF noise which is exactly in the range of WiFi channel 1. It seems that the Pi 4 is acting as a WiFi jammer on itself.

This story is pretty new, so hopefully the Raspberry Pi Foundation is aware of the issue and working on a correction. For now, though, it might be best to run a slightly lower resolution if you’re encountering this problem.

Your Raspberry Pi Cluster Is Not Like This One

Many readers will have had their first taste of experimentation with cluster computing through the medium of the Raspberry Pi. The diminutive Linux capable boards can easily be hooked up as a group via a network hub, and given the right software become a whole that is greater than the sum of its parts. None of us will however have reached the heights of the Raspberry Pi cluster shown by Oracle at their Oracle OpenWorld conference, a mighty rack packing a cluster of no less than 1060 Pi 3 B+ boards. This machine is touted as a supercomputer and it’s worthy of the name, though perhaps it’s not in the same class as the elite in that field.

Getting that number of individual 3Bs into a human-sized rack is no easy feat, and they have gone for custom 3D-printed racks to hold the boards. PoE would have resulted in too much heat dissipation, so instead they use USB power from an array of large multi-way USB power supplies. A set of switches provide the networking, and a conventional server sits in the middle to provide storage and network booting.

It’s certainly a cool way to wow the crowds at a conference, but we’re unsure whether it delivers the best bang for your supercomputing buck or whether it’s more useful as a large room heater. Meanwhile you can take a look at a few more modest Pi clusters, with unusual operating systems, or slightly more adherence to convention.

Thanks [Frisco] for the tip.

Patrol The Sprawl With This Battle Ready Cyberdeck

The recent crop of cyberdeck builds are inspired, at least tangentially, by William Gibson’s novel Neuromancer and its subsequent sequels. In the novels, the decks are used as mobile terminals to access the virtual reality of cyberspace. In our world, they’re usually just quasi-retro boxes with Raspberry Pis in them. Artistic license and all that. But the “XMT-19 Cutlass”, a deck built by [CaptNumbNutz], attempts to hew more closely to the source material than most builds we’ve seen.

Of course it won’t be transporting you into the matrix, and ultimately it’s still just a casemod for the Raspberry Pi. But at least it does a fantastic job of fitting the Neuromancer motif. The design is supposed to look like the XMT-19 was a piece of high-tech military hardware that was later co-opted by a cyberspace cowboy operating in the urban megatropolis that Gibson called the Sprawl, with exposed wiring and a visual mish-mash of components.

If you can believe it, the build started out as a locking clipboard of all things. From there, [CaptNumbNutz] started layering on the hand-cut foam greebles and spraying on the WWII inspired color scheme. We especially like the yellow tips on the antennas that invoke the propellers of vintage airplanes, and the serial number stenciled onto the bottom. In a departure from basically every other cyberdeck we’ve seen to date, there appear to be no 3D printed elements on the XMT-19; all the parts are hand made with nothing more than an a sharp knife and a heap of patience.

In terms of the electronics, the whole build has been greatly simplified by the use of a SmartiPi Touch case, which integrates the Pi and touch screen into a single hinged unit that just needed to get bolted to the top of the deck. Plus it gave him an excuse to put a big rainbow ribbon cable on the back of it to reach the Pi’s GPIO ports, which as you know, instantly makes everything look more retro-futuristic.

It might not be packing the raw power of the Intel NUC cyberdeck we covered last year, or have the convincingly vintage look of the VirtuScope, but we’d take the XMT-19 Cutlass into the matrix any day.

DIY Photo Backup In The Field

They say a file isn’t backed up if it isn’t backed up twice. This is easy enough to do if you have access to your computer and a network, but if you’re a photographer you might end up in a place without either of these things and need a way to back up the files you just created. For that you’ll need a specialized photo backup tool which you can easily build yourself.

While commercial offerings are available which back up files locally from a camera’s SD card to another medium, they suffer from a high price. [André]’s solution can be had for a fraction of that cost. Using a Raspberry Pi Zero, a tiny USB hub, and a high capacity jump drive, a photographer can simply plug in an SD card and the Pi will handle the backups with varying levels of automation. The software that [André] made use of is called Little Backup Box written by [Dmitri Popov] and can be used typically as an automatic backup for any other device as well.

This is a great solution to backing up files on the go, whether they’re from a camera or any device that uses an SD card. Removable storage is tiny and easily lost, so it’s good to have a few backups in case the inevitable happens. Raspberry Pis are an ideal solution to data backup, and can even be battery powered if you’re really roughing it for a few days.

Date Clock Requires (Almost) No Interaction

A lot of commercial offerings of technology aimed at helping the elderly seem to do a good job on the surface, but anything other than superficial interaction with them tends to be next to impossible for its intended users. Complicated user interfaces and poor design consideration reign in this space. [7402] noticed this and was able to design a better solution for an elderly relative’s digital day planner after a commercial offering he tried couldn’t automatically adjust for Daylight Savings.

Of course, the clock/day planner has a lot going on under the surface that the elderly relative may not be able to use, but the solution to all of that was to make it update over the network. This task [7402] plans to do remotely since the relative does not live anywhere nearby. It is based on a Raspberry Pi connected to a Uniroi screen which automatically dims but can be switched off by means of a large button in the front. The UI shows the date, time, and a number of messages or reminders in large font in order to improve [7402]’s relative’s life.

This is a great idea for anyone with their own elderly relative which might need something like this but won’t want to interact with the technology other than the cursory glance, but the project is also a great illustration of proper design for the intended users. Commercial offerings often had hidden buttons and complicated menus, but this has none of that, much like this well-designed walker for an elderly Swede.

A Foolproof Raspberry Pi Media Player

The media landscape in the home has changed precipitously over the years. Back in the days when torrents were king, DVD players and TVs started to sprout USB ports and various methods of playing digital videos, while hackers repurposed office machines and consoles into dedicated media boxes. [Roiy Zysman] is a fan of a clean, no-fuss approach, so built his PiVidBox along those lines.

The build, unsurprisingly, starts with a Raspberry Pi. Cheap, capable of playing most common codecs, and fitted with an HDMI port as standard, it’s a perfect platform for the job. Rather than fiddle with complex interfaces or media apps, instead, the PiVidBox uses a simple script. The Pi is configured to continually scan the /media folder for mounted devices, and play any videos it comes across. Simply pop in an SD card or USB drive, and the content starts rolling. No buttons, remotes, or keyboards needed!

It’s a interface without much flexibility, but it makes up for that in barebones simplicity. We can imagine it would come in handy for a conference room or other situation where users grow tired of messing around with configurations to get screens to work. The Raspberry Pi makes a rather excellent basis for a media player build, and we’ve seen some stunning examples in the past!