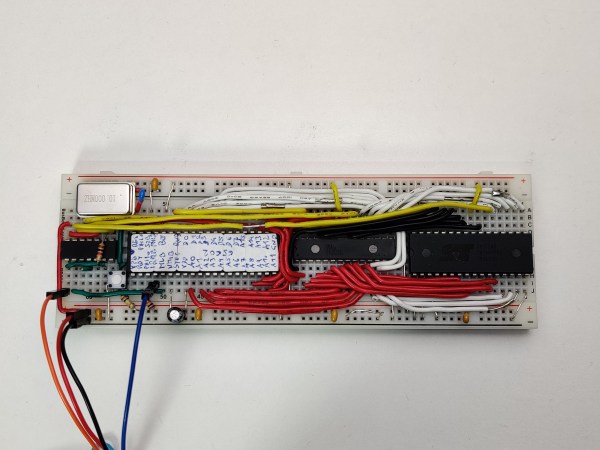
A breadboard with a few DIP chips

Minimalist 6502 System Uses A CPU And Not Much Else

A central processing unit, or CPU, is the heart of any computer system. But it’s definitely not the only part: you also need RAM, ROM and at least some peripherals to turn it into a complete system that can actually do something useful. Modern microcontrollers typically have some or all of these functions integrated into a single chip, but classic CPUs don’t: they were meant to be placed on motherboards along with dozens of other chips. That’s why [c0pperdragon]’s latest project, the SingleBreadboardComputer, is such an amazing design: assisting its 6502 CPU are just four companion chips.

The entire system takes up just one strip of solderless breadboard. Next to the CPU we find 32 KB of SRAM, 32 KB of flash and a clock oscillator. The fifth chip is a 74HC00 quad two-input NAND gate, which is used as a very tiny piece of glue logic to connect everything together. Two of its NAND gates are used for address decoding logic, allowing either the ROM or RAM chip to be selected depending on the state of the CPU’s A15 line as well as blocking the RAM during the low phase of the system clock. The latter function is needed because the address lines are not guaranteed to be stable during the low phase and could cause writes to random memory locations.

The remaining two NAND gates are connected as an RS-flipflop in order to implement a serial output. This is needed because the CPU cannot keep its outputs in the same state for multiple clock cycles, which is required for a serial port. Instead, [c0pperdragon] uses the MLB pin, normally used to implement multiprocessor systems, to generate two-clock pulses, and stores the state in the flipflop for as long as needed. A few well-timed software routines can then be used to transmit and receive serial data without any further hardware.

Currently, the only software for this system is a simple demonstration that sends back data received on its serial port, but if you fancy a challenge you could write programs to do pretty much anything. You could probably find some inspiration in other minimalist 6502 boards, or projects that emulate a complete motherboard in an FPGA.
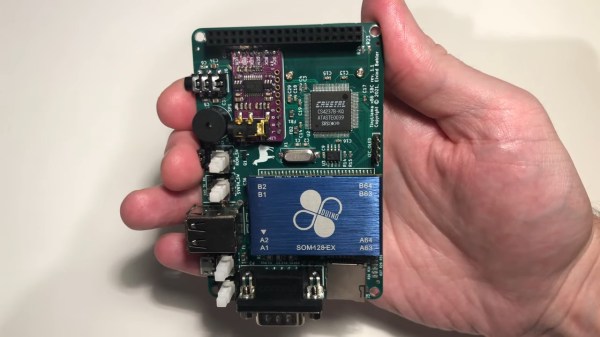
A smartphone-sized PCB is in a person's hand. A large blue chip package houses a 486 and the board has a SoundBlaster card and a 40 PIN Raspberry Pi Connector along one edge for attaching a Raspberry Pi Zero.

TinyLlama Is A 486 In Your Pocket

We love retrocomputing and tiny computers here at Hackaday, so it’s always nice to see projects that combine the two. [Eivind]’s TinyLlama lets you play DOS games on a board that fits in your hand.

Using the 486 SOM from the 86Duino, the TinyLlama adds an integrated Crystal Semiconductor audio chip for AdLib and SoundBlaster support. If you populate the 40 PIN Raspberry Pi connector, you can also use a Pi Zero 2 to give the system MIDI capabilities when coupled with a GY-PCM5102 I²S DAC module.

Audio has been one of the trickier things to get running on these small 486s, so its nice to see a simple, integrated solution available. [Eivind] shows the machine running DOOM (in the video below the break) and starts up Monkey Island at the end. There is a breakout board for serial and PS/2 mouse/keyboard, but he says that USB peripherals work well if you don’t want to drag your Model M out of the closet.

Looking for more projects using the 86Duino? Checkout ISA Sound Cards on 86Duino or Using an 86Duino with a Graphics Card.

Continue reading “TinyLlama Is A 486 In Your Pocket” →

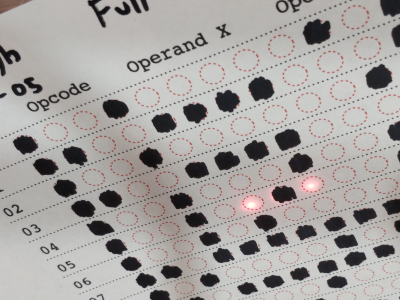
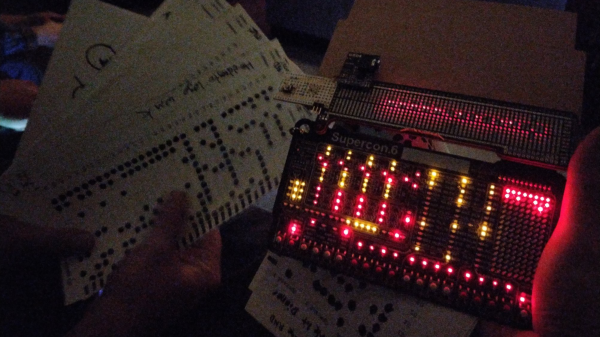
Hackaday supercon badge PCB showing illuminated activity lights after being loaded with a punch card

Supercon Badge Reads A “Punch” Card

This year’s Hackaday Supercon, the first since 2019 thanks to the pandemic, was a very similar affair to those of the past. Almost every hardware-orientated hacker event has its own custom electronic badge, and Supercon was no different. This year’s badge is a simulation platform for a hypothetical 4-bit CPU created by our own [Voja Antonic], and presented a real challenge for some of the attendees who had never touched machine code during their formative years. The challenge set was to come up with the most interesting hack for the badge, so collaborators [Ben Hencke] and [Zach Fredin] set about nailing the ‘expandr’ category of the competition with their optical punched card reader bolt-on.

Peripheral connectivity is somewhat limited. The idea was to build a bolt-on board with its own local processing — using a PixelBlaze board [Ben] brought along — to handle all the scanning details. Then, once the program on the card was read, dump the whole thing over to the badge CPU via its serial interface. Without access to theirPrinted paper faux punch card showing read LEDs and an array of set and reset bits of the encoding usual facilities back home, [Ben] and [Zach] obviously had to improvise with whatever they had with them, and whatever could be scrounged off other badges or other hardware lying around.
One big issue was that most people don’t usually carry photodiodes with them, but luckily they remembered that an LED can be used as a photodiode when reverse-biased appropriately. Feeding the signal developed over a one Meg resistance, into a transconductance amplifier courtesy of a donated LM358 there was enough variation for the STM32 ADC to reliably detect the difference between unfilled and filled check-boxes on the filled-in program cards.

The CPU required 12-bit opcodes, which obviously implies 12 photodiodes and 12 LEDs to read each word. The PixelBlaze board does not have this many analog inputs. A simple trick was instead of having discrete inputs, all 12 photodiodes were wired in parallel and fed into a single input amplifier. To differentiate the different bits, the illumination LEDs instead were charlieplexed, thus delivering the individual bits as a sequence of values into the ADC, for subsequent de-serialising. The demonstration video shows that it works, with a program loaded from a card and kicked into operation manually. Such fun!

Punch cards usually have a hole through them and can be read mechanically, and are a great way to configure testers like this interesting vacuum valve tester we covered a short while back.

Continue reading “Supercon Badge Reads A “Punch” Card” →

Is This The Smallest CP/M Machine Ever?

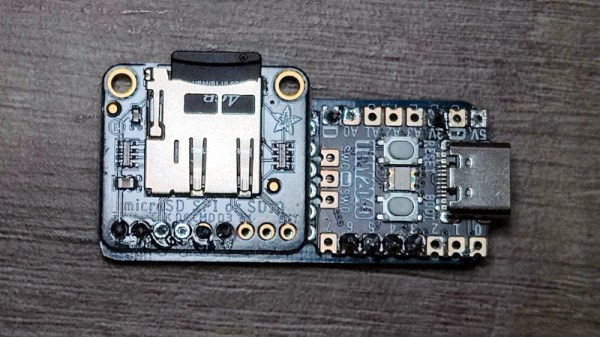
If you had an office word processor in the late 1970s, the chances are it ran Digital Research’s CP/M operating system. IBM went for Microsoft in the 1980s and the once-dominant player fell on hard times, but it survives today as a popular choice on retrocomputer platforms. Even the more compact Z80 systems are a little large for 2022, so when [Kian Ryan] needed the ultimate in CP/M portability it fell on a more modern piece of silicon. Hence he’s put it on a tiny RP2040-based board from Pimoroni alongside an Adafruit micro SD card breakout.

The tiny hardware is neat of course, but the real star of the show is the software. Non-CP/M aficionados will be interested to learn about RunCPM, and for this project, RunCPM 2040. This provides an emulated environment on a host microcontroller to run CP/M, allowing the operating system to be hosted on easier hardware than some of the original machines.

All this makes for a tiny development machine, but perhaps of more interest would be a machine that’s all-in-one with a display and perhaps a keyboard. The RP2040 is interesting in this case because of those programmable state machines. Could it be made to run a video display alongside RunCPM? We hope someone has a go at writing it.

Mastodon Comes To The IBM PC

Elon Musk has bought Twitter for an eye-watering sum, and his live adventures in chaotic mismanagement of a social media company have become a compelling performance for the rest of us. As we munch on our tasty popcorn and enjoy the show, many Twitter users have jumped ship for the open-source alternative Mastodon. It offers much to the escapee including instances tailored to particular communities, but aside from all that it’s got something Twitter never had. You can now use a Mastodon client on an IBM PC.

Many of you are no doubt looking askance at us, as you have been Tooting for years from behind the keyboard of a PC. But it’s likely that the PC you’re using is a generic modern x86 machine running an up-to-date operating system such as a GNU/Linux flavour or Microsoft Windows, by contrast here we’re referring to the original, the daddy of them all. Because the client we’re talking about is DOStodon, designed to run on a real IBM PC as though it’s the early 1980s again.

Stunt hacks aside, whether or not you fire up DOStodon on a 16-bit machine to get your Fediverse fix, it’s an interesting piece of software because it’s written in Javascript. Which in turn brings us to DOjS from the same author, a DOS Javascript canvas with sound. Not everyone will be raring to run their Javascript code on an early 1980s PC, but its existence proves that there’s plenty of life in the old platform yet.

Need more Mastodon on unexpected platforms? How about the ESP32?

Header image: Ruben de Rijcke, CC BY-SA 3.0, and Jin Nguyen, AGPL .

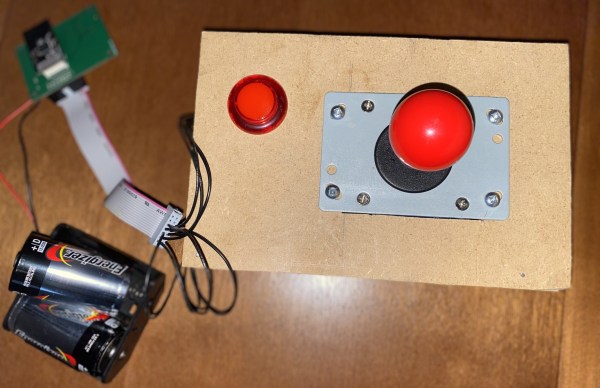
A home-made wireless game controller

ColecoVision Barn Find Gets Wireless Makeover

Few things are more satisfying than finding an old, forgotten piece of technology somewhere and bringing it back to life. And while it’s great to see a rare sports car or an Apollo Flight Computer being restored, even not-very-successful game consoles from the 1980s can make for some great repair stories. Just look at how [Discreet Mayor] describes his restoration and modification efforts on a ColecoVision that he literally found in a barn.

Given that the ColecoVision was on the market between 1982 and 1985, we can assume that [Discreet Mayor]’s console had been sitting on a shelf for at least three decades, and the machine was definitely showing its age. Several components had failed due to corrosion, including the clock crystal, a 7400 series logic chip and a capacitor in the power supply, but since these are all standard components it was rather straightforward to replace them.

The controllers however were sadly beyond repair. Replacing them with standard joysticks wasn’t really an option because the ColecoVision controllers included a numeric keypad, which was mainly used to select game options. Making something completely new was the way to go, and [Discreet Mayor] decided to go for a wireless system while he was at it. After all, he had already developed a modular wireless IoT system based on the IEEE 802.15.4 standard, which turned out to be a perfect fit for this system.

The splash screen of ColecoVision's Venture[Discreet Mayor] built a simple joystick-plus-fire-button setup on a piece of MDF and equipped it with his IoT transmitter. Instead of adding a replacement numeric keypad he decided to use the joystick to simulate the most commonly-used buttons: “right” for “1”, “down” for “2” and so on. The receiver module uses digital switches to mimic keypresses to the console’s input port. The end result might look a bit hacky, but the console is fully functional again and runs its games just like it did over thirty years ago.

We’ve seen several projects that add wireless controllers to a variety of classic consoles. If you’ve got a ColecoVision that turns out to be beyond salvaging, you can always just build your own from scratch.

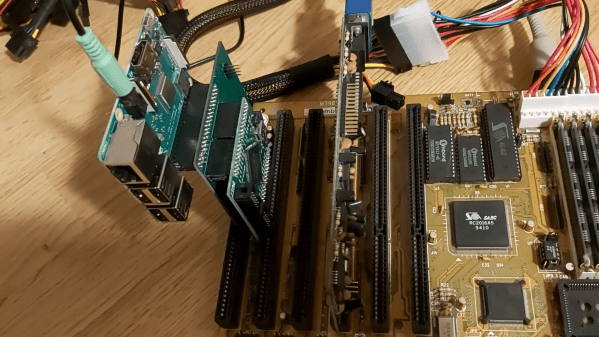
A 386 motherboard with a custom ISA card plugged in

Emulate Any ISA Card With A Raspberry Pi And An FPGA

One of the reasons the IBM PC platform became the dominant standard for desktop PCs back in the mid-1980s was its open hardware design, based around what would later be called the ISA bus. Any manufacturer could design plug-in cards or even entire computers that were hardware and software compatible with the IBM PC. Although ISA has been obsolete for most purposes since the late 1990s, some ISA cards such as high-quality sound cards have become so popular among retrocomputing enthusiasts that they now fetch hundreds of dollars on eBay.

So what can you do if your favorite ISA card is not easily available? One option is to head over to [eigenco]’s GitHub page and check out his FrankenPiFPGA project. It contains a design for a simple ISA plug-in card that hooks up to a Cyclone IV FPGA and a Raspberry Pi. The FPGA connects to the ISA bus and implements its bus architecture, while the Pi communicates with the FPGA through its GPIO ports and emulates any card you want in software. [eigenco]’s current repository contains code for several sound cards as well as a hard drive and a serial mouse. The Pi’s multi-core architecture allows it to run several of these tasks at once while still keeping up the reasonably high data rate required by the ISA bus.

In the videos embedded below you can see [eigenco] demonstrating the system on a 386 motherboard that only has a VGA card to hook up a monitor. By emulating a hard drive and sound card on the Pi he is able to run a variety of classic DOS games with full sound effects and music. The sound cards currently supported include AdLib, 8-bit SoundBlaster, Gravis Ultrasound and Roland MT-32, but any card that’s documented well enough could be emulated.

This approach could also come in handy to replace other unobtanium hardware, like rare CD-ROM interfaces. Of course, you could take the concept to its logical extreme and simply implement an entire PC in an FPGA.

Continue reading “Emulate Any ISA Card With A Raspberry Pi And An FPGA” →