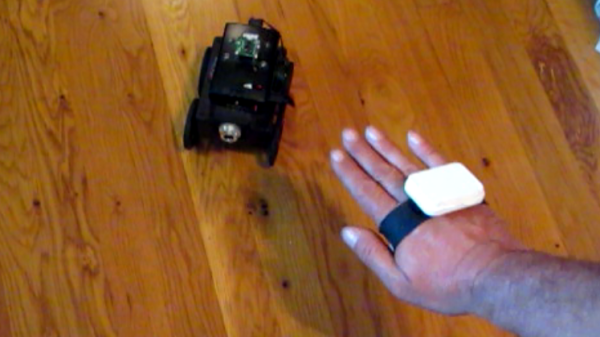
Rubik’s Robot So Fast It Looks Like A Glitch In The Matrix

From Ferraris to F-16s, some things just look fast. This Rubik’s Cube solving robot not only looks fast, it is fast: it solved a standard cube in 380 milliseconds. Blink during the video below and you’ll miss it — even on the high-speed we had trouble keeping track of the number of moves this solution took. It looked like about 20.

Beating the previous robot record of 637 milliseconds is just the icing on the cake of a very cool build undertaken by [Ben Katz]. He and his collaborator [Jared] put together a robot with a decidedly industrial look — aluminum extrusion chassis, six pancake servo motors with high-precision optical encoders, and polycarbonate panels for explosion containment which proved handy during development. The motors had to be modified to allow the encoders to be attached to the rear, and custom motor controllers were fabricated. [Jared] came up with a unique board to synchronize the six motors and prevent collisions between faces. Machine vision is provided by just two PlayStation Eye cameras; mounted at opposite corners of the enclosure, each camera can see three faces at a time. They had a little trouble distinguishing the red from the orange, which was solved with a Sharpie.

[Ben] and [Jared] think they can shave a few milliseconds here and there with tweaks, but even as it is, this is a great lesson in optimization and integration. We’ve covered Rubik’s robots before, like this two-motor slow and steady design and this six-motor build that solves a cube in less than a second.

Continue reading “Rubik’s Robot So Fast It Looks Like A Glitch In The Matrix”

Glorious Body Of Tracked ‘Mad Mech’ Started As Cardboard

[Dickel] always liked tracked vehicles. Taking inspiration from the ‘Peacemaker’ tracked vehicle in Mad Max: Fury Road, he replicated it as the Mad Mech. The vehicle is remote-controlled and the tank treads are partly from a VEX robotics tank tread kit. Control is via a DIY wireless controller using an Arduino and NRF24L01 modules. The vehicle itself uses an Arduino UNO with an L298N motor driver. Power is from three Li-Po cells.

The real artistic work is in the body. [Dickel] used a papercraft tool called Pepakura (non-free software, but this Blender plugin is an alternative free approach) for the design to make the body out of thin cardboard. The cardboard design was then modified to make it match the body of the Peacemaker as much as possible. It was coated in fiberglass for strength, then the rest of the work was done with body filler and sanding for a smooth finish. After a few more details and a good paint job, it was ready to roll.

There’s a lot of great effort that went into this build, and [Dickel] shows his work and process on his project page and in the videos embedded below. The first video shows the finished Mad Mech being taken for some test drives. The second is a montage showing key parts of the build process.

Continue reading “Glorious Body Of Tracked ‘Mad Mech’ Started As Cardboard”

Marble Chooses Its Own Path

[Snille]’s motto is “If you can’t find it, make it and share it!” and we could not agree more. We wager that you won’t find his Roball sculpture on any shopping websites, so it follows that he made, and subsequently shared his dream. The sculpture has an undeniable elegance with black brackets holding brass rails all on top of a wooden platform painted white. He estimates this project took four-hundred hours to design and build and that is easy to believe.

Our first assumption was that there must be an Arduino reading the little red button which starts a sequence. A 3D-printed robot arm grasps a cat’s eye marble and randomly places it on a starting point where it invariably rolls to its ending point. The brains are actually a Pololu Mini Maestro 12-channel servo controller. The hack is using a non-uniform marble and an analog sensor at the pickup position to randomly select the next track.

If meticulously bending brass is your idea of a good time, he also has a video of a lengthier sculpture with less automation, but it’s bent brass porn. If marbles are more your speed, you know we love [Wintergatan] and his Incredible Marble Music Machine. If that doesn’t do it for you, you can eat it.

Continue reading “Marble Chooses Its Own Path”

The M1 NerfBot: When Prototypes Evolve

What do you get when you cross a self-taught maker with an enthusiasm for all things Nerf? A mobile nerf gun platform capable of 15 darts per second. Obviously.

The M1 NerfBot built by [GrimSkippy] — posting in the ‘Let’s Make Robots’ community — is meant to be a constantly updating prototype as he progresses in his education. That being the case, the progress is evident; featuring two cameras — a webcam on the turret’s barrel, and another facing forward on the chassis, a trio of ultrasonic sensors, controlled by an Xbox 360 controller, and streaming video to a webpage hosted on the M1 itself, this is no mere beginner project.

Perhaps most compelling is how the M1 tracks its targets. The cameras send their feeds to the aforementioned webpage and — with a little reorganization — [GrimSkippy] accesses the the streams on an FPV headset-mounted smartphone. As he looks about, gyroscopic data from the phone is sent back to the M1, translating head movement into both turret and chassis cam movement. Check it out!

Continue reading “The M1 NerfBot: When Prototypes Evolve”

The Sensor Array That Grew Into A Robot Cat

Human brains evolved to pay extra attention to anything that resembles a face. (Scientific term: “facial pareidolia”) [Rongzhong Li] built a robot sensor array with multiple emitters and receivers augmenting a Raspberry Pi camera in the center. When he looked at his sensor array, he saw the face of a cat looking back at him. This started his years-long Petoi OpenCat project to build a feline-inspired body to go with the face.

While the name of the project signals [Rhongzhong]’s eventual intention, he has yet to release project details to the open-source community. But by reading his project page and scrutinizing his YouTube videos (a recent one is embedded below) we can decipher some details. Motion comes via hobby remote-control servos orchestrated by an Arduino. Higher-level functions such as awareness of environment and Alexa integration are handled by a Raspberry Pi 3.

The secret (for now) sauce are the mechanical parts that tie them all together. From impact-absorption spring integrated into the upper leg to how its wrists/ankles articulate. [Rongzhong] believes the current iteration is far too difficult to build and he wants to simplify construction before release. And while we don’t have much information on the software, the sensor array that started it all implies some level of sensor fusion capabilities.

Continue reading “The Sensor Array That Grew Into A Robot Cat”

Behold The Giant Eye’s Orrery-Like Iris And Pupil Mechanism

This is an older project, but the electromechanical solution used to create this giant, staring eyeball is worth a peek. [Richard] and [Anton] needed a big, unblinking eyeball that could look in any direction and their solution even provides an adjustable pupil and iris size. Making the pupil dilate or contract on demand is a really nice feature, as well.

The huge fabric sphere is lit from the inside with a light bulb at the center, and the iris and pupil mechanism orbit the bulb like parts of an orrery. By keeping the bulb in the center and orbiting the blue gel (for the iris) and the opaque disk (for the pupil) around the bulb, the eye can appear to gaze in different directions. By adjusting the distance of the disks from the bulb, the size of the iris and pupil can be changed.

A camera system picks out objects (like people) and directs the eye to gaze at them. The system is clever, but the implementation is not perfect. As you can see in the short video embedded below, detection of a person walking by lags badly. Also, there are oscillations present in the motion of the iris and pupil. Still, as a mechanism it’s a beauty.

Continue reading “Behold The Giant Eye’s Orrery-Like Iris And Pupil Mechanism”

This 3D-Printed Robotic Vacuum Sucks

After you’ve taken a moment to ponder the turn of phrase used in the title, take a look at this scratch-built robotic vacuum created by [theking3737]. The entire body of the vacuum was 3D printed, and all of the internal electronics are off-the-shelf modular components. We can’t say how well it stacks up against the commercial equivalents from iRobot and the like, but it doesn’t look like it would be too hard to build one yourself to find out.

The body of this rather concerned-looking robot was printed on a DMS DP5 printer, which is a neat trick as it only has a build platform of 200 mm x 200 mm. Once all the pieces were printed, a 3D pen was used to “weld” the sections together. The final result looks a bit rough, but should give a bond that’s just as strong as the printed parts themselves.

The robot has four sets of ultrasonic range finders to detect walls and obstacles, though probably not in the positions you would expect. The right side of the robot has two sets of sensors, while the left side only gets one. We aren’t sure the reasoning behind the asymmetrical layout, but presumably the machine prefers making right turns.

Control is provided by an Arduino Mega and the ever-reliable HC-05 Bluetooth module. A companion Android application was written which allows configuring the robot without having to plug into the Arduino every time you want to tweak a setting.

We can’t say we’ve seen that many DIY robotic vacuums here at Hackaday, but we’ve certainly featured our fair share of hacks for the commercially available models.