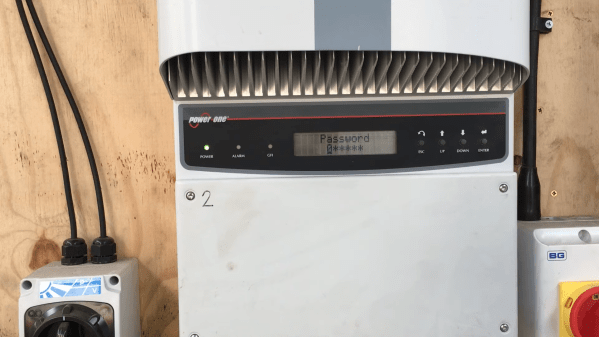
Solaris Might Be Free If You Want It

There was a time when “real” engineering workstations ran Linux Unix. Apollo and Sun were big names and Sun’s version was Solaris. Solaris has been an iffy proposition since Oracle acquired Sun, but Oracle announced last month that you can download and use Solaris 11.4 CBE free for non-production use.

Do you care? If you ever wanted to run “real” Unix this is an option although, honestly, so is Free BSD and it probably has better community support. On the other hand, since you can virtualize a machine to spin up, it might be worth a little time to install it.

On the other hand, if you have an old SPARC machine — this could be big news. We aren’t sure how far back the hardware this will support will go, but this could be just what you need to breathe new life into that eBay pizza box from Sun you’ve had in the basement. Of course, if you have an FPGA SPARC system, this might be interesting too, but we have no idea how much other stuff you need to implement to be able to benefit from Solaris.

Will you install Solaris? If so, tell us why. We are sure we won’t have to prompt you to tell us why not. In 2017, we thought we’d seen the end of Solaris, but apparently not. Maybe this will help those folks still on Solaris 9.

KiCAD Plugin Gives Your PCBs That Handmade Look

The first PCBs we built involved a draftsman laying out large pieces of tape. The finished artwork would be photographically reduced to produce the board. This solved a few problems. It was easier to work on the large pieces and any errors were reduced by the scale amount. Boards from this era have a distinct appearance because the tracks are generally curved. But when computer-aided drafting took over, the early packages couldn’t deal with wavy lines making all sorts of angles. So traces started appearing at very common angles like 45 degrees or 90 degrees only. If you use KiCAD, though, there’s no reason to have rectilinear traces. Now there is a plugin to help make your boards appear like old-fashioned circuit boards.

The video by [mitxela] below talks about how we got here and debunks some common myths about PCB design. The plugin produces rounded corners and teardrop-shaped pads. There’s also a second post on the topic with more details. The effect isn’t just ornamental. There are some reasons graceful traces might be better than sharp angles.

Continue reading “KiCAD Plugin Gives Your PCBs That Handmade Look”

Mindblowing Graphics From An ATtiny85

[Görg Pflug] wrote in with his really nice graphics library. It’s got multiple layers, two text consoles, greyscale, internal halftoning, and sprites. It can pull off a number of classic graphics tricks and demos. Oh yeah, and did we mention it runs on a freaking ATtiny85 and an I2C OLED screen?!

This is an amazing piece of work — if you’d asked us if this was possible, we would have probably said “no”. And now it’s yours to use in your own projects. The GitHub repo is full of demos showing off everything from switching between multiple layers, extremely rapid text scrolls, animations, boing balls, and even a Wolfenstein-style raycaster. On an ATtiny85.

There’s a demo video, embedded below, that shows it all off, but honestly you have to think about what’s going to to be suitably wowed. The first demo just seems to have a graphic wave over static text, for instance. No big deal? It’s blending the greyscale layers together and dithering them out to black and white for the OLED in real time! On an ATtiny85.

While the library is written in straight C++, there are even a couple examples of how you’d integrate this with Arduino’s Wire library if you so wished. We don’t know about you, but this makes us want to whip together an ATtiny85 and SSD1306 OLED demo board just to start playing around. This isn’t just an amazing hack, but it would also be a useful way to add graphics and a nice console to any project you’re working on.

Did we mention it’s all done on an ATtiny85?  Over I2C? Kudos!

Continue reading “Mindblowing Graphics From An ATtiny85”

Old Casio Calculator Learns New Tricks

[George Stagg] recently found himself stung by the burden of free time while in lockdown. Needing a project to keep him occupied, he decided to upgrade his 90s Casio CFX-9850G calculator to run custom machine code.

All [George] really wanted was for his vintage calculator to understand Reverse Polish Notation (RPN). The calculator in question can already run its own version of BASIC, however the bespoke Hitachi CPU struggles performance-wise with complex programs, and wouldn’t be a realistic way of using RPN on the calculator. An RPN interpreter written in assembly language would be much faster.

The first step in cracking this calculator wide open was a ROM dump, followed by writing a disassembler. Incredibly, the MAME framework already featured a ‘partial implementation’ of the calculator’s CPU, which was a much needed shot in the arm when it came time to write a full-featured emulator.

With the entire calculator emulated in software, the plan from here involved replacing one of the BASIC commands in ROM with new code that would jump to an address in RAM. With 32KB of RAM there ended up being plenty of room for experimentation, and uploading a program into RAM was simplified by using Casio’s original backup software to dump the RAM onto a PC. Here, the contents of RAM could be easily modified with custom code, then uploaded back into the calculator.

With RAM to burn, new routines were created to write custom characters to the screen, and a new font was created to squeeze more characters onto the display than normal. [George] ended up porting a Forth interpreter, which defaults to RPN style, to finally achieve his humble objective. He also managed to get a version of Conway’s Game Of Life running, check out the video after the break.

We can’t get enough of our calculator hacks here, so make sure to check out the CPU transplant on this vintage Soviet calculator.

Continue reading “Old Casio Calculator Learns New Tricks”

A Gaggle Of Boards Makes For An I2C Playground

It’s not much of a stretch to assume that the majority of Hackaday readers are at least familiar with I2C. In fact, there’s an excellent chance that anyone who’s ever done more with an Arduino than blink the onboard LED has at one time or another used the serial communication protocol to talk to a sensor, display, or other external gadget. Of course, just because most of us have used it in a few projects doesn’t mean we truly understand it.

If you’re looking to brush up on your I2C knowledge, you could do worse than to follow the guide [András Tevesz] recently wrote up. With a title like Hardware Hacking 101: E01 I2C Sniffing, How to Listen to Your Arduino’s I2C Bus, you know you’re in for a good time. While the document is arguably geared more towards security researchers than electronic hobbyists, the concepts presented can be useful even if you’re just trying to debug your own projects. Continue reading “A Gaggle Of Boards Makes For An I2C Playground”

Pong In Hardware… Virtually

We are big fans of the Falstad circuit simulator. Sure, it isn’t perfect, but there’s nothing else like it when you want to whip up a simple circuit. But we were blown away when we saw a more or less complete hardware implementation of Pong in Falstad. No kidding. Starting with the original schematics, there are multiple pages that show each sub-circuit and even a playable subset that you can play the game in your browser.

But wait… you probably noticed there’s no CRT display in the simulator’s component menu. That’s true, there isn’t. However, you can write JavaScript to interact with a running simulation, so the display is a simple bit of JavaScript that samples signals at predetermined points and does the appropriate drawings. There’s even audio output for the sound effects, although that is built into the simulator.

Continue reading “Pong In Hardware… Virtually”

Turn Timing Diagrams Into ASCII Art, For Friendlier Pasting

We all use text-based fields at one time or another, and being limited to ASCII only can end up being a limitation. That’s what led [Luke Wren] to create asciiwave, a fantastic tool that turns WaveDrom timing diagrams into ASCII art. Unlike images, ASCII timing diagrams are suitable for pasting into comment fields, change logs, or anywhere else that accepts text only. [Update: As the author kindly shared in the comments below, this tool’s original niche is pasting into HDL (e.g. Verilog) source code comments, where it has a special kind of usefulness.]

WaveDrom itself is a nifty JavaScript tool that we have covered before. It accepts timing diagrams expressed as JSON data, and renders nicely-readable digital timing diagrams as images directly inside one’s browser.

As cool and useful as that is, images can’t be pasted into text fields. That’s where asciiwave comes in. It reads the exact same format that WaveDrom uses, but generates an ASCII-art timing diagram instead. So if you’ve found WaveDrom useful, but wish you could generate ASCII versions, here’s your solution.