The idea behind Lua is a beautiful one. A simple and concise syntax offers almost all of the niceties of a first-class language. Moreover, a naive implementation of an interpreter with a giant switch case can be implemented in an afternoon. But assembly is your go-to to get decent performance in a JIT-style interpreter. So [Haoran Xu] started to ask himself if he could achieve better performance without hand-rolled assembly, and after a few months of work, he published a work-in-progress called LuaJIT Remake (LJR).
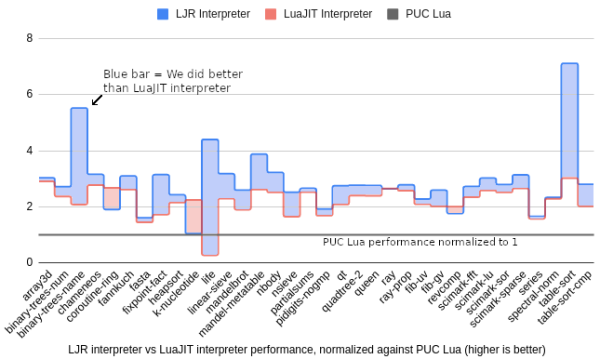
Currently, it supports Lua 5.1, and on a smattering of 34 benchmarks, LJR beats the leading fastest Lua, LuaJIT, by around 28% and the official Lua engine by 3x. [Haoran] offers a great explanation of interpreters that provides excellent background and context for the problem.
But the long and short of it is that switch cases are expensive and hard to optimize for compilers, so using tail calling is a reasonable solution that comes with some significant drawbacks. With tail calls, each case statement becomes a “function” that is jumped to and then jumped out of without mucking with the stack or the registers too much.
However, the calling convention requires any callee-saved registers to be preserved, which means you lose some registers as there is no way to tell the compiler that this function is allowed to break the calling convention. Clang is currently the only compiler that offers a guaranteed tail-call annotation ([[clang::musttail]]). There are other limitations too, for instance requiring the caller and callee to have identical function prototypes to prevent unbounded stack growth.
So [Haoran] went back to the drawing board and wrote two new tools: C++ bytecode semantical description and a special compiler called Deegen. The C++ bytecode looks like this:
void Add(TValue lhs, TValue rhs) {
  if (!lhs.Is<tDouble>() || !rhs.Is<tDouble>()) {
    ThrowError("Can't add!");
  } else {
    double res = lhs.As<tDouble>() + rhs.As<tDouble>();
    Return(TValue::Create<tDouble>(res));
  }
}
DEEGEN_DEFINE_BYTECODE(Add) {
  Operands(
    BytecodeSlotOrConstant("lhs"),
    BytecodeSlotOrConstant("rhs")
  );
  Result(BytecodeValue);
  Implementation(Add);
  Variant(
    Op("lhs").IsBytecodeSlot(),
    Op("rhs").IsBytecodeSlot()
  );
  Variant(
    Op("lhs").IsConstant(),
    Op("rhs").IsBytecodeSlot()
  );
  Variant(
    Op("lhs").IsBytecodeSlot(),
    Op("rhs").IsConstant()
  );
}
Note that this is not the C keyword return. Instead, there is a definition of the bytecode and then an implementation. This bytecode is converted into LLVM IR and then fed into Deegen, which can transform the functions to do tail calls correctly, use the GHC calling conventions, and a few other optimizations like inline caching through a clever C++ lambda mechanism. The blog post is exceptionally well-written and offers a fantastic glimpse into the wild world of interpreters.
The code is on Github. But if you’re interested in a more whimsical interpreter, here’s a Brainf**k interpreter written in Befunge.