Well-Built Sentry Gun Addresses The Menace Of Indoor Micro-UAVs

What is this world coming to when you can’t even enjoy sitting in your living room without some jamoke flying a drone in through the window? Is nothing sacred? Won’t someone think of the children?

Apparently [Drew Pilcher] did, and the result is this anti-drone sentry gun.  It’s a sturdily built machine – one might even say it’s overbuilt. The gimbal is made from machined steel pieces, and the swivels are a pair of Sherline stepper-controlled rotary tables with 1/40 of a degree accuracy selling for $400 each. Riding atop that is a Nerf rifle, which is cocked by a stepper-actuated linear slide, as well as a Kinect for object tracking. The tracking app is a little rough – just OpenCV hacked onto the Kinect SDK – but good enough for testing. The gun tracks as smoothly as one would expect given the expensive hardware, and the auto-cocking feature works well if a bit slowly. Based as it is on Nerf technology, this sentry is only indicated for the control of the micro-drones seen in the snuff video below, but really, anyone afflicted by indoor infestations of Phantoms or Mavics has bigger problems to worry about.

Over-engineered? Perhaps, but it’s better than letting the menace of indoor drones go unanswered. And it’s far from the first sentry gun we’ve seen, targeting everything from cats to squirrels using lasers, paintballs, and even plain water.

Continue reading “Well-Built Sentry Gun Addresses The Menace Of Indoor Micro-UAVs”

The Pianist Octopus

MIDI has been around for nearly forty years, but what do you do if you have an old ‘toy’ keyboard without MIDI? Or really any way to make it sound good? You could turn it into a player piano, and that’s exactly what [Alessandro] did with an old toy keyboard. It’s The Pianist Octopus, and it is perhaps the coolest, neatest pianist you’ve ever seen.

This build uses 24 individual 9 gram hobby servos, which of course means you need to drive those servos somehow. There are plenty of ways to attach a few servos to an Arduino board, but when you need to drive 24 servos, your options become somewhat limited. The electronics consist mostly of a Fishino Octopus, an Arduino shield that can drive sixteen individual servos. Slap two of these shields on an Arduino and you have something that will drive twenty four servos.

The mechanical part of the build consists of a 3D printed frame that allows the servos to be mounted across an arc, something like a harp. Metal rods connect the servos to tentacle-shaped actuators. These were designed in Google SketchUp and printed in PLA.

Attached to these servos and Arduino is a character LCD and a few buttons that allow the user to cycle through a few functions. The play button plays the current melody (based on old Nokia ringtones, by the way), a few more buttons adjust the position of the individual servos, and there’s another button to stop playing. Since this is a complete electronic-to-mechanical interface for a toy piano, a MIDI-in port isn’t out of the question; all a MIDI implementation would need to do is move a servo down on a note on event and move it back up on the note off event.

HestiaPi: A Stylish Open Hardware Thermostat

A common complaint about open hardware and software is that the aesthetic aspects of the projects often leave something to be desired. This isn’t wholly surprising, as the type of hackers who are building these things tend to be more concerned with how well they work than what they look like. But there’s certainly nothing wrong with putting a little polish on a well designed system, especially if you want “normal” people to get excited about it.

For a perfect example, look no further than the HestiaPi Touch. This entry into the 2019 Hackaday Prize promises to deliver all the home automation advantages of something like Google’s Nest “smart” thermostat without running the risk of your data being sold to the highest bidder. But even if we take our tinfoil hat out of the equation, it’s a very slick piece of hardware from a functional and visual standpoint.

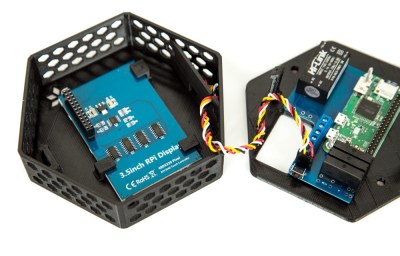
As you probably guessed from the name, the thermostat is powered by the Raspberry Pi Zero, which is connected to a custom PCB that includes a couple of relays and a connector for a BME280 environmental sensor. The clever design of the 3D printed case means that the 3.5 inch touch screen LCD on the front can connect directly to the Pi’s GPIO header when everything is buttoned up.

Of course, the hardware is only half the equation. To get the HestiaPi Touch talking to all the other smart gadgets in your life, it leverages the wildly popular OpenHAB platform. As demonstrated in the video after the break, this allows you to use the HestiaPi and its mobile companion application to not only control your home’s heating and air conditioning systems, but pretty much anything else you can think of.

The HestiaPi Touch has already blown past its funding goal on Crowd Supply, and the team is hard at work refining the hardware and software elements of the product; including looking at ways to utilize the unique honeycomb shape of the 3D printed enclosure to link it to other add-on modules.

Continue reading “HestiaPi: A Stylish Open Hardware Thermostat”

BikeOn Makes Electric Conversion A Snap

If you’re in a relatively urban area and your destination is within a reasonable distance, it’s hard to argue against riding your bike rather than taking a car. It’s a positive for the environment, and great way to exercise and keep active. But some of us, say folks who write for the Internet full-time, might appreciate a little electromechanical advantage when the going gets tough.

In an effort to make electrifying your bike as easy as possible, [Shushanik] and [Aram] are working on a product they call BikeOn which they’ve recently entered into the 2019 Hackaday Prize. Thanks to some very clever engineering, this small unit can clamp onto the frame of a standard bicycle and transfer the energy from its 350 watt motor directly into the rear wheel; all without any tools or permanent modifications.

In the video after the break, [Aram] demonstrates how the user can install the BikeOn motor assembly in literally just a few seconds. Naturally there’s a beefy battery that needs to get attached to the frame as well, but even that has been made modular enough that it can attach where many bikes have their water bottle holder.

The attentive reader will likely notice that there’s no obvious control mechanism for BikeOn. Instead of having to fumble around with it manually, BikeOn uses a combination of torque sensor, accelerometer, and gyroscope to intelligently determine when the rider could use a boost.

BikeOn nabbed Editor’s Choice award at Maker Faire 2019, and now that it’s in the running for the Hackaday Prize, we’re excited to see more information on the product as it moves towards commercial release.

Continue reading “BikeOn Makes Electric Conversion A Snap”

The Finest Linux Tablet You Can Build

For the last few years now, we’ve all had access to tiny, affordable Systems on a Module. These wunderchips are complete Linux systems with WiFi, a halfway decent GPU, and enough memory to run a real system. This is the perfect platform to base a tablet build on, the only problem is that someone has to actually do it. The DLT One is the ‘Damn Linux Tablet’ from [Prof. Fartsparkle]. It’s the answer to the question of when someone is going to build a tablet computer around one of these cheap Systems on a Chip that are floating around.

With many modules to choose from, the first task is actually choosing one of these Linux modules. [Fartsparkle] ended up with the Nvidia Jetson Nano, an impressive little board that has one distinct advantage: it’s drop-in compatable with the Raspberry Pi Compute Module, the Raspberry Pi-on-an-SODIMM. Given a single chassis, [Prof. Fartsparkle] can simply upgrade his tablet by getting a newer version of the Jetson Nano (or the Compute Module).

The current state of the board is basically an SODIMM socket on a board, with breakouts for Ethernet, a power jack, USB, and HDMI. That’s all there is to it, and design on the tablet chassis is ongoing.

Future updates for this tablet build will include USB-C PD, an mPCI-E connector that would allow for M.2 storage, LTE in some form or another and a dock that would allow you to turn this into a Surface-like laptop. It’s an amazing build, and one of the best entries we’ve seen in this year’s Hackaday Prize.

Protect Yourself — And Your Project — While Working With Mains Power

When debugging ordinary low-voltage circuitry, you’re pretty safe: unless you have some really power-hungry devices that need a ton of current, there aren’t that many truly bad things that can happen, so you can take a lot of liberties with electrical-safety rules. With mains-powered devices, you don’t have this luxury, and a lack of knowledge, sloppy work practices, or simple mistakes can cost you — and your project — dearly. While you still need to know what you’re doing and use the requisite caution, [Yann Guidon]’s latest project — and entry in the 2019 Hackaday Prize —  a mains protection box, might keep simple mistakes from becoming a disaster.

There are a number of precautions you can take when working with mains power. We’ve all used the simple in-line power strip so you can quickly switch off the current, but [Yann] has included a number of devices that can be configured in different ways to experiment with mains-powered devices safely. Built into a sturdy open-topped wooden box with carry handles, the project evokes the traditional breadboard in appearance and functionality. A number of different devices are included, which could be re-configured into different topologies if needed.

[Yann] included an isolation transformer, which can be useful not only for protection against shock in case of accidentally grounding, but also for noise suppression. There is also a variac, which allows the output voltage to be adjusted over a wide range for testing. Of course, circuit breakers are a must, and current and voltage meters keep you informed about what’s going on. A big, easy-to-access switch cuts the power quickly when needed.

The (maybe) final touch is an adjustable output current limit, which is still a work in progress. Built around a current-monitoring relay and a DPDT relay wired as a latch, this allows the output to be disconnected if it draws more than a specified current, equivalent to between 10 W and 100 W. This is the perfect thing for initial testing of new projects.

So, if you’re thinking of working on mains-powered projects, have a close look at what [Yann] has assembled, and learn proper safety procedures before you begin. One place to start is with a great series by our own Jenny List about mains safety: part one and part two. Stay safe out there!

Simple Arduino Universal Remote Control

The infrared remote control might not hold the seat of honor in the average home theater setup that it once enjoyed, but it’s not quite out to pasture yet. After all, what are you going to use to stop Netflix once the Chromecast invariably disconnects from your phone? As long as there are devices out there that will respond to commands blasted their way via an IR LED, hackers will be looking to get in on the action.

In an effort to make IR remote hacking just a bit easier, [sjm4306] has submitted his Remoteduino for the 2019 Hackaday Prize. With this handy tool in your arsenal, you can focus on developing the software side of your next IR remote project without worry about the hardware. Just upload your code, and get clicking.

As you might imagine, the design is rather simple. On the front edge of the PCB you’ve got the prerequisite IR LED, and a healthy supply of tactile buttons that your code can use as input. The remote features a fairly standard layout on the top half, complete with silkscreened labels for the common functions, but below that [sjm4306] has packed in six general purpose buttons that can be used for whatever you like.

The Remoteduino is powered by an ATmega328P, and the whole thing runs on a CR2032 cell mounted on the backside. [sjm4306] mentions in his write-up on Hackaday.io that battery life was always a consideration during development of the Remoteduino, so he’s made a few energy-saving considerations. Using the internal 8 MHz oscillator instead of an external crystal shaved a bit off the top, and the aggressive sleep routines got him the rest of the way. In testing, he estimates the battery should last a few years even with daily use.

Continue reading “Simple Arduino Universal Remote Control”