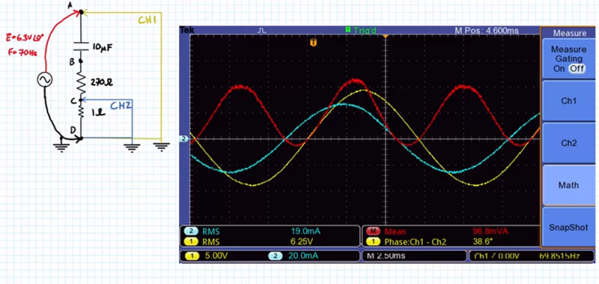
Inside The Secret World Of Crimping

At some point in your electrical pursuits, you’ll need to make a connector. Maybe you’re designing something that will connect to another device, or maybe the spaghetti mess of wires coming out of your Raspberry Pi has become a pain to deal with. Whatever the reason, a proper connector can solve a lot of headaches in electronics projects.

Your first thought might be to run to your favorite component distributor and order the connectors, terminals, and crimping tool. Unfortunately, those tools can cost thousands of dollars. Maybe you’ll just solder the connectors instead? Don’t! It makes for easily damaged connections.

Fortunately, [Matt Millman] has a great guide on wire-to-board connectors. This guide will explain why you should never solder crimp terminals and then get into working with some of the most common wire-to-board connector families.

For example, the Mini-PV series (which often get called “Dupont”) are one of the most ubiquitous connectors in hobbyist electronics. They’re the connector on those rainbow colored jumper wire sets, and connect perfectly to 0.1″ pin headers. The connectors and terminals are cheap, but the official HT-0095 crimp tool costs over $1500. Most crimp tools make a mess of these terminals since they require a cylindrical jaw to crimp correctly. By using a combination of two unofficial tools, you can crimp these connectors properly for under $60.

If you want to learn more about the art of wiring, the NASA Workmanship Standards are an interesting read.

[Thanks to MarkMLl for the tip!]

Know Your Fits And Tolerances

When designing parts on a screen, it’s very easy to type in a bunch of nice round numbers and watch everything slot together in perfect harmony. Unfortunately, the real world is not so kind. A 10mm shaft will not readily fit in a 10mm hole, and producing parts to perfect dimensions simply isn’t possible. This is where fits and tolerances come in, and [tarkka] have created a practical demonstration of this on Youtube.

Tighter tolerances require more care and thus increase production costs significantly.

Hole and shaft tolerances are important to ensure parts mate correctly and as intended. If a shaft is to fit into a hole easily and the dimensions aren’t critical, a clearance fit is called for. If assembly should be easy but the part is required to locate accurately, a running fit is called for. Alternatively, if the parts are intended to be pressed together permanently, an interference or force fit should be used.

The video covers the basics of fits and tolerances in an easy to understand way, with visual examples. The fits discussed are based in Imperial measurements, but the metric standard of hole and shaft tolerances (ISO 286-2) is also noted.

Getting your tolerances right is key to making good parts – we’ve covered common issues such as tolerance stacking before. Video after the break.

Continue reading “Know Your Fits And Tolerances”

Casting The Bed Of A CNC Machine In Granite

If you’re looking at CNC machines, or machine tools in general, heavier is better. That old drill press or mill made of a few hundred pounds of cast iron isn’t just better because it’s stood the test of time for a hundred years — greater mass equals less vibration. Thanks to modern epoxy resins, we now have a replacement for tons and tons of iron. Epoxy granite, or chips of granite bound together with epoxy resin, is a viable and very good base for CNC machines, mills, and other tools that are served well with a ton of mass. [Joerg Beigang] is building his own CNC router, and he’s building the base out of epoxy granite. Here’s how he’s doing it.

Before you pour epoxy into a mold, you’ll need to figure out how you’re going to attach your ways, linear rails, and ball screws. [Joreg] is bolting these parts to pieces of aluminum he cut on his home made panel saw before carefully drilling and tapping them to accept the linear rails. These aluminum plates were then mounted to the bottom panel of the mold, in this case melamine-coated plywood.

As you would expect, the most intricate part of this build isn’t globbing up a mold with epoxy resin. No, the real trick here is making sure the rails of the CNC are aligned perfectly before the epoxy goes in. This was done by bolting the linear rails to the mold box and checking everything with a dial indicator. Once that was done it was time to pour.

The bed itself is made of 18kg of epoxy granite, with the entire pour done in four batches. The best way to settle a big pour of epoxy granite is through vibration, just like concrete, but it looks as though [Joreg] is getting some good results by tamping it down with a few sticks. You can check out the first part of this build series below.

If we’ve captured your interest, it’s worth reminding you that this isn’t the first epoxy granite CNC machine we’ve featured.

Continue reading “Casting The Bed Of A CNC Machine In Granite”

Well-Protected USB Power Strip Makes It Easy To Plug In

When we get a new device these days, somewhere in the package is likely to be a wall-wart USB power supply. We look for a place to plug in the little switch-mode dongle, rearrange a few plugs in the mains power strip, and curse its designers for the overly cozy outlet spacing. And all the while that USB-A plug on the power supply cable taunts us with its neat, compact form factor. If only there were a USB power strip.

Unwilling to suffer such indignity any longer, [Scott M. Baker] took matters into his own hands and designed this USB power distribution system. We were surprised to hear that he was unable to find a commercial USB power strip, but even if he had, it likely wouldn’t have had the bells and whistles that he added to his. The circuit went through a couple of revs, but each was focused on protection of the connected USB devices. He included both overcurrent protection, in the form of an electronic fuse built around a TPS2421 hot-swap controller, and overvoltage protection using a crowbar circuit with the usual zener-SCR arrangement. There’s also a transient voltage suppression diode to keep any inductive spikes at bay. Interestingly, each USB outlet has all these protections – it’s not just one protected bus feeding a bunch of USB outlets in parallel, but individual modules with all the circuitry. The modules are gangable and live inside a laser-cut acrylic case. The video below shows the design and build process in some detail.

We have to say that we always learn a lot about circuit design from [Scott]’s projects. You may recall his custom Atari 2600 controller or his dual-port memory retro game console, both interesting and instructive builds in their own right.

Continue reading “Well-Protected USB Power Strip Makes It Easy To Plug In”

This Home Made Power Hacksaw Cuts Quick And Clean

If you’re cutting metal in the workshop, you’re likely using a table-mounted cutoff saw, or perhaps a bandsaw for finer work. The power hacksaw is an unwieldy contraption that looks and feels very old fashioned in its operation. Despite the drawbacks inherent in the design, [Emiel] decided to build one that operates under drill power, and it came out a treat.

The build uses a basic battery powered drill as its power source. This is connected to a shaft which rotates a linkage not dissimilar to that seen on steam locomotives, but in reverse. The linkage in this case is turning the rotational motion of the drill into linear motion of the hacksaw, which moves along a metal rail, guided by a 3D printed bearing.

With a body of plywood and plastic moving parts, this might not be your tool of choice for high-volume, fast paced work. However, as [Emiel] notes, it’s faster than doing it by hand, and it was a fun build that by and large, used what was already lying around the workshop. It’s not the first time we’ve seen a powered hacksaw use 3D printed parts, either. Video after the break.

Continue reading “This Home Made Power Hacksaw Cuts Quick And Clean”

Test PCBs On A Bed Of Nails

While it might be tempting to start soldering a circuit together once the design looks good on paper, experience tells us that it’s still good to test it out on a breadboard first to make sure everything works properly. That might be where the process ends for one-off projects, but for large production runs you’re going to need to test all the PCBs after they’re built, too. While you would use a breadboard for prototyping, the platform you’re going to need for quality control is called a “bed of nails“.

This project comes to us by way of [Thom] who has been doing a large production run of circuits meant to drive nixie tubes. After the each board is completed, they are laid on top of a number of pins arranged to mate to various points on the PCB. Without needing to use alligator clamps or anything else labor-intensive to test, this simple jig with all the test points built-in means that each board can be laid on the bed and tested to ensure it works properly. The test bed looks like a bed of nails as well, hence the name.

There are other ways of testing PCBs after production, too, but if your board doesn’t involve any type of processing they might be hard to implement. Nixie tubes are mostly in the “analog” realm so this test setup works well for [Thom]’s needs.

Recycled Piano Becomes Upcycled Workbench

Pianos are free, in case you’re not hip to the exciting world of musical instrument salvage. Yes, the home piano, once the pinnacle of upper middle class appreciation of the arts, is no longer. The piano your great aunt bought in 1963 is just taking up space, and it’s not like the guy on Craigslist giving away a free piano has a Bösendorfer.

It’s out of this reality of a surplus of cheap used pianos that [luke] built a new desk. He got it a while ago, but after getting it into his house, he realized it was too old to be tuned anymore. Or at least it was uneconomical to do so. This piano became a workbench, but after a while [luke] wanted something with a little more storage.

The process of converting this piano to a desk began with taking a few photos and putting them into Fusion 360. A series of panels and brackets were modeled in box jointed plywood, and the entire thing was cut out of 6mm Baltic birch plywood at the Vancouver Hack Space.

There are a few nice features that make this desk a little better than an Ikea special. There’s a Raspberry Pi mounted to the shelves, because the Pi still makes a great workbench computer. There’s a power supply, and hookups for 12 V, 5 V, and 3.3 V from an ATX power supply. This is controlled with an awesome antique power switch mounted to the side of the piano. Slap a few coats of black paint on that, and [luke] has an awesome, functional workbench that also has out-of-tune sympathetic strings. Not bad.

You can check out the entire build video below. Thanks [Jarrett] for sending this one in.

Continue reading “Recycled Piano Becomes Upcycled Workbench”