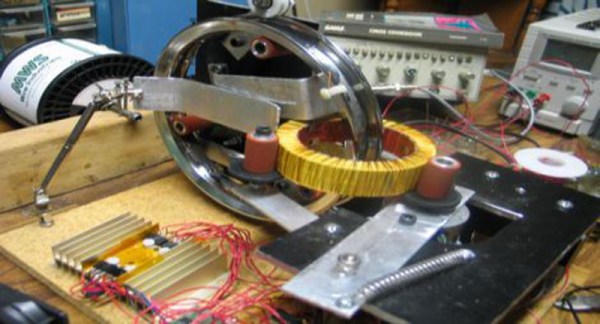
[eclipsed78], built an automatic toroid winder (Internet Archive). The drum splits in order to load the toroid. Then wire is wound on the drum, much like any other coil would be wound. The drum rotates as a slider pulls the wire off the drum, while revolving in and out of the toroid. A side tension keeps the slack out of the wire during operation. The winding coil is stepped as the drum rotates, in order to control the turns ratio. [eclipsed78] created a stepper driver from a schematic, so he could drive the motors. You can watch the winder in operation as a series of videos. The first of which is embedded below. If you have ever needed to wind a massive toroidal transformer, this is the project for you.
Tool Hacks3065 Articles
Repair A Malfunctioning LCD
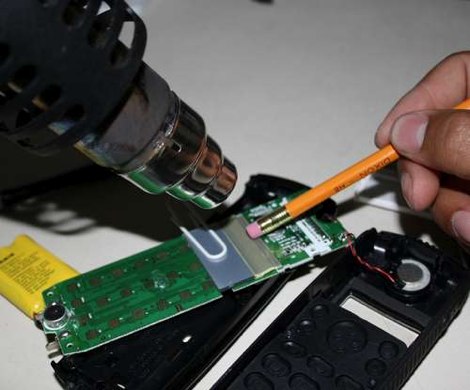
When most people encounter dead pixels on an LCD text display, they figure that the display is dead and they decide to scrap it. However when the LCD display on one of [Joe]’s cordless phones started to show dead rows and columns of pixels, [Joe] decided that he could fix it. With only a pencil eraser, a hot air gun, and a screwdriver (for disassembly), [Joe] was able to fix his phone’s screen in just under 10 minutes. His process involves heating the glue holding the LCD’s ribbon cable to the phones PCB with a hot air gun and using a pencil eraser to reattach segments of the ribbon cable to the PCB. If anyone here has a problem similar to [Joe]’s, be sure to check out his detailed how-to complete with step-by-step pictures.
Microcontroller Cheat Sheet

[Alex] put together this handy cheat sheet to make pinout lookups much quicker. It covers the most common chips from the AVR line, ISP headers, and FTDI cables.
2 Axis Joystick From VCR Parts

[eric] has found that he can build a pretty nice 2 axis joystick out of some VCR parts. Specifically, he’s using the idler wheel. When you disassemble the idler wheel, you’ll find that it has a bevelled washer in the perfect location to help with smooth joystick operation. Add a spring and a hole in some wood and you’ve got the basics. All you need to add now are the switches. This is a fantastic example of recycling parts, you never would have guessed that it was made from trash.
Nice LCD Thermometer

This digital thermometer won’t win any awards for being something innovative and new, but we really like how it looks. The bar graph style display adds something to the project that a normal character display just wouldn’t. You can download source code and schematics on the site.
[via YourITronics]
Unique Li-Ion Battery Tester

[moris_zen] found himself with a hand full of Li-Ion batteries and no good way to see what their capacities were. He built a this unique tester really quick to get the job done. He’s using off the shelf components and a cheap pocket watch which he bought in Taiwan for $1. You hook the circuit up to your battery, click the button and the watch starts working. When it stops, you multiply that number by .38 to get your amp/hour results. Sure, he could have just used a counter, but this is an interesting approach. All he needs to do now is make a nice container to hide all of the circuitry. How could he change the circuit to make the end multiplication unnecessary?
Zif Socket For Arduino

Evil Mad Scientist Laboratories has put out this nice tool. It’s a Zif socket for Arduino. If you’re doing a lot of flashing, this could be a nice addition to keep from having to pry your chip out every time. Plus, it looks cool in a soviet era technology kind of way.


