When you think of ultrasonics, you probably think of a cleaner or maybe a toothbrush. If you are a Star Trek fan, maybe you think of knocking out crew members or showers. But there is another practical use of ultrasonics: cutting. By vibrating a blade at 40 kHz or so, you can get clean, precise cuts in a variety of materials. The problem? Commercial units are quite expensive. So [Electronoobs] decided to roll his own. Check it out in the video below.
There are dreams and then there’s reality. Originally, the plan was for a handheld unit, but this turned out not to be very practical. Coil actuators were too slow. Piezo elements made more sense, but to move the blade significantly, you need a larger element.
Taking apart an ultrasonic cleaner revealed a very large element, but mounting it to a small blade would be a problem. The next stop was an ultrasonic toothbrush. Inside was a dual piezo element with an interesting trick. The elements were mounted in a horn that acts like an ultrasonic megaphone, if you will.
When you’re like [Wes] from Watch Wes Work fame, you don’t have a CNC machine hoarding issue, you just have a healthy interest in going down CNC machine repair rabbit holes. Such too was the case with a recently acquired 2001 Milltronics ML15 lathe, that at first glance appeared to be in pristine condition. Yet despite – or because of – living a cushy life at a college’s workshop, it had a number of serious issues, with a busted Z-axis drive board being the first to be tackled.
The Glentek servo board that caused so much grief. (Credit: Watch Wes Work, YouTube)
The identical servo control board next to it worked fine, so it had to be an issue on the board itself. A quick test showed that the H-bridge IGBTs had suffered the typical fate that IGBTs suffer, violently taking out another IC along with them. Enjoyably, this board by one Glentek Inc. did the rebranding thing of components like said IGBTs, which made tracking down suitable replacements an utter pain that was eased only by the desperate communications on forums which provided some clues. Of course, desoldering and testing one of the good IGBTs on the second board showed the exact type of IGBT to get.
After replacing said IGBTs, as well as an optocoupler and other bits and pieces, the servo board was good as new. Next, the CNC lathe also had a busted optical encoder, an unusable tool post and a number of other smaller and larger issues that required addressing. Along the way the term ‘pin-to-pin compatible’ for a replacement driver IC was also found to mean that you still have to read the full datasheet.
Of the whole ordeal, the Glentek servo board definitely caused the most trouble, with the manufacturer providing incomplete schematics, rebranding parts to make generic replacements very hard to find and overall just going for a design that’s interesting but hard to diagnose and fix. To help out anyone else who got cursed with a Glentek servo board like this, [Wes] has made the board files and related info available in a GitHub repository.
Full disclosure. If you want a lathe capable of turning metal stock, you probably should just buy one. But what fun is that? You can do like [kachurovskiy] and build one with your 3D printer. If you are chuckling, thinking you can’t make 3D printed parts sturdy enough, you aren’t exactly wrong. [Kachurovskiy’s] trick is to 3D print forms and then cast the solid parts in concrete. The result looks great, and we don’t doubt his claim that it “can surpass many comparable lathes in rigidity and features.”
Even he admits that this is a “… hard, long, and expensive project…” But all good projects are. There’s a GitHub page with more details and informative videos below. The action shots are in the last video just before the six-minute mark. Around the seven-minute mark, you can see the machine cut a conical thread. Color us impressed!
One of the lost pleasures of our modern world is the experience of going shopping at a grocery store, a mall, or a drugstore, and finding this month’s electronics magazine festooned with projects that you might like to build. Sure, you can find anything on the Internet, but there’s something to be said about the element of surprise. Can any of those old projects still be of interest?
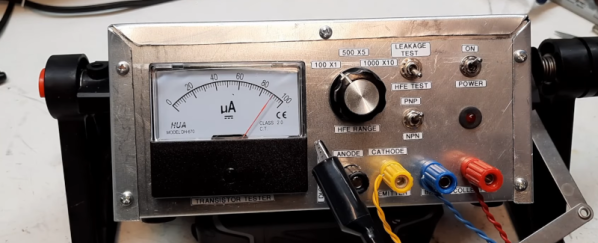
[Bettina Neumryr] thinks so. She has a hobby of finding old magazine projects and building them. Her most recent installment is a transistor tester from the June 1983 issue of Everyday Electronics.
The tester was quite a neat job for 1983, with a neat case and a PC board. It measures beta and leakage. There’s an analog meter that can measure the collector current for a fixed base current (beta or hfe). Leakage is how much current flows between emitter and collector with the base turned off.
In 1983, we’d have loved to have a laser printer to do toner transfer for the PC board, but of course, that was unheard of in hobby circles of the day. The tester seemed to work right off the bat, although there was a small adjustment necessary to calibrate the device. All that was left was to put it in a period-appropriate box with some printed labels.
We loved the old electronics and computer magazines. Usually, when we see someone working on an old magazine project, it is probably not quite a literal copy of it. But either way is cool.
[CreativeLab] bought a cheap arbitrary waveform generator and noted that it only had a two-pin power cord. That has its ups and downs. We feel certain the intent was to isolate the internal switching power supply to prevent ground loops through the scope probes or the USB connector. However, it is nice to have all your equipment referencing the same ground. [CreativeLab] agrees, so he decided to do something about it.
Opening the box revealed that there was hardly anything inside. The main board was behind the front panel. There was also the power supply and a USB board. Plus lots of empty space. Some argue the case is made too large to be deceptive, but we prefer to think it was to give you a generous front panel to use. Maybe.
It was a simple matter to ground everything to a new three-pin connector, but that left the problem of the USB port. Luckily, since it was already out on its own board, it was easy to wire in an isolator.
Honestly? We’d have hesitated to do this unless we had made absolutely sure it didn’t pose some safety hazard to “jump over” the switching power supply. They are often isolated for some reason. However, the likelihood is that it is just fine. What do you think? Let us know in the comments.
You have some fine pitch soldering to do, but all you have on hand is a big soldering iron. What do you do? There are a few possible answers, but [Mr SolderFix] likes to pull a strand from a large wire, file the point down, and coil it around the soldering iron. This gives you a very tiny hot tip. Sure, the wire won’t last forever, but who cares? When it gives up, you can simply make another one.
Many people have done things like this before — we are guilty — but we really liked [Mr Solder Fix’s] presentation over two videos that you can see below. He coils his wire over a form. In his case, he’s using a screwdriver handle and some tape to get to the right size. We’ve been known to use the shanks of drill bits for that purpose, since it is easy to get different sizes.
Who doesn’t know the problem of glare when trying to ogle a PCB underneath a microscope of some description? Even with a ring light, you find yourself struggling to make out fine detail such as laser-etched markings in ICs, since the scattered light turns everything into a hazy mess. That’s where a simple sheet of linear polarizer film can do wonders, as demonstrated by [northwestrepair] in a recent video.
Simply get one of these ubiquitous films from your favorite purveyor of goods, or from a junked LCD screen or similar, and grab a pair of scissors or cutting implements. The basic idea is to put this linear polarizer film on both the light source as well as on your microscope’s lens(es), so that manipulating the orientation of either to align the polarization will make the glare vanish.
This is somewhat similar to the use of polarizing sunshades, only here you also produce specifically the polarized light that will be let through, giving you excellent control over what you see. As demonstrated in the video, simply rotating the ring light with the polarizer attached gives wildly different results, ranging from glare-central to a darkened-but-clear picture view of an IC’s markings.
How to adapt this method to your particular microscope is left as your daily arts and crafts exercise. You may also want to tweak your lighting setup to alter the angle and intensity, as there’s rarely a single silver bullet for the ideal setup.