Albert Dremel developed the now famous rotary tool and started the company in 1932 to make blade sharpeners. It would be 1935 before the company produced the Moto-Tool which is mostly recognizable as an ancestor of the modern Dremel.
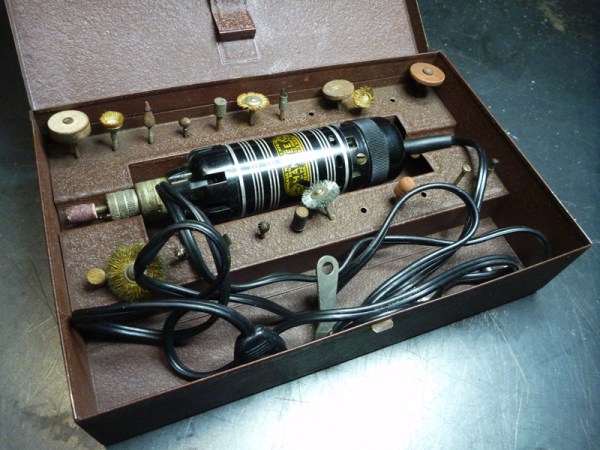
Dremel achieved such dominance that today the name is synonymous with rotary tools in the same way Xerox means photocopy and Crock-Pot is any slow cooker. Sure, there are knock offs you can get from the usual cheap tool outlets, but generally, people reach for a Dremel even when it isn’t really one. Today that tool might really be a Black and Decker or a Dewalt or even a cheap brand like Wen or Chicago Electric. But in the first half of the 20th century, you might have reached for a Handee.
 A Whole Shop Full of Tools

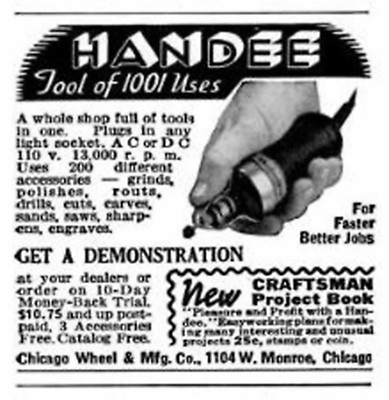
The Handee was a product of the Chicago Wheel and Manufacturing Company who, in 1937, billed it as “a whole shop full of tools in one,” as you can see in this ad. While $10.75 might sound like a price for a Harbor Freight cheapie tool, adjusted for inflation that’s around $200 in 2020 money. At least for that price you got three free accessories out of the over 200 available.
I didn’t remember the Handee and I wanted to see if I could figure out what happened to it and the company who made it. After all, with the Internet at your disposal, how hard could it be? Turns out, I did learn a lot, but in the end, tracing down a company like this from the old days isn’t always as easy as you might think.
Continue reading “Old School Rotary Tools That Weren’t Made By Dremel”