Tools, You Can’t Take Them With You

When I die I hope be buried in the English rural churchyard that has been my responsibility as churchwarden, after a funeral service that has been a celebration of my life. I am neither an Egyptian pharaoh nor a Viking queen though, so my grave will not contain all my tools and equipment to serve me in the afterlife. Instead aside from my mortal remains it will contain only a suitably biodegradable coffin, and my headstone will be a modest one bearing perhaps a technical puzzle to entertain visitors to the churchyard.

My workshop, my bench, and my tools will be the responsibility of my nearest and dearest, and I hope I will have suitably equipped them for the task of their dispersal. But for anyone who has a sizeable collection of gear, have you thought of what would happen if someone else had to clean it all out? What is profession for some and hobby for others, we deal in specialization that might as well be tools of arcane magic to the uninitiated.

Continue reading “Tools, You Can’t Take Them With You”

DIY Tiny Dovetail Cube Needs DIY Dovetail Cutter

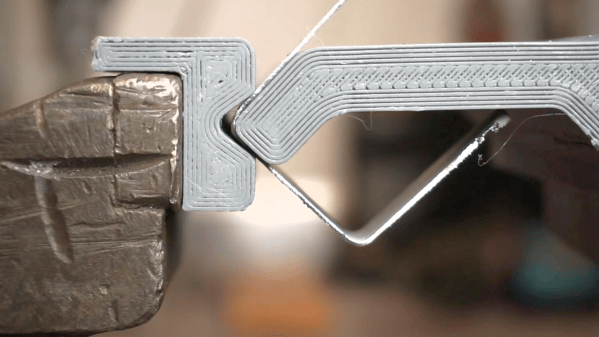
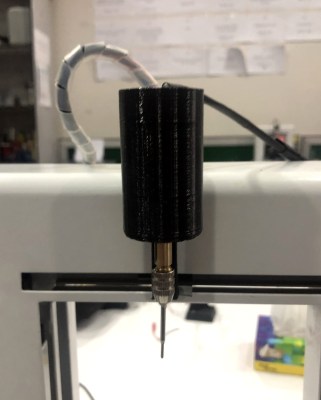
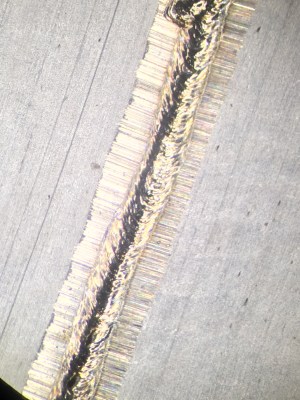
Dovetail cutter, made from a 5 mm drill rod.

There’s a trinket called a dovetail cube, and [mitxela] thought it would make a fine birthday present. As you can see from the image, he was successful in creating a tiny version out of aluminum and brass. That’s not to say there weren’t challenges in the process, and doing it [mitxela] style means:

  • Make it tiny! 15 mm sides ought to do it.
  • Don’t have a tiny dovetail bit on hand, so make that as well.
  • Of course, do it all without CNC in free-machining style.
  • Whoops the brass stock is smaller than expected, so find a clever solution.
  • That birthday? It’s tomorrow, by the way.

The project was a success, and a few small learning experiences presented themselves. One is that the shape of a dovetail plays tricks on the human eye. Geometrically speaking, the two halves are even but it seems as though one side is slightly larger than the other. [mitxela] says that if he were to do it again, he’d make the aluminum side slightly larger to compensate for this visual effect. Also, deburring with a knife edge on such a small piece flattened the edges ever so slightly, causing the fit to appear less precise than it actually is.

Still, it was a success and a learning experience. Need more evidence that [mitxela] thrives on challenge? Take a look at his incredible vector game console project.

This Dibbling Plate Will Grow Your Love For Sowing

One of the best things about 3D printers and laser cutters is their ability to produce specialized tools that steal time back from tedious processes. Seed sowing is a great example of this. Even if you only want to sow one tray with two dozen or so seeds, you still have to fill the tray with soil, level it off, compress it evenly, and poke all the holes. When seed sowing is the kernel of your bread and butter, doing all of that manually will eat up a lot of time.

There are machines out there to do dibbling on a large scale, but [Michael Ratcliffe] has been dabbling in dibbling plates for the smaller-scale farm. He’s created an all-in-one tool that does everything but dump the soil in the tray. Once you’ve done that, you can use edge to level off the excess soil, compress it with the back side, and then flip to the bed-of-nails side to make all the holes at once. It comes apart easily, so anyone can replace broken or dulled dibblers.

[Michael] is selling these fairly cheaply, but you can find all the files and build instructions out there in the Thingiverse. We planted the demo video after the break.

More into micro-greens? 3D printing can feed that fixation, too.

Continue reading “This Dibbling Plate Will Grow Your Love For Sowing”

2D-Scanner Records Surfboard Profiles For Posterity

[Ryan Schenk] had a problem: he built the perfect surfboard. Normally that wouldn’t present a problem, but in this case, it did because [Ryan] had no idea how he carved the gentle curves on the bottom of the board. So he built this homebrew 2D-scanner to make the job of replicating his hand-carved board a bit easier.

Dubbed the Scanbot 69420 – interpretation of the number is left as an exercise for the reader, my dude – the scanner is pretty simple. It’s just an old mouse carrying a digital dial indicator from Harbor Freight. The mouse was gutted, with even the original ball replaced by an RC plane wheel. The optical encoder and buttons were hooked to an Arduino, as was the serial output of the dial indicator. The Arduino consolidates the data from both sensors and sends a stream of X- and Z-axis coordinates up the USB cable as the rig slides across the board on a straightedge. On the PC side, a Node.js program turns the raw data into a vector drawing that represents the profile of the board at that point. Curves are captured at various points along the length of the board, resulting in a series of curves that can be used to replicate the board.

Yes, this could have been done with a straightedge, a ruler, and a pencil and paper – or perhaps with a hacked set of calipers – but that wouldn’t be nearly as much fun. And we can certainly see applications for this far beyond the surfboard shop.

Soldering Your Own Soldering Iron

A device that even DIY enthusiasts don’t usually think to DIY is the humble soldering iron. Yet, that’s exactly what one Hackaday.io user did by building a USB-powered soldering pen with better performance than a $5 Chinese soldering pen.

The project draws inspiration from another Weller RT tip-based soldering pen by [vlk], although this project has a simpler display than an OLED. Slovakia-based maker [bobricius] was inspired by the DiXi ATSAMD11C14-based development board. The project uses the same 32-bit ATMEL ARM microcontroller with a USB bootloader, which makes updating the firmware a lot easier.

Two buttons control the heat (+/-) and the jack for the Weller RT soldering tip controls the power out with PWM. For the display, 20 Charlieplexed 3014 LEDs are used to show the temperature from 0-399. The last missing LED is left out since 5 GPIO pins can only drive 20 LEDs.

Assuming that the main heating controls stay the same as [vlk]’s project, the pen uses a current sensor and heating controller for PID control of a heating module, which connects to the SMT connector for the Weller RT soldering iron tip. The temperature sensor uses a an op-amp for amplification of the signal from a type K thermocouple.

While there aren’t currently GERBER files for the PCB yet, the project is based on the open-source OLED display soldering pen project by [vlk], whose schematic for the device is published.

Continue reading “Soldering Your Own Soldering Iron”

When Engineering, Fine Art, And ASMR Collide

The success that [Julian Baumgartner] has found on YouTube is a perfect example of all that’s weird and wonderful about the platform. His videos, which show in utterly engrossing detail the painstaking work that goes into restoring and conserving pieces of fine art, have been boosted in popularity by YouTube’s Autonomous Sensory Meridian Response (ASMR) subculture thanks to his soft spoken narration. But his latest video came as something of a surprise to lovers of oil paintings and “tingles” alike, as it revealed that he’s also more than capable of scratch building his own equipment.

Anyone who’s been following his incredible restorations will be familiar with his heated suction table, which is used to treat various maladies a canvas may be suffering from. For example, by holding it at a sufficiently high temperature for days on end, moisture can be driven out as the piece is simultaneously smoothed and flattened by the force of the vacuum. But as [Julian] explains in the video after the break, the heated suction table he’s been using up to this point had been built years ago by his late father and was starting to show its age. After a recent failure had left him temporarily without this important tool, he decided to design and build his own fault-tolerant replacement.

The table itself is built with a material well known to the readers of Hackaday: aluminum extrusion. As [Julian] constructs the twelve legged behemoth, he extols the many virtues of working with 4040 extrusion compared to something like wood. He then moves on to plotting out and creating the control panel for the table with the sort of zeal and attention to detail that you’d expect from a literal artist. With the skeleton of the panel complete, he then begins wiring everything up.

Underneath the table’s 10 foot long surface of 6061 aluminum are 6 silicone heat pads, each rated for 1,500 watts. These are arranged into three separate “zones” for redundancy, each powered by a Crydom CKRD2420 solid state relay connected to a Autonics TC4M-14R temperature controller. Each zone also gets its own thermocouple, which [Julian] carefully bonds to the aluminum bed with thermally conductive epoxy. Finally, a Gast 0523-V4-G588NDX vacuum pump is modified so it can be activated with the flick of a switch on the control panel.

What we like most about this project is that it’s more than just a piece of equipment that [Julian] will use in his videos. He’s also released the wiring diagram and Bill of Materials for the table on his website, which combined with the comprehensive build video, means this table can be replicated by other conservators. Whether it’s restoring the fine details on Matchbox cars or recreating woodworking tools from the 18th century, we’re always excited to see people put their heart into something they’re truly passionate about.

Continue reading “When Engineering, Fine Art, And ASMR Collide”

How Do Those Component Testers Work?

Most people have at least seen those cheap component testers you can buy on the Chinese websites for $10 or so. If you haven’t seen them before, they usually have some kind of multi pin socket. You put a component in the socket and it will identify — with a push of a button — what the part is, which pin is which, and the value of the part. For example, you can insert a resistor, a capacitor, an inductor, a diode, or a transistor and get a readout of which pin is which. It seems like magic, but [Andreas Spiess] did the research on how it all works and summed up his findings in a recent video.

[Andreas] even quotes our earlier post on the topic and, as we did, dug into the original developers of the device which has been cloned over and over by Chinese sellers. Although there have been some divergence with all the different versions, the basic idea is the same. An AVR CPU uses some analog and digital trickery to make a lot of different measurements.

Continue reading “How Do Those Component Testers Work?”