Mechanical 7-Segment Display Combines Servos And LEGO

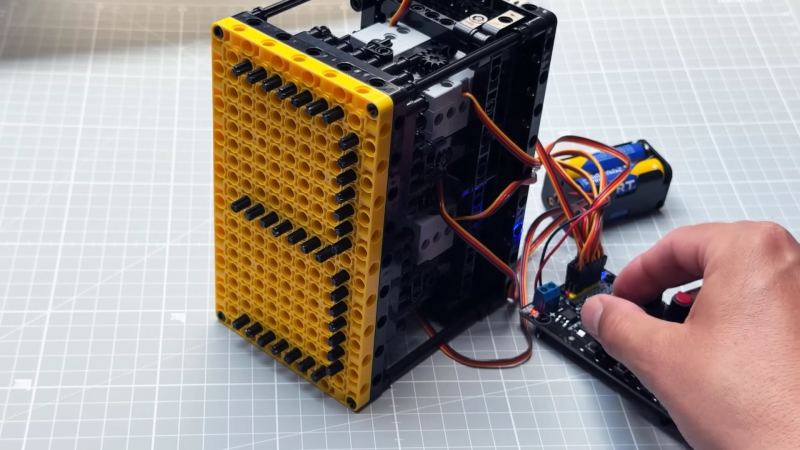
If you need a seven-segment display for a project, you could just grab some LED units off the shelf. Or you could build something big and electromechanical out of Lego. That’s precisely what [upir] did, with attractive results.

The build relies on Lego Technic parts, with numbers displayed by pushing small black axles through a large yellow faceplate. This creates a clear and easy to read display thanks to the high contrast. Each segment is made up of seven axles that move as a single unit, driven by a gear rack to extend and retract as needed. By extending and retracting the various segments in turn, it’s possible to display all the usual figures you’d expect of a seven-segment design.

It’s worth noting, though, that not everything in this build is Lego. The motors that drive the segments back and forth are third-party components. They’re Geekservo motors, which basically act as Lego-mountable servos you can drive with the electronics of your choice. They’re paired with an eight-channel servo driver board which controls each segment individually. Ideally, though, we’d see this display paired with a microcontroller for more flexibility. [upir] leaves that as an exercise for the viewer for now, with future plans to drive it with an Arduino Uno.

Design files are on Github for the curious. We’ve featured some similar work before, too, because you really can build anything out of Lego. Video after the break.

Continue reading “Mechanical 7-Segment Display Combines Servos And LEGO”

Robot Dinosaur YOLOs Colors And Shapes For Kids

YOLO can mean many things, but in the context of [be_riddickulous]’s AI Talking Robot Dinosaur it refers to the “You Only Look Once” YOLOv11 object-detection algorithm by Ultralytics, the method by which this adorable dino recognizes colors and shapes to teach them to children.

If you’re new to using YOLO or object recognition more generally, [be_riddiculous]’s tutorial is not a bad place to get started. She goes through how many images you’ll need and what types to get the shape-and-color recognition needed for this project, as well as how to annotate them and train the model, either locally or in the cloud.

The project itself is an adorable paper-mache dinosaur with a servo-actuated mouth hiding some LEDs and a Raspberry Pi camera module to provide images. In operation, the dinosaur “talks” to children using pre-recorded voice lines, inviting them to play a game and put a specific shape, or shape of a specific color (or both) in its mouth. Then the aforementioned object detection (running on a laptop) goes “YOLO” and identifies the shape so the toy can provide feedback on the child’s choice via a speaker in the belly of the beast.

The link to the game code is currently not valid, but it looks like they used PyGame for the audio output code. A servo motor controls the mouth, but without that code it’s not entirely clear to us what it’s doing. We expect by the time you read this there’s good odds [be_riddickulous] will have fixed that link and you can see for yourself.

The only thing that holds this back from being a great toy to put in every Kindergarten class is the need to have a laptop close by to plug the webcam into. A Raspberry Pi 5 ought to have the horsepower to run YOLOv11, so with a little extra effort the whole thing could be standalone — there might even be room in there for batteries.We’ve had other hacks aimed at little ones, like a kid-friendly computer to relive the glory days of the school computer lab or one of the many iterations of the RFID jukebox idea. If you want to wow the kiddos with AI, perhaps take a look at this talking Santa plush.

Got a cool project, AI, kid-related, or otherwise? Don’t forget to toss us a tip!

Electromechanical Atari Is A Steampunk Meccano Masterpiece

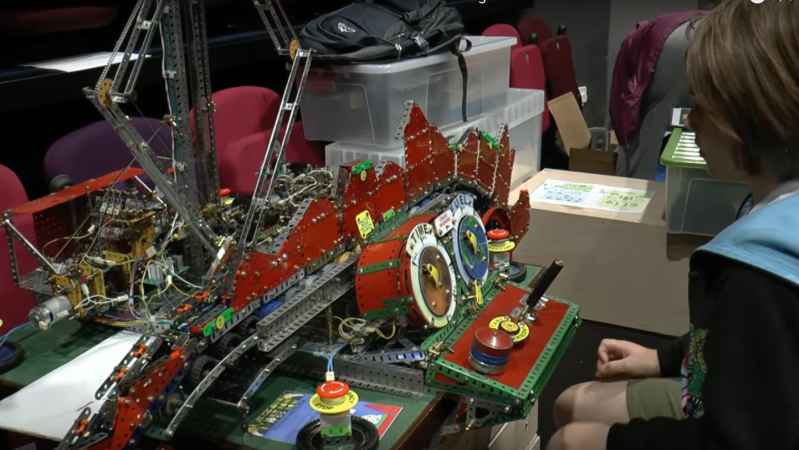
If William Gibson and Bruce Sterling had written an arcade scene into “The Difference Engine”, it probably would have looked a lot like [Pete Wood]’s Meccano Martian Mission, as illustrated in the video below by the [London Meccano Club]. Meccano Martian Mission is an homage to Atari’s 1978 Lunar Lander video game, but entirely electromechanical and made of– you guessed it– Meccano.

Continue reading “Electromechanical Atari Is A Steampunk Meccano Masterpiece”

Build a $35 400 MHz Logic Analyzer

Build A 400 MHz Logic Analyzer For $35

What do you do when you’re a starving student and you need a 400 MHz logic analyzer for your digital circuit investigations? As [nanofix] shows in a recent video, you find one that’s available as an open hardware project and build it yourself.

The project, aptly named LogicAnalyzer was developed by [Dr. Gusman] a few years back, and has actually graced these pages in the past. In the video below, [nanofix] concentrates on the mechanics of actually putting the board together with a focus on soldering. The back of the build is the Raspberry Pi Pico 2 and the TXU0104 level shifters.

If you’d like to follow along at home, all the build instructions and design files are  available on GitHub. For your convenience the Gerber files have been shared at PCBWay

Of course we have heaps of material here at Hackaday covering logic analyzers. If you’re interested in budget options check out $13 Scope And Logic Analyzer Hits 18 Msps or how to build one using a ZX Spectrum! If you’re just getting started with logic analyzers (or if you’re not sure why you should) check out Logic Analyzers: Tapping Into Raspberry Pi Secrets.

Continue reading “Build A 400 MHz Logic Analyzer For $35”

A Lego vehicle crossing a gap between two benches.

Making A LEGO Vehicle Which Can Cross Large Gaps

Here is a hacker showing off their engineering chops. This video shows successive design iterations for a LEGO vehicle which can cross increasingly large gaps.

At the time of writing this video from [Brick Experiment Channel] has been seen more than 110,000,000 times, which is… rather a lot. We guess with a view count like that there is a fairly good chance that many of our readers have already seen this video, but this is the sort of video one could happily watch twice.

Continue reading “Making A LEGO Vehicle Which Can Cross Large Gaps”

3D Printed Tank Has A Cannon To Boot

Few of us will ever find ourselves piloting a full-sized military tank. Instead, you might like to make do with the RC variety. [TRDB] has whipped up one of their own design which features a small little pellet cannon to boot.

The tank is assembled from 3D printed components — with PETG filament being used for most of the body and moving parts, while the grippy parts of the treads are printed in TPU. The tank’s gearboxes consist of printed herringbone gears, and are driven by a pair of powerful 775 brushed DC motors, which are cooled by small 40 mm PC case fans. A rather unique touch are the custom linear actuators, used to adjust the tank’s ride height and angle relative to the ground. The small cannon on top is a flywheel blaster that fires small plastic pellets loaded from a simple drum magazine. Running the show is an ESP32, which responds to commands from [TRDB]’s own custom RC controller built using the same microcontroller.

As far as DIY RC tanks go, this is a very complete build. We’ve seen some other great work in this space, like this giant human-sized version that’s big enough to ride in.

Continue reading “3D Printed Tank Has A Cannon To Boot”

Render of a simple clockwork orrery

Planetary Poetry With A Tiny Digital Core

Some hacks just tickle the brain in a very particular way. They’re, for a change, not overly engineered; they’re just elegant, anachronistic, and full of mischief. That’s exactly what [Frans] pulls off with A Gentleman’s Orrery, a tiny, simple clockwork solar system. Composed of shiny brass and the poise of 18th-century craftsmanship, it hides a modern secret: there’s barely any clockwork inside. You can build it yourself.

Mechanism of a simple clockwork orreryPeek behind the polished face and you’ll find a mechanical sleight of hand. This isn’t your grandfather’s gear-laden planetarium. Instead of that, it operates on a pared-down system that relies on a stepper motor, driving planetary movement through a 0.8 mm axle nested inside a 1 mm brass tube. That micro-mechanical coupling, aided by a couple of bevel gears, manages to rotate the Moon just right, including its orientation. Most of the movement relies on clever design, not gear cascades. The real wizardry happens under the hood: a 3D-printed chassis cradles an ESP32-C6, a TTP223 capacitive touch module, STSPIN220 driver, and even a reed switch with magnetic charging.

You can even swap out the brass for a stone shell where the full moon acts as the touch control. It’s tactile, it’s poetic, and therefore, a nice hack for a weekend project. To build it yourself, read [Frans]’ Instructable.

Continue reading “Planetary Poetry With A Tiny Digital Core”