Creating Surreal Short Films From Machine Learning

Ever since we first saw the nightmarish artwork produced by Google DeepDream and the ridiculous faux paintings produced from neural style transfer, we’ve been aware of the ways machine learning can be applied to visual art. With commercially available trained models and automated pipelines for generating images from relatively small training sets, it’s now possible for developers without theoretical knowledge of machine learning to easily generate images, provided they have sufficient access to GPUs. Filmmaker [Kira Bursky] took this a step further, creating a surreal short film that features characters and textures produced from image sets.

She began with about 150 photos of her face, 200 photos of film locations, 4600 photos of past film productions, and 100 drawings as the main datasets.

via [Kira Bursky]
Using GAN models for nebulas, faces, and skyscrapers in RunwayML, she found the results from training her face set disintegrated, realistic, and painterly. Many of the images continue to evoke aspects of her original face with distortions, although whether that is the model identifying a feature common to skyscrapers and faces or our own bias towards facial recognition is up to the viewer.

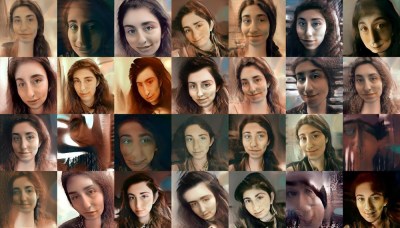
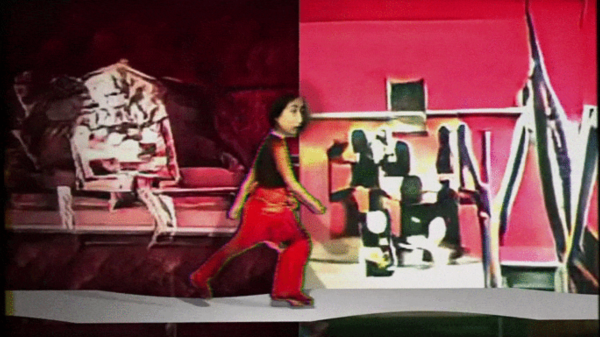
On the other hand, the results of training the film set photos on models of faces and bedrooms produced abstract textures and “surreal and eerie faces like a fever dream”. Perhaps, unlike the familiar anchors of facial features, it’s the lack of recognizable characteristics in the transformed images that gives them such a surreal feel.

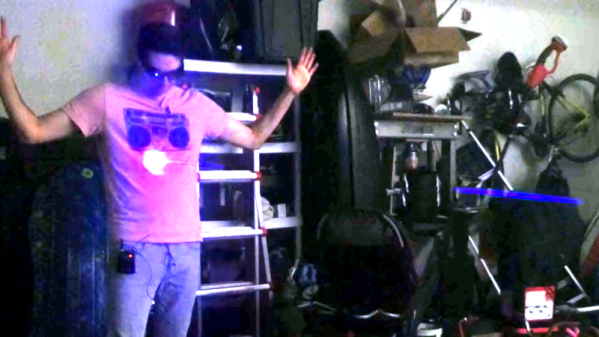
[Kira] certainly uses these results to her advantage, brainstorming a concept for a short film that revolves around her main character experiencing nightmares. Although her objective was to use her results to convey a series of emotionally striking scenes, the models she uses to produce these scenes are also quite interesting.

She started off by using the MiDaS model, created by a team of researchers from ETH Zurich and Intel, for generating monocular depth maps. The results associated levels inside of an image with their appropriate depth in relation to one another. She also used the MASK R-CNN for masking out the backgrounds in generated faces and combined her generated images in Photoshop to create the main character for her short film.

via [Vox]
In order to simulate the character walking, she used the Liquid Warping GAN, a framework for human motion imitation and appearance transfer, created by a team from ShanghaiTech University and Tencent AI Lab. This allowed her to take her original images and synthesize results from reference poses of herself going through the motions of walking by using a 3D body mesh recovery module. Later on, she applied similar techniques for motion tracking on her faces, running them through the First Order Motion Model to simulate different emotions. She went on to join her facial movements with her character using After Effects.

Bringing the results together, she animated a 3D camera blur using the depth map videos to create a less disorienting result by providing anchor points for the viewers and creating a displacement map to heighten the sense of depth and movement within the scenes. In After Effects, she also overlaid dust and film grain effects to give the final result a crisper look. The result is a surprisingly cinematic film entirely made of images and videos generated from machine learning models. With the help of the depth adjustments, it almost looks like something that you might see in a nightmare.

Check out the result below:

Continue reading “Creating Surreal Short Films From Machine Learning”

Freeze Laser Beams — Sort Of

They say a picture is worth a thousand words, and by that logic a video must be worth millions. However, from nearly the dawn of photography around 1840, photographers have made fake photographs.  In modern times, Photoshop and Deepfake make you mistrust images and videos. [Action Lab] has a great camera trick in which it looks like he can control the speed of light. You can see the video below.

You probably can guess that he can’t really do it. But he has videos where a real laser beam appears to slowly move across the screen like a laser blaster shot in a movie. You might think you only need to slow down the video speed, but light is really fast, so you probably can’t practically pull that stunt.

Continue reading “Freeze Laser Beams — Sort Of”

Automatic Timelapses, Made Educational And Easy

Timelapse fragment from an infrared sky camera watching cloud patterns.

There are plenty of ways to create timelapse videos, but [Andy] has an efficient method for ensuring up-to-date ones exist for his infrared sky camera, and he has it running thanks to some well-documented shell scripts on a spare Raspberry Pi. The resulting timelapse video is always available from the web, and always up-to-date for the current day.

The idea is to automatically fetch images from a remote source (in his case, an infrared sky camera) and turn them into a cumulative video that is regularly updated for the day in question. The resulting video file is either served from the same machine, or sent elsewhere. All that’s needed besides a source for the stills are two shell scripts and some common Linux utilities.

Since [Andy] is mainly interested in tracking clouds his system only runs during daylight hours, but it can be easily changed. In fact, [Andy]’s two shell scripts are great project resources, not only because they are easily modified and well documented, but because he doesn’t make assumptions about how well one might know the command line. He also provides tips from experience; for example he has found that a 120 second interval makes for the best timelapses.

[Andy] runs his scripts on an Raspberry Pi 4, but any Linux system will do. For those who might prefer a more embedded approach, the ESP32-CAM can make a great time lapse camera with remarkably little effort.

Capture Device Firmware Hack Unlocks All The Pixels

According to [Mike Walters], the Elgato Cam Link 4K is a great choice if you’re looking for a HDMI capture device that works under Linux. But the bad news is, it wouldn’t work with any of the video conferencing software he tried to use it with because they expect the video stream to be in a different pixel format. For most people, that would probably have been the end of the story. But you’re reading this on Hackaday, so obviously he didn’t give up without a fight.

Early on, [Mike] found there was a software workaround for this exact issue. The problem isn’t that the Elgato can’t generate the desired format, it’s that the video conferencing programs just don’t know how to ask it to switch modes. The software fix is to create a dummy Video4Linux device and use that to change the format in real-time using ffmpeg. It’s a clever trick if you’ve got a conference call coming up in a few minutes, but it does waste CPU resources and adds some unnecessary hoop jumping.

Putting the device into bootloader mode.

Inspired by the software fix, [Mike] wondered if there was a way he could simply force the Elgato to output video in the desire format by default. He found a firmware dump for the device online, and found where the pixel formats were referenced by searching for their names in ASCII with hexdump. Looking through the source for the Linux USB Video Class (UVC) driver, he was then able to determine what the full 16 byte sequence should be for each video mode was so he could zero out the unwanted ones. Then it was just a matter of flashing his modified firmware back to the hardware.

But there was a problem: with the modified firmware installed, the device stopped working. After investigating the obvious culprits, [Mike] broke out the oscilloscope and hooked it up to the Elgato’s flash chip. It turns out that due to a bug in the program he was using, the SPI erase commands weren’t getting sent during the flash. This lead to corrupted firmware which was keeping the Elgato from booting. After making a pull request with his fixes, the firmware flashed without incident and the capture device now does double-duty as a webcam when necessary.

We could certainly think of easier and quicker was to roll your own webcam, but we’re glad that [Mike] took the time to modify his Elgato Cam Link 4K and document it. It’s a fantastic example of practical firmware hacking, even if you’re not in the market for a new high-definition video conferencing rig.

Background Substitution, No Green Screen Required

All this working from home that people have been doing has a natural but unintended consequence: revealing your dirty little domestic secrets on a video conference. Face time can come at a high price if the only room you have available for work is the bedroom, with piles of dirty laundry or perhaps the incriminating contents of one’s nightstand on full display for your coworkers.

There has to be a tech fix for this problem, and many of the commercial video conferencing platforms support virtual backgrounds. But [Florian Echtler] would rather air his dirty laundry than go near Zoom, so he built a machine-learning background substitution app that works with just about any video conferencing platform. Awkwardly dubbed DeepBackSub — he’s working on a better name — the system does the hard work of finding the person in the frame with Tensorflow Lite. After identifying everything in the frame that’s a person, OpenCV replaces everything that’s not with whatever you choose, and the modified scene is piped over a virtual video device to the videoconferencing software. He’s tested on Firefox, Skype, and guvcview so far, all running on Linux. The resolution and framerates are limited, but such is the cost of keeping your secrets and establishing a firm boundary between work life and home life.

[Florian] has taken the need for a green screen out of what’s formally known as chroma key compositing, which [Tom Scott] did a great primer on a few years back. A physical green screen is the traditional way to do this, but we honestly think this technique is great and can’t wait to try it out with our Hackaday colleagues at the weekly videoconference.

Adding RGB To A CRT

There was a time when all TVs came with only an antenna socket on their backs, and bringing any form of video input to them meant dicing with live-chassis power supplies. Then sets with switch-mode supplies made delving into a CRT TV much safer, and we could bodge in composite video and even RGB sockets by tapping into their circuitry. For Europeans the arrival of the SCART socket gave us ready-made connectivity, but in the rest of the world there was still a need to break out the soldering iron for an RGB input. [Jacques Gagnon] is in Canada, and has treated us to a bit of old-school TV input hacking as he put an RGB socket on his JVC CRT set.

Earlier hacks had inventive incursions into discrete analogue circuitry, but on later sets such as this one the trick was to take advantage of the on-screen-display features. The signal processing chip would usually have an RGB input with a blanking input to turn of the picture during the OSD chip’s output. These could be readily hijacked to provide an RGB input, and this is the course taken here. We see a VGA socket on the rear panel going to a resistor network on a piece of protoboard stuck in a vacant space on the PCB, from which a set of lines then go to the signal processing chip. The result is a CRT gaming monitor for retro consoles, of the highest quality.

For those of us who cut our teeth on CRT TVs it’s always good to see a bit of TV hacking. It’s a mod we’ve seen before, too.

Velocity Based Training, With A Camera

In the world of weight training, the buzzword of the moment is VBT, or Velocity Based Training. This involves sensors being used to measure the speed and position of a weight as it moves through each repetition, and thus provide instant feedback for the athlete and glean information from which they can work upon their training routine. Typically the sensors involved may be accelerometers, but [Kris] has taken a different tack using a webcam and machine vision to do the same job.

The barbell has a green disc attached to its end, and the software tracks it and measures the velocity. It issues a warning when the velocity of a repetition drops below a preset level, telling the athlete to stop their set before pushing themselves too far. Under the hood is a Python script and OpenCV, and the write-up in his GitHub repository takes us through its camera calibration to remove the effects of distortion, and set-up. All calibration of distances within the image is made through the known size of the green disc, allowing the software to accurately chart the distance through which it travels.

We’ve not seen a machine vision approach to weight training before, but we have seen one using accelerometers. Maybe this project will re-ignite interest in this field.