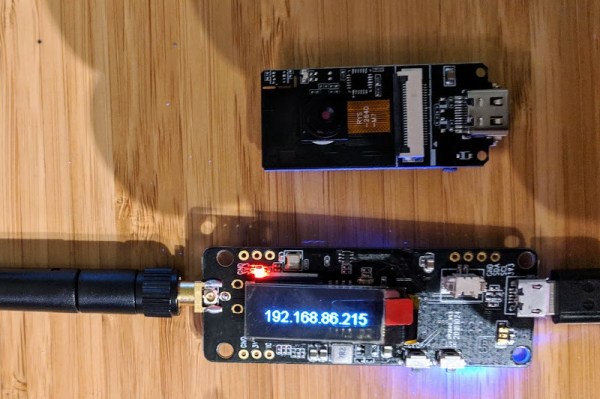
Looking for a cheap way to keep an eye on something? [Kevin Hester] pointed us to a way to make a WiFi webcam for under $10. This uses one of the many cheap ESP32 dev boards available, along with the Internet of Things platform PlatformIO and a bit of code that creates an RTSP server. This can be accessed by any software that supports this streaming protocol, and a bit of smart routing could put it on the interwebs. [Kevin] claims that the ESP32 camera dev boards he uses can be found for less than $10, but we found that most of them cost about $15. Either way, that’s cheaper than most commercial streaming cameras.
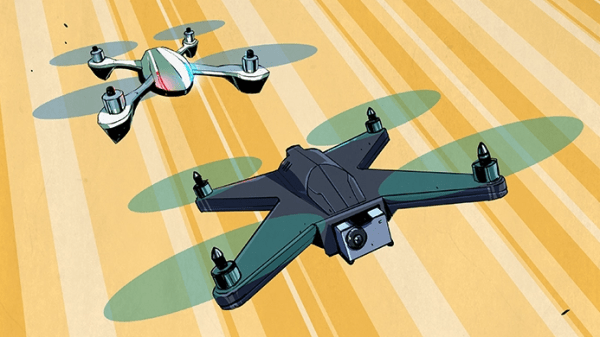
Drone racing is nifty as heck, and a need all races share is a way to track lap times. One way to do it is to use transponders attached to each racer, and use a receiver unit of some kind to clock them as they pass by. People have rolled their own transponder designs with some success, but the next step is ditching add-on transponders entirely, and that’s exactly what the Delta 5 Race Timer project does.
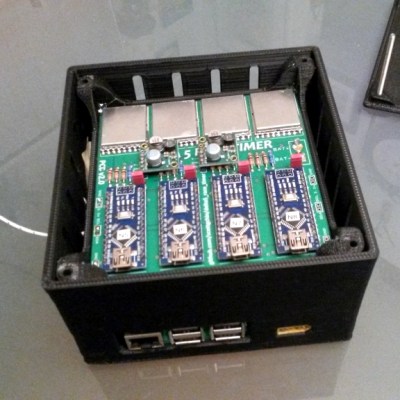
A sample Delta 5 Race Timer build (Source: ET Heli)
The open-sourced design has a clever approach. In drone racing, each aircraft is remotely piloted over a wireless video link. Since every drone in a race already requires a video transmitter and its own channel on which to broadcast, the idea is to use the video signal as the transponder. As a result, no external hardware needs to be added to the aircraft. The tradeoff is that using the video signal in this way is trickier than a purpose-made transponder, but the hardware to do it is economical, accessible, and the design is well documented on GitHub.
The hardware consists of RX508 RX5808 video receiver PCBs modified slightly to enable them to communicate over SPI. Each RX508 RX5808 is attached to its own Arduino, which takes care of low-level communications. The Arduinos are themselves connected to a Raspberry Pi over I2C, allowing the Pi high-level control over the receivers while it serves up a web-enabled user interface. As a bonus, the Pi can do much more than simply act as a fancy stopwatch. The races themselves can be entirely organized and run through the web interface. The system is useful enough that other projects using its framework have popped up, such as the RotorHazard project by [PropWashed] which uses the same hardware design.
While rolling one’s own transponders is a good solution for getting your race on, using the video transmission signal to avoid transponders entirely is super clever. The fact that it can be done with inexpensive, off the shelf hardware is just icing on the cake.
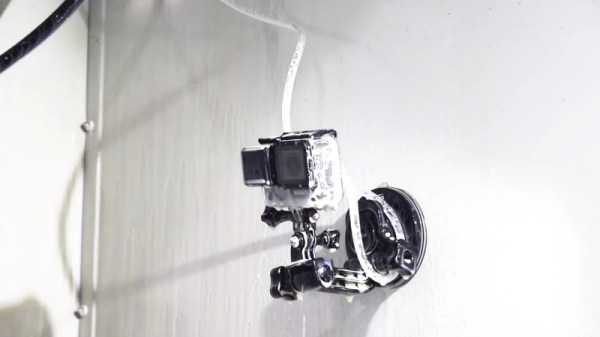
Before the GoPro, shooting video of messy, fast-paced, or dangerous things was very different. There were commercial sports camera rigs and various industrial solutions, but the GoPro, with its waterproof housings and diminutive size, was the revolutionary, stick-it-anywhere camera. Despite this, the team at [tarkka] were having issues with the lens getting covered in coolant while shooting videos of their CNC machining projects. To solve this, they created an air knife to clean the lens.
The air knife consists of a wide, flat nozzle that is designed to blow fluid off of the lens. It’s a tidy 3D printed design, which wraps around the GoPro housing. Felt pads are used to give a snug fit, so the device simply slides into place and stays there. The device is fed from a hand-operated nozzle at present, though the team notes that this could be changed to a more permanent connection.
In testing, the device has performed well, even when under a constant barrage of coolant spray. This should make shooting CNC videos much easier for the team, who were formerly required to manually wipe the camera down several times during a shoot. The build was actually inspired by an earlier build by [Edge Precision], which used machined aluminum parts to create a similar tool.
The GoPro remains a popular camera wherever a small and rugged device is required. Consider mounting one to a toy car for a weekend’s worth of fun. Video after the break.
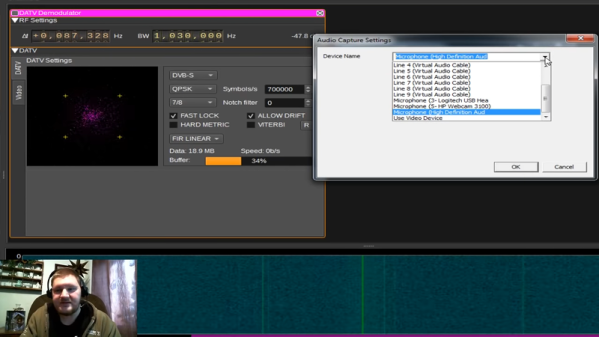
If you have experienced software defined radio (SDR) using the ubiquitous RTL SDR dongles, you are missing out on half of it. While those SDRs are inexpensive, they only receive. The next step is to transmit. [Corrosive] shows how he uses DATV Express along with a Lime SDR or a Pluto (the evaluation device from Analog Devices) to transmit video. He shows how to set it all up in the context of ham radio. An earlier video shows how to receive the signal using an SDR and some Windows software. The receiver will work with an RTL SDR or a HackRF board, too. You can see both videos, below.
The DATV Express software has plenty of options and since SDR if frequency agile, you ought to be able to use this on any frequency (within the SDR range) that you are allowed to use. At the end, he mentions that to really put these on the air you will want a filter and amplifier since the output is a bit raw and low powered.
The holy grail of display technology is to replicate what you see in the real world. This means video playback in 3D — but when it comes to displays, what is 3D anyway?
You don’t need me to tell you how far away we are from succeeding in replicating real life in a video display. Despite all the hype, there are only a couple of different approaches to faking those three-dimensions. Let’s take a look at what they are, and why they can call it 3D, but they’re not fooling us into believing we’re seeing real life… yet.
Most displays are looking to play things faster. We’ve got movies at 60 frames per second, and gaming displays that run at 144 fps. But what about moving in the other direction? [Bryan Boyer] wanted to try this out, so he built the VSMP, or Very Slow Movie Player. It’s a neat device that plays back a movie at about 24 fph (frames per hour) on an e-ink display to demonstrate something that [Bryan] calls Slow Seeing, which, he says “helps you see yourself against the smear of time.” A traditional epic-length movie is now going to run you greater than 8,000 hours of viewing.
Artistic considerations aside, it’s an interesting device from a technical point of view. [Bryan] built it from a 7.4-inch e-ink display from Pervasive Displays. The controller is connected to a Raspberry Pi Zero, which is running a Python script to convert a frame of the movie file into a dithered file, then send it to the display. Because the Pi Zero isn’t a very fast computer, this takes some time, and thus the slow speed of the VSMP. Originally, [Bryan] had set it up to run as fast as the system could manage, which was about 25 seconds per frame, or about 2 frames per minute. He decided to slow it down a bit further to the more attractive multiple of 24 frames per hour to contrast with the 24 frames per second of the original movie. He did this by using a CRON job that kicks of the conversion script once every 2.5 minutes and increments the frame counter. All of this is topped off with a nice 3D-printed case that has a lovely interference pattern to make a rather neat and intriguing project.
Perhaps the best part of this is see a time-lapse of the VSMP — life moves quickly around it while 2001: A Space Odyssey plays at normal speed.
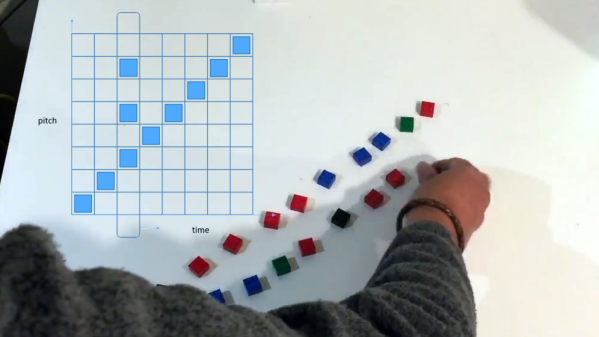
We’re not sure what it is, but something about LEGO and music go together like milk and cookies when it comes to DIY musical projects. [Paul Wallace]’s Lego Music project is a sequencer that uses the colorful plastic pieces to build and control sound, but there’s a twist. The blocks aren’t snapped onto anything; the system is entirely visual. A computer running OpenCV uses a webcam to watch the arrangement of blocks, and overlays them onto a virtual grid where the positions of the pieces are used as inputs for the sequencer. The Y axis represents pitch, and the X axis represents time.
Embedded below are two videos. The first demonstrates how the music changes based on which blocks are placed, and where. The second is a view from the software’s perspective, and shows how the vision system processes the video by picking out the colored blocks, then using their positions to change different values which has an effect on the composition as a whole.