Automatic MtG Card Sorter Separates Rags From Riches

Like many of us, [Michael Portera] was an avid trading card collector as a kid. Also like many of us, life got in the way, and the collections sat ignored in boxes until our mothers threatened to get rid of them (or skipped the threat altogether and sold them at a garage sale for next to nothing).

[Michael] was recently reunited with his collection of Magic cards, which vary in value as much as baseball or any other kind of collectible card. Now that his Friday nights are otherwise occupied, he decided to sell them off. But first, he had to know how much they’re worth.

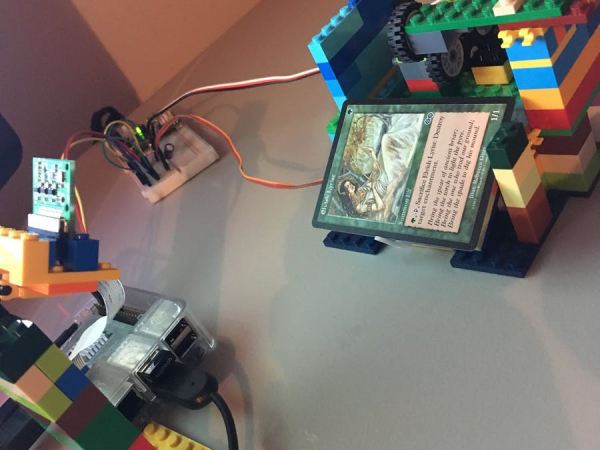
Manually sorting and pricing hundreds of cards would take longer than he’d like, so he built a sorter to automate the process. It takes a stack of MtG cards and uses servos and little tires to move them, one by one, into position. A short Python script runs the servos, tells a Raspi 3 camera take a picture of each one, and uploads it to Amazon AWS. Once the pictures are there, [Michael] uses a second script to grab the card title text from the picture and fetch the value through TCGPlayer’s pricing API.

This machine probably isn’t for purists or people with a bunch of originals and re-issues of the same card. We probably should have mentioned that he took out all the Black Lotuses and other obviously valuable cards first. Someone still has to assess the condition of each card, but at two seconds per card, it’s quite the time twister saver. Time Walk past the break to see it in action.

Tired of using dice or scratch paper for your life counter? Summon some Nixie tubes and make a cooler one.

Continue reading “Automatic MtG Card Sorter Separates Rags From Riches”

DIY SSR For Mains Switching

Typical power strips have their sockets tightly spaced. This makes it cumbersome to connect devices whose wall warts or power bricks are bulky — you end up losing an adjoining socket or two. And if the strip has a single power switch, you cannot turn off individual devices without unplugging them.

Planning to tackle both problems together, [Travis Hein] built himself some custom Dual SSR Controlled Socket Outlets for his workbench. He also decided to add remote switching ability so he could turn off individual sockets via a controller, Raspberry Pi, smartphone app or most ideally, a nice control panel on his desk consisting of a bank of switches.

The easiest solution for his problem would have been to just buy some off-the-shelf SSR or relay modules and wire them up inside his sockets. But he couldn’t find any with the features he wanted, and SSR’s were a little bit on the expensive side. Also, we wouldn’t have a project to write about – sometimes even the simple ones can show us a thing or two.

For starters, he walks us through a quick and simplified primer on figuring out thermal dissipation for the triacs which will be used on his boards. This is tricky since the devices are connected directly to utility voltage so he needs to take care of track clearances, mechanical separation as well as safety. However, for his first board prototypes, he did not add any heat sinking for the triacs, thereby limiting their use to low current loads. Since the SSR also needs to have a wide control voltage range, he describes how the two transistor constant-current input block works to limit opto-triac LED current over a range of 2 V to 30 V.

Before he moves on to his next prototype, [Travis] is looking for feedback to improve his design, make it safer, and figure out if it can pass safety protocols. Let him know via comments below.

Suitcase Computer Reborn With Raspberry Pi Inside

Fun fact, the Osborne 1 debuted with a price tag equivalent to about $5,000 in today’s value. With a gigantic 9″ screen and twin floppy drives (for making mix tapes, right?) the real miracle of the machine was its portability, something unheard of at the time. The retrocomputing trend is to lovingly and carefully restore these old machines to their former glory, regardless of how clunky or underpowered they are by modern standards. But sometimes they can’t be saved yet it’s still possible to gut and rebuild the machine with modern hardware, like with this Raspberry Pi used to revive an Osborne 1.

Purists will turn their nose up at this one, and we admit that this one feels a little like “restoring” radios from the 30s by chucking out the original chassis and throwing in a streaming player. But [koff1979] went to a lot of effort to keep the original Osborne look and feel in the final product. We imagine that with the original guts replaced by a Pi and a small LCD display taking the place of the 80 character by 24 line CRT, the machine is less strain on the shoulder when carrying it around. (We hear the original Osborne 1 was portable in the same way that an anvil is technically portable.) The Pi runs an emulator to get the original CP/M experience; it even runs Wordstar. The tricky part about this build was making the original keyboard talk to the Pi, which was accomplished with an Arduino that translates key presses to USB.

As an aside, if reading this has given you a twinge of nostalgia and you’re on the Eastern seaboard you may want to check out more vintage gear at the VCF East this weekend. If you hail from Europe, get your hack on with CP/M and a retrocomputing badge at Hackaday Belgrade one wee from now.

We’ve seen the Raspberry Pi pressed into retrocomputing duty before, of course. Here’s one used to emulate a Commodore 1541 disk drive, and another in the laptop Clive Sinclair never built.

Continue reading “Suitcase Computer Reborn With Raspberry Pi Inside”

No-Battery HD Video Streaming Does It With Backscatter

What if Google Glass didn’t have a battery? That’s not too far fetched. This battery-free HD video streaming camera could be built into a pair of eyeglass frames to stream HD video to a nearby phone or other receiver using no bulky batteries or external power source. Researchers at the University of Washington are using backscatter to pull this off.

The problem is that a camera which streams HD video wirelessly to a receiver consumes over 1 watt due to the need for a digital processor and transmitter. The researchers have separated the processing hardware into the receiving unit. They then send the analog pixels from the camera sensor directly to backscatter hardware. Backscatter involves reflecting received waves back to where they came from. By adding the video signal to those reflected waves, they eliminated the need for the power-hungry transmitter. The full details are in their paper (PDF), but here are the highlights.

Battery-free camera design approach

On the camera side, the pixel voltages (CAM Out) are an analog signal which is fed into a comparator along with a triangular waveform. Wherever the triangle wave’s voltage is lower than the pixel voltage, the comparator outputs a 0, otherwise, it outputs a 1. In this way, the pixel voltage is converted to different pulse widths. The triangular waveform’s minimum and maximum voltages are selected such that they cover the full possible range of the camera voltages.

The sub-carrier modulation with the XOR gate in the diagram is there to address the problem of self-interference. This is unwanted interference from the transmitter of the same frequency as the carrier. And so the PWM output is converted to a different frequency using a sub-carrier. The receiver can then filter out the interference. The XOR gate is actually part of an FPGA which also inserts frame and line synchronization patterns.

They tested two different implementations with this circuit design, a 112 x 112 grayscale one at up to 13 frames per second (fps) and an HD one. Unfortunately, no HD camera on the market gives access to the raw analog pixel outputs so they took HD video from a laptop using USB and ran that through a DAC and then into their PWM converter. The USB limited it to 10 fps.

The result is that video streaming at 720p and 10 fps uses as low as 250 μW and can be backscattered up to sixteen feet. They also simulated an ASIC which achieved 720p and 1080p at 60 fps using 321 μW and 806 μW respectively. See the video below for an animated explanation and a demonstration. The resulting video is quite impressive for passive power only.

If the University of Washington seems familiar in the context of backscatter, that’s because we’ve previously covered their battery-free (almost) cell phone. Though they’re not the only ones experimenting with it. Here’s where backscatter is being used for a soil network. All of this involves power harvesting, and now’s a great time to start brushing up on these concepts and building your own prototypes. The Hackaday Prize includes a Power Harvesting Challenge this year.

Continue reading “No-Battery HD Video Streaming Does It With Backscatter”

The Solid State Weather Station

Building personal weather stations has become easier now than ever before, thanks to all the improvements in sensors, electronics, and prototyping techniques. The availability of cheap networking modules allows us to make sure these IoT devices can transmit their information to public databases, thereby providing local communities with relevant weather data about their immediate surroundings.

[Manolis Nikiforakis] is attempting to build the Weather Pyramid — a completely solid-state, maintenance free, energy and communications autonomous weather sensing device, designed for mass scale deployment. Typically, a weather station has sensors for measuring temperature, pressure, humidity, wind speed and rainfall. While most of these parameters can be measured using solid-state sensors, getting wind speed, wind direction and rainfall numbers usually require some form of electro-mechanical devices.

The construction of such sensors is tricky and non-trivial. When planning to deploy in large numbers, you also need to ensure they are low-cost, easy to install and don’t require frequent maintenance. Eliminating all of these problems could result in more reliable, low-cost weather stations to be built, which can then be installed in large numbers at remote locations.

[Manolis] has some ideas on how he can solve these problems. For wind speed and direction, he plans to obtain readings from the accelerometer, gyroscope, and compass in an inertial sensor (IMU), possibly the MPU-9150. The plan is to track the motion of the IMU sensor as it swings freely from a tether like a pendulum. He has done some paper-napkin calculations and he seems confident that it will provide the desired results when he tests his prototype. Rainfall measurement will be done via capacitive sensing, using either a dedicated sensor such as the MPR121 or the built-in touch capability in the ESP32. The design and arrangement of the electrode tracks will be important to measure the rainfall correctly by sensing the drops. The size, shape and weight distribution of the enclosure where the sensors will be installed is going to be critical too since it will impact the range, resolution, and accuracy of the instrument. [Manolis] is working on several design ideas that he intends to try out before deciding if the whole weather station will be inside the swinging enclosure, or just the sensors.

If you have any feedback to offer before he proceeds further, let him know via the comments below.

Circuit VR: Current Mirrors

Last time we looked at Spice models of a current sink. We didn’t look at some of the problems involved with a simple sink, and for many practical applications, they are perfectly adequate. However, you’ll often see more devices used to improve the characteristics of the current sink or source. In particular, a common design is a current mirror which copies a current from one device to another. Usually, the device that sets the current is in a configuration that makes it very stable while the other device handles the load current.

For example, some transistor parameters vary based on the output voltage which causes small nonlinearities in the output. But if the setting transistor has a fixed voltage across it, that won’t be a problem. The only problem with mirror schemes is that the transistors involved all have to match in key characteristics. For that reason, mirrors are usually better on ICs where the transistors are all more or less the same. You can get discrete transistors that have multiple devices built on a single substrate, but these are not very common.

Continue reading “Circuit VR: Current Mirrors”

The Pros And Cons Of Microcontrollers For Boost Converters

It never fails — we post a somewhat simple project using a microcontroller and someone points out that it could have been accomplished better with a 555 timer or discrete transistors or even a couple of vacuum tubes. We welcome the critiques, of course; after all, thoughtful feedback is the point of the comment section. Sometimes the anti-Arduino crowd has a point, but as [Great Scott!] demonstrates with this microcontroller-less boost converter, other times it just makes sense to code your way out of a problem.

Built mainly as a comeback to naysayers on his original boost-converter circuit, which relied on an ATtiny85, [Great Scott!] had to go to considerable lengths to recreate what he did with ease using a microcontroller. He started with a quick demo using a MOSFET driver and a PWM signal from a function generator, which does the job of boosting the voltage, but lacks the feedback needed to control for varying loads.

Ironically relying on a block diagram for a commercial boost controller chip, which is probably the “right” tool for the job he put together the final circuit from a largish handful of components. Two op amps form the oscillator, another is used as a differential amp to monitor the output voltage, and the last one is a used as a comparator to create the PWM signal to control the MOSFET. It works, to be sure, but at the cost of a lot of effort, expense, and perf board real estate. What’s worse, there’s no simple path to adding functionality, like there would be for a microcontroller-based design.

Of course there are circuits where microcontrollers make no sense, but [Great Scott!] makes a good case for boost converters not being one of them if you insist on DIYing. If you’re behind on the basics of DC-DC converters, fear not — we’ve covered that before.

Continue reading “The Pros And Cons Of Microcontrollers For Boost Converters”