Remember the Key Bridge collapse? With as eventful a year as 2025 has been, we wouldn’t blame anyone for forgetting that in March of 2024, container ship MV Dali plowed into the bridge across Baltimore Harbor, turning it into 18,000 tons of scrap metal in about four seconds, while taking the lives of six very unlucky Maryland transportation workers in the process. Now, more than a year and a half after the disaster, we finally have an idea of what caused the accident. According to the National Transportation Safety Board’s report, a loss of electrical power at just the wrong moment resulted in a cascade of failures, leaving the huge vessel without steerage. However, it was the root cause of the power outage that really got us: a wire with an incorrectly applied label.
Hackaday Podcast Episode 346: Melting Metal In The Microwave, Unlocking Car Brakes And Washing Machines, And A Series Of Tubes
Wait, what? Is it time for the podcast again? Seems like only yesterday that Dan joined Elliot for the weekly rundown of the choicest hacks for the last 1/52 of a year. but here we are. We had quite a bit of news to talk about, including the winners of the Component Abuse Challenge — warning, some components were actually abused for this challenge. They’re also a trillion pages deep over at the Internet Archive, a milestone that seems worth celebrating.
As for projects, both of us kicked things off with “Right to repair”-adjacent topics, first with a washing machine that gave up its secrets with IR and then with a car that refused to let its owner fix the brakes. We heated things up with a microwave foundry capable of melting cast iron — watch your toes! — and looked at a tiny ESP32 dev board with ludicrously small components. We saw surveyors go to war, watched a Lego sorting machine go through its paces, and learned about radar by spinning up a sonar set from first principles.
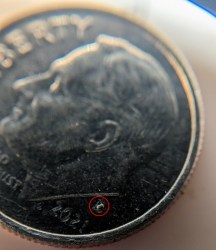
Finally, we wrapped things up with another Al Williams signature “Can’t Miss Articles” section, with his deep dive into the fun hackers can have with the now-deprecated US penny, and his nostalgic look at pneumatic tube systems.
Possibly-Smallest ESP32 Board Uses Smallest-Footprint Parts
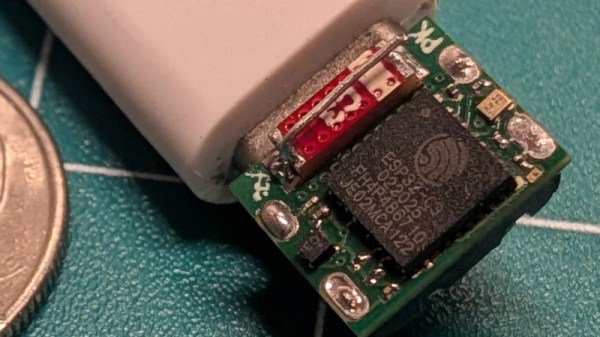
Whenever there’s a superlative involved, you know that degree of optimization has to leave something else on the table. In the case of [PegorK]’s f32, the smallest ESP32 dev board we’ve seen, the cost of miniaturization is GPIO.
There’s only one GPIO pin broken out, and it’s pre-wired to an LED. That’s the bad news, and depending on what you want an ESP32 for, it might not phase you at all. What is impressive here, if not the number of I/O pins, is the size of the board: at 9.85 mm x 8.45 mm barely overhangs the USB-C socket that takes up one side of the board.

In order to get the ESP32-C3FH4 onto such a tiny board, all of the other support hardware had to be the smallest possible sizes– including resistors in 01005. If you don’t speak SMD, one could read that number code as “oh god too small” — at 0.4 mm x 0.2 mm it’s as minuscule as you’ll find– and [Pegor] hand soldered them.
OK, he did use a hot plate for the final step, but he did tin the pads manually with a soldering iron, which is still impressive. Most of us probably would have taken PCBWay up on their offer of assembly services, but not [Pegor]. Apparently part of the reason for this project was that he was looking for an excuse to use the really small footprint components.
Aside from leaving out GPIO and needing too-small SMD components, [Pegor] admits that pesky little details like antenna matching circuits and decoupling capacitors had to get cut to make the tiny footprint, so this board might be more of a stunt than anything practical. So what can you do with the smallest ESP32 board? Well, [Pegor] put up a basic web interface up to get you started blinking the built-in LED; after that, it’s up to you. Perhaps you might fancy a teeny-tiny minecraft server? If you can stand to increase the volume a little bit, we’ve seen how to hack a C3 for much better wifi performance.
Thanks to [Pegor] for the tip, and remember– submit your projects, big or small, we read ’em all!
Building A Drivable, Life-Size 3D-Printed LEGO Technic Buggy

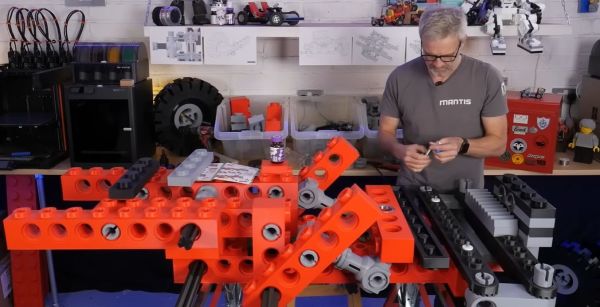
It’s part of the great circle of life that toys and scale models that provide a reflection of macro-sized objects like vehicles and buildings will eventually be scaled up again to life-sized proportions. Case in point the LEGO Technic dune buggy that [Matt Denton] recently printed at effectively human scale, while also making it actually drivable.
The basis for this project is the 8845 Dune Buggy which was released in 1981. Unlike the modern 42101 version, it’s more straightforward and also seems more amenable to actually sitting in despite featuring more pieces for a total of 174 pieces. Naturally, [Matt] didn’t simply go for a naïve build of the 8845 buggy, but made a few changes. First is the scale that’s 10.42 times larger than the LEGO original, based around the use of 50 mm bearings. The model was also modified to be a single-seater, with the steering wheel placed in the center.
With some structural and ergonomic tweaks in place, the resulting CAD model was printed out mostly in PLA with a 1 mm nozzle and 10% infill using a belt FDM printer to help with the sheer size of the parts. After that it was mostly a LEGO kit assembly on a ludicrous scale that resembles a cross between building a LEGO kit and assembling Ikea flatpack furniture.
At merely the cost of most of his sanity, [Matt] finally got the whole kit together, still leaving a few suspension issues to resolve, as it turns out that so much plastic actually weighs a lot, at 102 kg. With that and other issues resolved, the final touch was to add an electric motor to the whole kit using a belt-driven system on the rear axle and bringing every LEGO minifig’s dreams to life.
After a few test drives, some issues did pop up, including durability concerns and not a lot of performance, but overall it performs much better than you’d expect from a kid’s toy.
Continue reading “Building A Drivable, Life-Size 3D-Printed LEGO Technic Buggy”
Hackaday Podcast Episode 345: A Stunning Lightsaber, Two Extreme Cameras, And Wrangling Roombas
It’s a wet November evening across Western Europe, the steel-grey clouds have obscured a rare low-latitude aurora this week, and Elliot Williams is joined by Jenny List for this week’s podcast. And we’ve got a fine selection for your listening pleasure!
The 2025 Component Abuse Challenge has come to an end, so this week you’ll be hearing about a few of the entries. We’ve received an impressive number, and as always we’re bowled over by the ingenuity of Hackaday readers in pushing parts beyond their limits.
In the news is the potential discovery of a lost UNIX version in a dusty store room at the University of Utah, Version 4 of the OS, which appeared in 1973. Check out your own stores, for hidden nuggets of gold. In the hacks, we have two cameras at the opposite end of the resolution spectrum, but sharing some impressive reverse engineering. Mouse cameras and scanner cameras were both a thing a couple of decades ago, and it’s great to see people still pushing the boundaries. Then we look at the challenge of encoding Chinese text as Morse code, an online-upgraded multimeter, the art of making lenses for an LED lighting effect, and what must be the best recreation of a Star Wars light sabre we have ever seen. In quick hacks we have a bevvy of Component Abuse Challenge projects, a Minecraft server on a smart light bulb, and a long term test of smartphone battery charging techniques.
We round off with a couple of our long-form pieces, first the uncertainties about iRobot’s future and what it might mean for their ecosystem — think: cheap hackable robotics platform! — and then a look at FreeBSD as an alternative upgrade path for Windows users. It’s a path not without challenges, but the venerable OS still has plenty to give.
As always, you can listen using the links below, and we’ve laidout links to all the articles under discussion at the bottom of the page.
Tiny386 On An Espressif ESP32-S3
Some people may remember the joys of trying to boot Linux on an 8-bit AVR microcontroller, which was an absolute exercise in patience. In comparison [He Chunhui]’s Tiny386 emulator running on an ESP32-S3 MCU is positively zippy when it boots and runs Windows 95. The provided video (also embedded below) makes clear that while you can comfortably waddle off to prepare and pour a fresh cup of tea, it’s actually borderline usable.
The source code can be obtained via GitHub, which contains not just the basic emulated 80386 CPU written in C99, but also peripherals borrowed from TinyEMU and QEMU, along with a SeaBIOS ROM. In addition to the Windows 95 demo it’s claimed that Tiny386 should be able to run most 16/32-bit software.
Right now the ESP32-S3 version targets the JC3248W535 board, which is a roughly $30 development board featuring a built-in display with touch screen and an ESP32-S3 module. Although it has a USB-C port, it appears that this one is just for programming and not for the USB peripheral of the ESP32-S3. With the USB OTG peripheral used, one could conceivably make a small 386 system based around an ESP32-S3 that features a USB hub to plug a keyboard, mouse, etc. into.
Considering that the Tiny386 emulator is a very simple and straightforward approach to emulating an early-90s PC, some optimization might enable a pretty zippy general purpose PC for early 90s software. Quite a boost from watching Linux struggle into a command line on an AVR, indeed.
3D Printing A Piano Action
Part of the reason there are always free pianos on your digital classifieds listing of choice is that, at least economically speaking, a piano is less of a musical instrument and more of a complicated machine that can and will wear out (not to mention the physical difficulty of actually moving one). Once a piano reaches that point, whether through age, use, or neglect, at that point it’s to intents and purposes worthless. But still, they’re essentially just machines. [Toast] figured that, since 3D printers not only can print all kinds of other machines and musical instruments alike, he would take a stab at combining these two and made his own 3D printed piano.
A piano’s action is the mechanical linkage between the keys and the strings of the piano themselves. Over many hundreds of years this has developed into a complicated series of levers which not only rapidly strike strings when a key is pressed, but also mute the strings while the key is not being pressed and strike the strings in a way that the hammer won’t be pressed into the strings if the player leaves their finger on a key. Rather than try to recreate all of this in meticulous detail, [Toast] has swapped out the strings for a series of tubes which, unlike strings, do not much change their musical behavior if the hammer remains on the tube after being struck. This greatly simplifies the action (and cost) of his miniature piano.
The piano works by positioning hammers above these tubes, which strike downwards when a musician depresses the keys. Rubber bands return the hammers to their upright positions after the key is lifted. The instrument went through a few stages of design as well where [Toast] refined the size and shape of the tubes as well as improved the way by which the hammers are attached to the keys.
Is it still a piano if it has pipes instead of strings? Perhaps, but at the very least we can all agree that he’s built a working keyboard action capable of producing music, if not an outright definitionally-accurate piano. It’s an interesting build that we hope to see more iterations of in the future, if not to build a more functionally accurate 3D printed piano action then to see what is possible from a 3D printer in the piano space. Despite their complexity and weight, pianos are a fundamental and popular instrument in the Western music tradition and we’ve seen many interesting builds around them like this modern player piano built with a series of solenoids. Continue reading “3D Printing A Piano Action”


