Reverse Engineering The Apple Lightning Connector

A frequent contributor to the hacker community, [stacksmashing] has prepared an excellent instructional video on reverse engineering Apple’s Lighting connector proprietary protocol. The video begins by showing how to gain physical access to the signals and hooking them up to a logic analyzer. He then notes that the handshaking uses only a single signal and proposes that Apple isn’t going to re-invent the wheel (perhaps a risky assumption). Using a ChatGPT search, obligatory these days, we learn that Dallas Semiconductor / Microchip 1-wire is probably the protocol employed.

Which embedded single-wire busses exist that encode bits with different lengths of low and high signals?

At the basic level, 1-wire and protocols like Texas Instruments SDQ operate in a similar manner. It turns out that [stacksmashing] already wrote a SDQ analyzer module for the Saleae logic analyzer. Aided by this tool, he digs deeper and learns more about the kinds of messages and their contents. For example, upon being plugged in, the host system queries the accessory’s serial number, manufacturer, model number, and product description. Finally, he introduces the CRC reverse engineering tool reveng to determine which CRC polynomial and algorithm the protocol uses to frame each packet.

Even if you have no interest in Lightning cables, this video is a great tutorial on the types of things you need to do in order to make sense of an unknown communications protocol. Gather what information you can, make some educated guesses, observe the signals, revise your guesses, and repeat. In part two, [stacksmashing] will show how to build a homemade iPhone JTAG cable.

We wrote in more detail about cracking the Lightning interface back in 2015. The Lightning interface may have been a good solution in its day, foreshadowing some of the features we now have in USB-C. But its proprietary and closed nature meant it wasn’t used outside of the Apple ecosystem. With the proliferation and capabilities of USB-C, not to mention various legislative edicts, Lightning’s days seem numbered. Is the industry finally settling on one interface? Let us know your thoughts in the comments below.

Continue reading “Reverse Engineering The Apple Lightning Connector”

A USB-PD Laptop Conversion In Extreme Detail.

With USB-PD slowly making wall wart power supplies obsolete and becoming the do-it-all standard for DC power, it’s a popular conversion to slap an off-the-shelf USB-PD module in place of the barrel jack in a laptop. Not when it comes to [jakobnator] though, who fitted his Dell with an upgrade lovingly and expertly crafted for both electrical and mechanical perfection.

The video that you can find below the break is a long and detailed one, but in that detail lies touches that set the conversion apart from the norm. We’re treated to a full-run-down of USB-PD module design and chip programming, and then the mechanics of the 1-wire chip through which the Dell ties itself in with only Dell power supplies. Programming this chip in particular is something of a challenge.

It’s the mechanical design that sets this one apart. He started with an odd-shaped space that had contained the barrel jack socket and a ferrite choke, and designed a PCB to fit it exactly. 3D-printing a model to check for fit is attention to detail at the stratospheric level. The result is a fit that looks almost as though it was part of the original manufacture, and which should keep the laptop useful for years to come.

This may be the most elegant USB-C laptop conversion we’ve seen, but it’s not the only one.

Continue reading “A USB-PD Laptop Conversion In Extreme Detail.”

Hackerspacing: Making A Temperature Logger

The folks at Swindon Makerspace took possession of a new space a few months ago after a long time in temporary accommodation. They’ve made impressive progress making it their own, and are the envy of their neighbours.

A small part of the new space is a temperature logger, and it’s one whose construction they’ve detailed on their website. It’s a simple piece of hardware based around a Dallas DS18B20 1-wire temperature sensor and an ESP8266 module, powered by 3 AA batteries and passing its data to data.sparkfun.com. The PCB was created using the space’s CNC router, and the surface-mount components were hand-soldered. The whole thing is dwarfed by its battery box, and will eventually be housed in its own 3D printed case. Sadly they’ve not posted the files, though it’s a simple enough circuit that’s widely used, it looks similar to this one with the addition of a voltage regulator.

The device itself isn’t really the point here though, instead it serves here to highlight the role of a typical small hackspace in bringing simple custom electronic and other prototyping services to the grass roots of our community. Large city hackspaces with hundreds of members will have had the resources to create the space program of a small country for years, but makers in provincial towns like Swindon – even with their strong engineering heritage – have faced an uphill struggle to accumulate the members and resources to get under way.

So to the wider world it’s a simple temperature logger but it really represents more than that — another town now has a thriving and sustainable makerspace. Could your town do the same?

If you’ve never used a Dallas 1-wire temperature sensor like the one the Swindon folks have in their logger, we suggest you read our primer on the parts and their protocol.

A Slide Viewer Makes An Excellent Case For An OLED Project

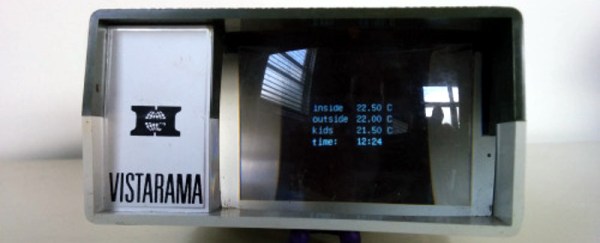
Sometimes when browsing the websites of our global hackspace community you notice a project that’s attractive not necessarily because of what it does or its technology but because of its presentation. So it is with the subject of this article, [Kris] needed a house temperature monitor and found a 1960s slide viewer made an excellent choice for its housing.

The monitor itself is a fairly straightforward Arduino build using a couple of DS18B20 1-wire temperature sensors and a real-time-clock module and displaying their readings on a small OLED screen. Its code can be found on this mailing list thread if you are interested. The display presented a problem as it needed to be reasonably large, yet fairly dim so it could be read at night without being bright enough to interrupt sleep.

A variety of projection techniques were tried, involving lenses from a projection clock, a magnifying glass, and a Google Cardboard clone. Sadly none of these lenses had the required focal length. Eventually the slide viewer was chosen because it was pointed out that the OLED screen was about the same size as a photographic slide.

Slide viewers are part of the familiar ephemera of the analog era that most people over 60 may still have taking up drawer space somewhere but may well be completely alien to anyone under about 30. They were a magnification system packaged up into a console usually styled to look something like a small portable TV of the day, and different models had built-in battery lights, or collected ambient light with a mirror. The screen was usually a large rectangular lens about 100mm(4″) diagonal.

[Kris]’s Vistarama slide viewer came via eBay. It’s not the smallest of viewers, other models folded their light paths with mirrors, however the extra space meant that the Arduino fit easily. The OLED was placed where the slide would go, and its display appeared at just the right magnification and brightness. Job done, and looking rather stylish!

We’ve not featured a slide viewer before here at Hackaday, though we did recently feature a similar hack on an Ikea toy projector. We have however featured more than one digital conversion on a classic slide projector using LCD screens in place of the slide.

Via Robots and Dinosaurs makerspace, Sydney.

Easier UART To 1-Wire Interface

The 1-Wire protocol is usually found in temperature sensors, but you’ll also find it in chips ranging from load sensors, a battery sensor and LED driver that is oddly yet officially called a ‘gas gauge’, and iButtons. It’s a protocol that has its niche, and there are a few interesting application notes for implementing the 1-wire protocol with a UART. Application notes are best practices, but [rawe] has figured out an even easier way to do this.

The standard way of reading 1-Wire sensors with a UART is to plop a pair of transistors and resistors on the Tx and Rx lines of the UART and connect them to the… one… wire on the 1-Wire device. [rawe]’s simplification of this is to get rid of the transistors and just plop a single 1N4148 diode in there.

This would of course be useless without the software to communicate with 1-Wire devices, and [rawe] has you covered there, too. There’s a small little command line tool that will talk to the usual 1-Wire temperature sensors. Both the circuit and the tool work with the most common USB to UART adapters.

The Network Of 1-Wire Devices

teensynet

[jimmayhugh] is a homebrewer and has multiple fermentation chambers and storage coolers scattered around his home. Lucky him. Nevertheless, multiple ways of making and storing beer requires some way to tell the temperature of his coolers and fermenters. There aren’t many temperature controllers that will monitor more than two digital thermometers or thermocouples, so he came up with his own. It’s called TeensyNet, and it’s able to monitor and control up to 36 1-wire devices and ties everything into his home network.

Everything in this system uses the 1-Wire protocol, a bus designed by Dallas Semiconductor that can connect devices with only two wires; data and ground. (To be a fly on the wall during that marketing meeting…) [jimmay] is using temperature sensors, digital switches, thermocouples, and even a graphic LCD with his 1-wire system, with everything controlled by a Teensy 3.1 and Ethernet module to push everything up to his network.

With everything connected to the network, [jimmay] can get on his personal TeensyNet webpage and check out the status of all the devices connected to any of his network controllers. This is something the engineers at Dallas probably never dreamed of, and it’s an interesting look at what the future of Home Automation will be, if not for a network connected relay.

Hacking Dell Laptop Charger Identification

If you’ve ever had a laptop charger die, you know that they can be expensive to replace. Many laptops require you to use a ‘genuine’ charger, and refuse to boot when a knock off model is used. Genuine chargers communicate with the laptop and give information such as the power, current, and voltage ratings of the device. While this is a good safety measure, ensuring that a compatible charger is used, it also allows the manufacturers to increase the price of their chargers.

[Xuan] built a device that spoofs this identification information for Dell chargers. In the four-part series (1, 2, 3, 4), the details of reverse engineering the communications and building the spoofer are covered.

Dell uses the 1-Wire protocol to communicate with the charger, and [Xuan] sniffed the communication using a MSP430. After reading the data and verifying the CRC, it could be examined to find the fields that specify power, voltage, and current.

Next, a custom PCB was made with two Dell DC jacks and an MSP430. This passes power through the board, but uses the MSP430 to send fake data to the computer. The demo shows off a 90 W adapter pretending to run at 65 W. With this working, you could power the laptop from any supply that can meet the requirements for current and voltage.