Hackaday Prize 2022: Solar Powered LoRa Weather Station For The Masses

[Debasish Dutta] has designed a few weather stations in the past, and this, the fourth version of the system has had many of the feature requests from past users rolled in. The station is intended to be used with an external weather sensor unit, provided by Sparkfun. This handles wind speed and direction, as well as measuring rainfall. A custom PCB hosts an ESP32-WROOM module and an Ai-Thinker Ra-02 LoRa module for control and connectivity respectively. A PMS5003 sits on the PCB to measure those particulate densities, but most sensors are connected 
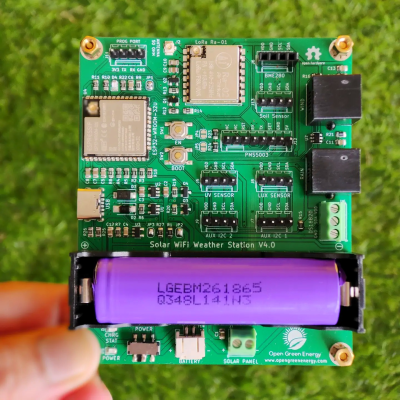
with simple 4-way I2C connectors. Temperature, humidity, and pressure are handled by a BME280 module, UV Index (SI1145), visible light (BH1750) even soil humidity and temperature with a cable-mounted SHT10 module.

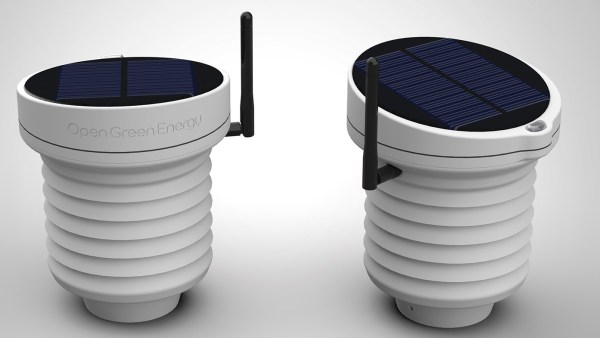
All this is powered by a solar panel, which charges a 18650 cell, and keeps the show running during the darker hours. For debugging and deployment, a USB-C power port can also be used to provide charge. A 3D printed Stevenson screen type enclosure allows the air to circulate amongst the PCB-mounted sensor modules, without hopefully too much moisture making it in there to cause mischief.

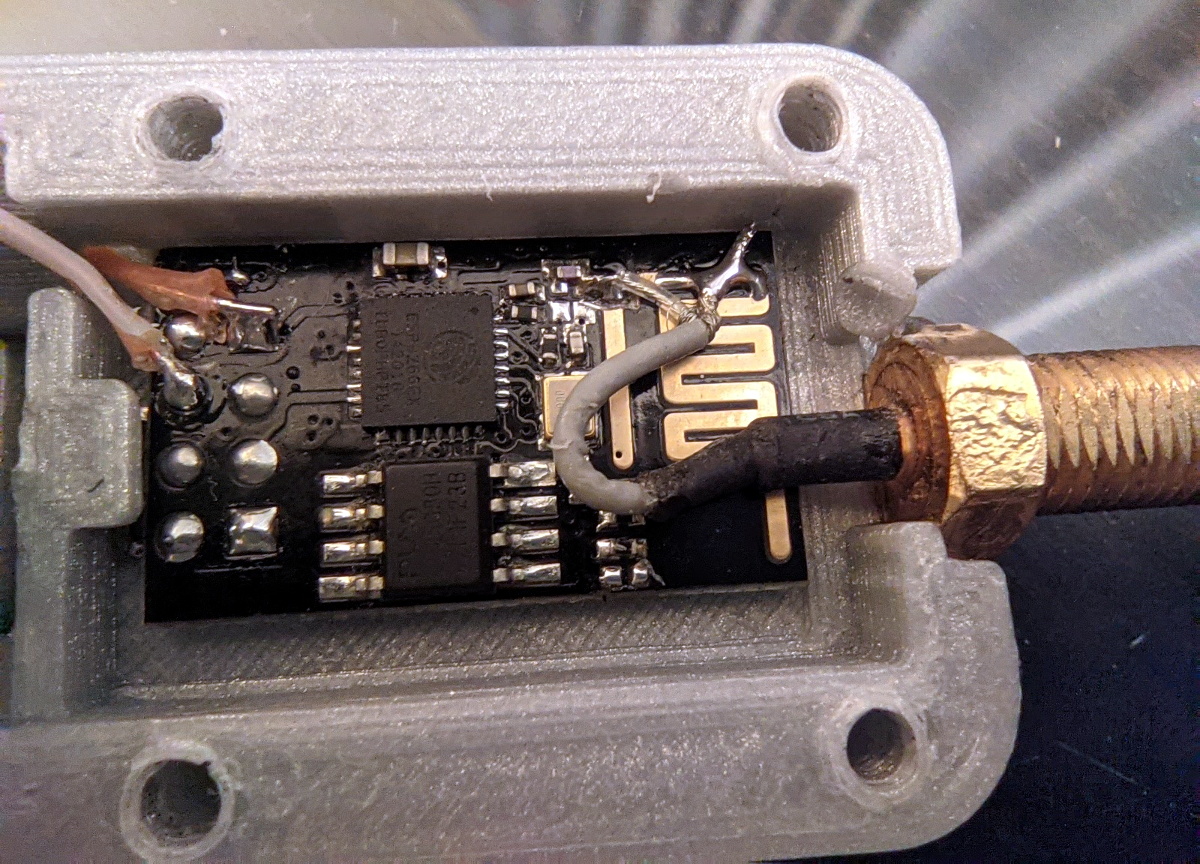
On the data collection and visualization side, a companion LoRa receiver module is in progress, which is intended to pass along measurements to a variety of services. Think Home Assistant, ESP home, and that kind of thing. Software is still a work in progress, so maybe check back later to see how [Debasish] is getting on with that?

This kind of multi-sensor hosting project is nothing new here, here’s a 2019 Hackaday prize entry along the same lines. Of course, gathering and logging measurement data is only part of the problem, visualization of those measurements is also important. Why not use a mechanical approach, such as a diorama?

Lithium-Ion Batteries Are Your Friends

Need some kind of battery for a project? You can always find a few Lithium-Ion (LiIon) batteries around! They’re in our phones, laptops, and a myriad other battery-powered things of all forms – as hackers, we will find ourselves working with them more and more. Lithium-Ion batteries are unmatched when it comes to energy capacity, ease of charging, and all the shapes and sizes you can get one in.

There’s also misconceptions about these batteries – bad advice floating around, fearmongering videos of devices ablaze, as well as mundane lack of understanding. Today, I’d like to provide a general overview of how to treat your LiIon batteries properly, making sure they serve you well long-term.

What’s A Battery? A Malleable Pile Of Cells

Lithium-Ion batteries are our friends. Now, there can’t be a proper friendship if you two don’t understand each other. Lithium-Ion batteries are tailored for human needs by the factory that produced them. As for us hackers, we’ll want to learn some things.

First thing to learn – a single LiIon “unit” is called a cell. An average laptop contains three or six Li-Ion cells, a phone will have one, a tablet will have from one to three. What we refer to as “battery” is typically one or multiple cells, together with protection circuitry, casing and a separate connector – most of the time all three of these, but not always. The typical voltage is 3.6 V or 3.7 V, with maximum voltage being 4.2 V – these are chemistry-defined, the same for most kinds of cells and almost always written on the cell. Continue reading “Lithium-Ion Batteries Are Your Friends”

Hackaday Prize 2022: A Backup Battery Pack

These days, we’re all running around toting smartphones and laptops that could always use a bit more charge. Portable battery packs have become popular, and [Anuradha] has designed one that packs plenty of juice to keep everything humming.

The pack is designed to be charged via solar panels, at 18 V and up to 5 A of current. It’s intended to work with a Maximum Power Point Tracking module to ensure the maximum energy is gained from the sunshine available. For storage, the pack relies on 75 individual 18650 lithium cells, arranged with 3 cells in series, each with 25 in parallel (3s25p). They’re spot welded together for strength and good conductivity. Nominally, the output voltage is on the order of 10-12 V. The included battery management system (BMS) will allow an output current up to 100 A, and the pack can be used with an AC inverter to power regular home appliances.

Overall, it’s a tidy pack that’s more than capable of keeping a few devices charged up for days at a time. If you’re building something similar yourself, though, just be sure to package it well and keep it protected. So many lithium batteries can quickly turn fiery if something goes wrong, so store and use it appropriately! Fear not, however – we’ve got a guide on how to do just that.

Weather Station Dumps CR2032 Cells, Gains 18650

Despite the fact that we’re rapidly approaching the year 2022, there are still an incredible number of gadgets out there that you’re expected to power with disposable batteries. Sure you can buy rechargeable stand-ins that come in the various shapes and sizes of the traditional alkaline cells, but that’s a stopgap at best. For some, if a new gadget doesn’t feature an internal Li-ion battery and standardized USB charging, it’s a non-starter.

[Danilo Larizza] is one of those people. Bothered by the fact that his Oregon Scientific weather station required a pair of CR2032 coin cells, he set out to replace them with an integrated rechargeable solution. The conversion ending up being easier to implement than he initially expected, and by his calculations, his solution should keep the unit up and running for nearly 40 days before needing to be topped off with a standard USB charger.

Wiring in the new battery.

The first step was determining how much power it actually took to run the weather station. Although the two CR2032 cells were wired in series, and therefore providing a nominal 6 V, he determined through experimentation with a bench power supply that it would run on as little as 3.2 volts. This coincides nicely with the voltage range for a single 18650 cell, and meant he didn’t need to add a boost converter into the mix. He notes the weather station does flash a “Low Battery” warning most of the time now, but that seems a fair price to pay.

Confident in the knowledge that the weather station could happily run with an 18650 cell connected in place of the original CR2032s, all [Danilo] needed to do was figure out a way to charge the battery up from time to time. To that end, he reached for a common TP4056 module. This handy little board is a great match for 18650 cells, and is so cheap that there’s really no excuse not to  have a few of them kicking around your parts bin. You never know when you might need to teach an old gadget new tricks.

Pool Temperature Monitor Mollifies Fortunate But Frustrated Children

Who needs the city pool when you can party in the private pool over at Grandma and Grandpa’s house? No need to wait until Memorial Day weekend when it hits 90° F in the first week of May. But how can you placate grandchildren who want to know each and every day if it’s finally time to go swimming, and the pool itself is miles away? Although grandparents probably love to hear from you more often there’s no need to bother them with hourly phone calls. You just have to build a floating, remote pool temperature monitor which broadcasts every 30 minutes to an Adafruit MagTag sitting at kid’s eye level on the refrigerator.

Between the cost of commercial pool temperature monitors and all the reviews that mention iffy Wi-Fi connections, it sounds like [Blake] is better off rolling his own solution. Inside the floating part is an ESP32, a DS18B temperature sensor, and a 18650 cell. Most of the body is PVC, except for the 3D-printed torus that holds some foam for buoyancy. A handful of BBs in the bottom keep the thing pointed upright. For now, it shows the water temperature, but [Blake]’s ultimate goal is to show the air temperature as well.

Maybe it’s still too cold to swim, but the sun shines brightly most days. Why not harness its energy to heat up the water?

A Hot-Swappable Battery Grip Keeps The Camera Rolling

There’s nothing worse than being in the middle of an important shot, only to have the camera’s batteries die on you. The losses can be very real, so it’s best to avoid them entirely. In an effort to do so, [funkster] built himself a battery grip for his Canon EOS M.

The hack is based around the venerable 18650 battery, packing 3.6V of lithium-ion goodness into a compact metal can. [funkster]’s build has slots for two of these cells, powering the camera off of one and keeping the other in reserve. The cells are monitored by a STM32 microcontroller, which switches from one battery to another as they run out or are removed. This allows batteries to be swapped while the camera is on – a highly useful feature. There’s even an OLED display to keep an eye on the state of charge of each cell.

The manner in which power is connected to the camera is rather amusing. An original Canon battery that slides inside the camera was gutted and turned into a simple adapter for the battery port. The battery grip, which wraps around the camera body, connects to this via pin headers that pass through a hole drilled in the camera’s case. It’s a permanent mod, but one [funkster] is happy with for the added usability – especially as doing it this way still provides easy access to the SD card slot.

Keeping a camera juiced on the go can be a headache without the right gear. [funkster] demonstrates that if you can’t buy it, you can always build it yourself. If your problem isn’t battery power, but your camera is overheating, you can of course fix that too. Video after the break.

Continue reading “A Hot-Swappable Battery Grip Keeps The Camera Rolling”

18650 Brings ESP8266 WiFi Repeater Along For The Ride

We’re truly fortunate to have so many incredible open source projects floating around on the Internet, since there’s almost always some prior art you can lean on. By combining bits and pieces from different projects, you can often save yourself a huge amount of time and effort. It’s just a matter of figuring out how all the pieces fit together, like in this clever mash-up by [bethiboothi] that takes advantage of the fact that the popular TP4056 lithium-ion battery charger module happens to be almost the exact same size of the ESP-01.

By taking a 3D printed design intended to attach a TP4056 module to the end of an 18650 cell and combining it with an ESP8266 firmware that turns the powerful microcontroller into a WiFi repeater, [bethiboothi] ended up with a portable network node that reportedly lasts up to three days on a charge. The observed range was good even with the built-in PCB antenna, but hacking on an external can get you out a little farther if you need it.

While it doesn’t appear that [bethiboothi] is using it currently, the esp_wifi_repeater firmware does have an automatic mesh mode which seems like it would be a fantastic fit for this design. Putting together an impromptu mesh WiFi network with a bunch of cheap battery powered nodes would be an excellent way to get network connectivity at an outdoor hacker camp, assuming the ESP’s CPU can keep up with the demand.