Restoring A 3DO Blaster Card From The Early 90s

Before the modern trifecta of video game giants came to dominate the market around two decades ago, the world was awash in video game consoles. Many of these retro platforms have largely been forgotten outside of the enthusiast communities, and an average gamer today might not have ever heard of brands like ColecoVision or TurboGrafx. Among these unusual, rare, or forgotten systems was the 3DO which wasn’t strictly a console but rather a specification that manufacturers could use to make consoles on their own. But even more unusual was that this standard could be used to build 3DO-compatible expansion cards for PCs as well.

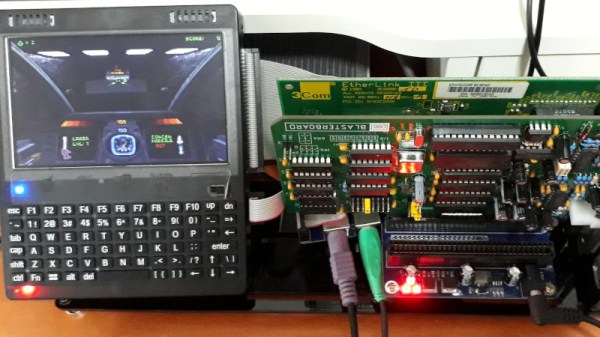
In this video, [The Retro Collective] received one of these boards to add to their museum, but like much retro hardware of this era it wasn’t working exactly like it would have out-of-the-box. After adding it to one of their period-correct 386 machines of the time, they found that it would only work properly with weight applied at one of the corners. This led to the discovery of some disconnected pins on the PCB, and a repair of that and some other issues brought the card back to life again.

The video also discusses the platform itself and shows how it would connect to a PC from that time. The PC would have needed a Sound Blaster card, a CD ROM drive with a particular proprietary interface, and a few other hardware requirements, but with everything up and working the player would have a console that theoretically competed with the original Playstation or Nintendo 64. It also illustrates an alternative path video games might have taken where expansion cards added console compatibility to any modern PC, but unfortunately the 3DO never really caught on.

Continue reading “Restoring A 3DO Blaster Card From The Early 90s”

Unusual Circuits In The Intel 386’s Standard Cell Logic

Intel’s 386 CPU is notable for being its first x86 CPU to use so-called standard cell logic, which swapped the taping out of individual transistors with wiring up standardized functional blocks. This way you only have to define specific gate types, latches and so on, after which a description of these blocks can be parsed and assembled by a computer into elements of a functioning application-specific integrated circuit (ASIC). This is standard procedure today with register-transfer level (RTL) descriptions being placed and routed for either an FPGA or ASIC target.

That said, [Ken Shirriff] found a few surprises in the 386’s die, some of which threw him for a loop. An intrinsic part of standard cells is that they’re arranged in rows and columns, with data channels between them where signal paths can be routed. The surprise here was finding a stray PMOS transistor right in the midst of one such data channel, which [Ken] speculates is a bug fix for one of the multiplexers. Back then regenerating the layout would have been rather expensive, so a manual fix like this would have made perfect sense. Consider it a bodge wire for ASICs.

Another oddity was an inverter that wasn’t an inverter, which turned out to be just two separate NMOS and PMOS transistors that looked to be wired up as an inverter, but seemed to actually there as part of a multiplexer. As it turns out, it’s hard to determine sometimes whether transistors are connected in these die teardowns, or whether there’s a gap between them, or just an artifact of the light or the etching process.

Tiny386 On An Espressif ESP32-S3

Some people may remember the joys of trying to boot Linux on an 8-bit AVR microcontroller, which was an absolute exercise in patience. In comparison [He Chunhui]’s Tiny386 emulator running on an ESP32-S3 MCU is positively zippy when it boots and runs Windows 95. The provided video (also embedded below) makes clear that while you can comfortably waddle off to prepare and pour a fresh cup of tea, it’s actually borderline usable.

The source code can be obtained via GitHub, which contains not just the basic emulated 80386 CPU written in C99, but also peripherals borrowed from TinyEMU and QEMU, along with a SeaBIOS ROM. In addition to the Windows 95 demo it’s claimed that Tiny386 should be able to run most 16/32-bit software.

Right now the ESP32-S3 version targets the JC3248W535 board, which is a roughly $30 development board featuring a built-in display with touch screen and an ESP32-S3 module. Although it has a USB-C port, it appears that this one is just for programming and not for the USB peripheral of the ESP32-S3. With the USB OTG peripheral used, one could conceivably make a small 386 system based around an ESP32-S3 that features a USB hub to plug a keyboard, mouse, etc. into.

Considering that the Tiny386 emulator is a very simple and straightforward approach to emulating an early-90s PC, some optimization might enable a pretty zippy general purpose PC for early 90s software. Quite a boost from watching Linux struggle into a command line on an AVR, indeed.

Continue reading “Tiny386 On An Espressif ESP32-S3”

How Intel’s 386 Protects Itself From ESD, Latch-up And Metastability

To connect the miniature world of integrated circuits like a CPU with the outside world, a number of physical connections have to be made. Although this may seem straightforward, these I/O pads form a major risk to the chip’s functioning and integrity, in the form of electrostatic discharge (ESD), a type of short-circuit called a latch-up and metastability through factors like noise. Shielding the delicate ASIC from the cruel outside world is the task of the I/O circuitry, with [Ken Shirriff] recently taking an in-depth look at this circuity in Intel’s 386 CPU.

The 386 die, zooming in on some of the bond pad circuits. (Credit: Ken Shirriff)

The 386 has a total of 141 of these I/O pads, each connected to a pin on the packaging with a delicate golden bond wire. ESD is on the top of the list of potential risks, as a surge of high voltage can literally blow a hole in the circuitry. The protective circuit for this can be seen in the above die shot, with its clamping diodes, current-limiting resistor and a third diode.

Latch-up is the second major issue, caused by the inadvertent creation of parasitic structures underneath the P- and NMOS transistors. These parasitic transistors are normally inactive, but if activated they can cause latch-up which best case causes a momentary failure, but worst case melts a part of the chip due to high currents.

To prevent I/O pads from triggering latch-up, the 386 implements ‘guard rings’ that should block unwanted current flow. Finally there is metastability, which as the name suggests isn’t necessarily harmful, but can seriously mess with the operation of the chip which expects clean binary signals. On the 386 two flip-flops per I/O pad are used to mostly resolve this.

Although the 386’s 1985-era circuitry was very chonky by today’s standards, it was still no match for these external influences, making it clear just how important these protective measures are for today’s ASICs with much smaller feature sizes.

How Corroded Can A Motherboard Be?

We will admit it. If we found a 386 motherboard as badly corroded as the one [Bits und Bolts] did, we would trash it—not him, though. In fact, we were surprised when he showed it and said he had already removed most of it in vinegar. You can check the board out in the video below.

There was still a lot of work to do on both the front and back of the board. The motherboard was a Biostar and while it isn’t as dense as a modern board, it still had plenty of surface mount parts jammed in.

Continue reading “How Corroded Can A Motherboard Be?”

Build Your Own 16 MB 30-Pin SIMMs For Vintage PCs

Today’s memory sticks have hundreds of pins and many gigabytes of RAM on board. Decades ago, though, the humble 30-pin SIMM was the state of the art where memory was concerned. If you’ve got vintage gear, you can try and hunt down old RAM, or you can copy [Bits und Bolts] and make your own.

Previously, [Bits und Bolts] built a 4 MB SIMM, but he’s now ramped up to building 16 MB RAM sticks — the largest size supported by the 30-pin standard. That’s a ton compared to most 30-pin sticks from the 1980s, which topped out at a feeble 1 MB.

We get to see four of his 16 MB sticks installed in a 386 motherboard, set up to operate in the appropriate Fast Page Mode. He was able to get the system operating with 64 MB of RAM, an amount still considered acceptable in the early Pentium 3 era. Hilariously, memtest took a full ten hours to complete a single pass with this configuration. [Bits and Bolts] also tried to push the motherboard further, but wasn’t able to get it to POST with over 64 MB of RAM.

As [Bits und Bolts] demonstrates, if you can read a schematic and design a PCB, it’s not that hard to design RAM sticks for many vintage computers. We’ve seen some other RAM hacks in this vein before, too.

Continue reading “Build Your Own 16 MB 30-Pin SIMMs For Vintage PCs”

That Handheld 386SX Gets A Teardown

A few weeks ago our community was abuzz with the news of a couple of new portable computers available through AliExpress. Their special feature was that they are brand new 2023-produced retrocomputers, one with an 8088, and the other with a 386SX. Curious to know more? [Yeo Kheng Meng] has one of the 386 machines, and he’s taken it apart for our viewing pleasure.

What he found is a well-designed machine that does exactly what it claims, and which runs Windows 95 from a CF card. It’s slow because it’s an embedded version of the 386 variant with a 16-bit bus originally brought to market as a chip that could work with 16-bit 286-era chipsets. But the designer has done a good job of melding old and new parts to extract the most from this vintage chip, and has included some decidedly modern features unheard of in the 386 era such as a CH375B USB mass storage interface.

If we had this device we’d ditch ’95 and run DOS for speed with Windows 3.1 where needed. Back in the day with eight megabytes of RAM it would have been considered a powerhouse before users had even considered its form factor, so there’s an interesting exercise for someone to get a vintage Linux build running on it.

One way to look at it is as a novelty machine with a rather high price tag, but he makes the point that considering the hardware design work that’s gone into it, the 200+ dollar price isn’t so bad. With luck we’ll get to experience one hands-on in due course, and can make up our own minds. Our original coverage is here.