Using Spiral Mode To Rapidly Print Enclosures

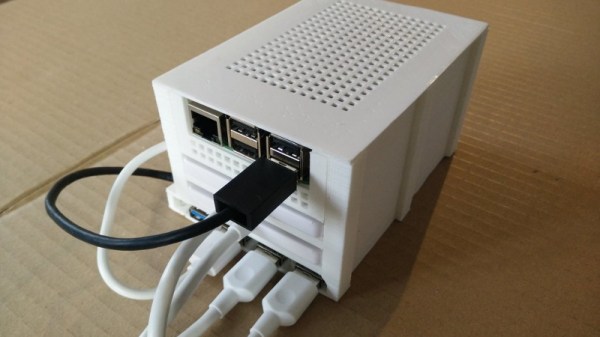
We’ve often said that one of the best applications of desktop 3D printing is the production of custom enclosures. A bespoke case adds a touch of professionalism to any project, and considering the materials needed to print one will cost less than even the cheapest generic project box, it’s a no-brainer. There’s only one problem: it can take hours to print even a simple case.

To try and speed things up, [Electrobob] has been experimenting with running off enclosures using spiral or “vase” mode on his 3D printer. Unlike the normal layer-by-layer approach, in this mode, the printer’s hotend continually rises at a steady rate during the entire print. Think of it as akin to printing out a Slinky and you should get the idea.

Spiral printed boxes may need manual retouching

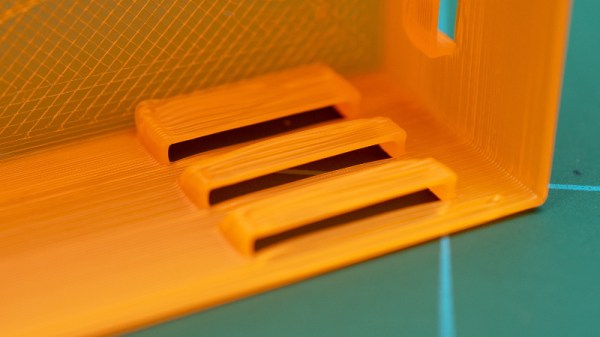
As you might expect, there are some trade-offs here. For one, the walls of the box can’t be very thick since the printer is only making one pass. The nozzle on most printers is 0.4 mm, but in his experiments, [Electrobob] has found he’s able to reliably double that to a wall thickness of 0.8 mm by adjusting the extrusion rate.

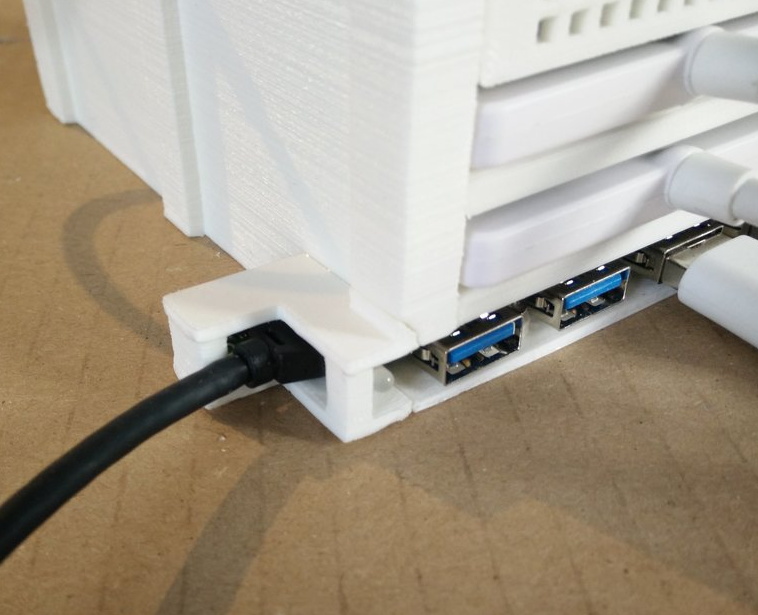
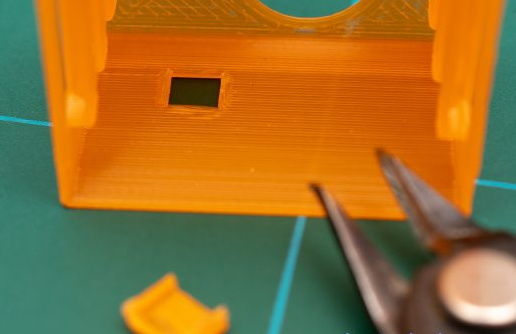
You also need to approach the design a bit differently during the CAD phase. Printing holes in the side of the enclosure, which would be easy enough to do normally, doesn’t really work when running in spiral mode. For those situations, [Electrobob] recommends designing a “pocket” into the side that you can come back and cut out with a knife. It will add a little time to the post-processing stage, but the time saved during the print will more than make up for it.

So how much faster are we talking about? In the example [Electrobob] shows in his write-up, the print time went from nearly two hours to just 18 minutes. The resulting enclosure obviously looks a bit different than the traditionally printed version, and isn’t as strong, but the concept still clearly holds promise for some applications. If you’re building a sensor network that needs a bunch of enclosures, those time savings will really add up.

This Compact Pi Terminal Will Show You The Way

The Raspberry Pi holds incredible promise for those looking to build a small mobile terminal that they can take with them on the go, something you can throw into your bag and pull out whenever there’s some hacking to be done. But getting the diminutive Linux board to that point can take quite a bit of work. You need to find a suitably small keyboard, design a custom case, and wire it all up without letting any of that pesky Magic Smoke escape.

But a recent project from [remag293] might make things a bit easier for those looking to get their feet wet in the world of custom mobile computers. The boxy handheld device has everything you need, and nothing you don’t. A basic case, a short parts list, and an absolute minimum of wiring. What’s not to love? Even if you don’t make an exact clone of this device, it’s an excellent reference to quickly bootstrap your own bespoke terminal.

So what’s inside the 3D printed case? Not a whole lot, really. Obviously there’s a Raspberry Pi, a 3.5 inch TFT touch screen display, and a miniature keyboard. The keyboard is of the Bluetooth variety, and other than being freed from its enclosure and wired into the header on the display module for power, it’s otherwise stock.

As for the parts you can’t see from the outside, there’s a 3.7 V 4400 mAh battery pack and an Adafruit PowerBoost 1000 module to handle charging and power distribution. Beyond the big lighted button on the side (which you could certainly replace with something more low-key should you chose), that’s about it. When it’s all together, you’ve got a battery powered computer that’s ready for the road with a minimum amount of fuss.

If you’re looking for something that’s a bit larger, and more than a little unconventional, you could start by printing out a full cyberdeck. After all, if you’re going to build your own non-traditional portable computer, you might as well go all out.

A Very Buttoned Up Raspberry Pi Media Server

Projects that turn the Raspberry Pi into a low-cost Network Attached Storage (NAS) solution are very common; all you need is the right software, the Pi itself, and some USB storage devices. But unless you particularly like the “Medusa” look, with loose cables running all over the place, you’ll probably want to put the hardware into a suitable enclosure. Unfortunately, that’s where the somewhat unusual layout of the Pi can make things tricky.

Which is why [AraymBox] came up with this unique “capsule” enclosure for the Raspberry Pi and two USB-attached hard drives. Every effort has been made to keep the outside of this design as clean and streamlined as possible. The asymmetrical loops of wires that we so often see on other projects are gone, with everything been brought inside thanks to some clever wiring. This enclosure looks like a professional product, and if you’re willing to put in the effort, you can have one to call your own.

The good news is that the 3D printed enclosure only has four parts, albeit rather large ones, and none of which require support material. So it should be an easy print even on a relatively low-end machine. Of course, you’re not going to get that futuristic metallic look without a little work. You’ll need to do a considerable amount of sanding, filling, and paint work to get that kind of a surface finish. Then again, that rough “just printed” look has a certain cyberpunk appeal to it as well.

But the printed enclosure is only half the battle. Inside, [AraymBox] has soldered the USB to SATA adapter cables directly to the Raspberry Pi to keep things tight and compact. A micro USB breakout board was then used to add a power connector on the back of the device where the Ethernet and USB ports are, solving the issue of having one lonely USB cable coming out of the side of the case.

In the past we’ve seen other attempts to create a 3D printable enclosure for Pi servers, with varying levels of success. While some would argue that the better solution is to just throw the Pi and the drives in a large enough enclosure that it doesn’t matter what the wiring looks like, we appreciate the effort that some hackers are willing to put in to make something custom.

Up Your Game With DIY Headset Motion Tracking

While there’s been a lot of advancements in VR gaming over the last couple of years, plenty of folks are still happy enough to just stare at their monitor. But that’s not to say some of those fancy head-tracking tricks wouldn’t be a welcome addition to their repertoire. For players who are literally looking to get their head in the game, [Adrian Schwizgebel] has created qeMotion.

The idea here is simple enough: attach a motion sensor to a standard gaming headset (here a MPU-6050 IMU), and use the data from it to virtually “press” keys through USB HID emulation. Many first person shooter games offer the ability to lean left or right by pressing Q or E respectively, so all [Adrian] had to do was map the appropriate accelerometer readings to those keys for it to work seamlessly with popular titles such as Tom Clancy’s Rainbow Six Siege and Insurgency.

The concept might be basic, but the execution is anything but. Rather than just duct taping an Arduino to his headset, [Adrian] designed a very slick 3D printed enclosure for the electronics that sits on his desk. While they haven’t all been implemented yet, the devices features indicator lights and buttons to switch through various modes. The sensor on the headset has similarly been encased in a very professional looking 3D printed box, complete with a nice braided cable to link it to the desk unit.

It’s been awhile since we’ve seen a head tracking project, and most of those utilized something like the Wii Remote. Adding sensors to a person’s head normally wouldn’t be an ideal situation, but if you’re going to be wearing the headset anyway to listen to the game and chat, it’s not really a problem. If your hair is too nice for the qeMotion, you could always try doing something similar with computer vision.

Continue reading “Up Your Game With DIY Headset Motion Tracking”

A Miniature Laptop You Can Build Yourself

Over the last couple of years, we’ve seen more and more hackers building their own custom computers. We’re not just talking casemods here; enabled by advancements in desktop 3D printing and increasingly powerful boards such as the Raspberry Pi 4, these are machines designed and built from the ground up to meet the creator’s particular set of needs and desires.

A perfect example of this trend is the Rasptop 2.0, a remarkably practical design for a 3D printed miniature laptop. Despite the name, you don’t even need to use the Raspberry Pi if you don’t want to. Creator [Morgan Lowe] has designed the Rasptop to take other single board computers (SBCs) such as the Asus Tinker Board or even the Intel Atom powered Up Board. So whether you want an energy efficient ARM machine running Linux for development, or a mobile Windows box for on the go gaming, you can use the same printed parts.

At the most basic level, the Rasptop 2.0 is just a hollow box with a hinged compartment for a screen mounted on top. You’re free to equip it with whatever hardware you chose. If you’re after maximum runtime you could fill all the free space with batteries, or maybe install multiple hard drives if you’re a data horder in need of a mobile terminal. Even the various SBCs that [Morgan] has tested are really just suggestions. The choice is yours.

Perhaps also our favorite feature of the Rasptop is how he worked a keyboard into the design. Rather than just leaving a big rectangle in the STL for you to shove a mobile keyboard into, the top surface is designed to mount the PCB and membrane keypad of one of those mini wireless keyboards you see on all the import sites. Aside from the fact it’s a good deal chunkier than what we expect from modern mobile devices, it has a very finished and professional overall look.

Of course if you’d rather use all these powerful tools to build a computer that’s somewhat farther off the beaten track, your design could abandon the traditional computer form factors altogether.

Keeping A 3D Printed NAS Updated With The Times

Back in 2018, [Paul-Louis Ageneau] created a 3D printed network-attached storage (NAS) enclosure for his Raspberry Pi. The design worked well, the Internet liked it when he posted the details on his blog, and all was right with the world. But of course, such glories are fleeting. Two years later that design needs updating, and thanks to the parametric nature of OpenSCAD, he’s been able to refresh his design for another tour of duty.

In our book, this is as much a cautionary tale as it is a success story. On one hand, it’s a testament to the power of CAD and desktop 3D printing. That a design can be tweaked and reproduced down the line with only minimal hassle is great for folks like us. But it’s also a shame that he didn’t get more than two years before some of the parts he used in the original NAS became unobtainium.

The main issue was that the integrated USB hub he used for the first version is no longer available, so the design had to be modified to accept a similar board. Unfortunately, the new hub is quite a bit wider than the old one. Resizing the entire case isn’t really an option since the Pi has to slide into it, so the hub now bumps out a bit on one side. He’s added a printable cover that cleans it up a bit, but the asymmetrical look might be a problem for some. While fiddling with the design, he also changed around the cooling setup so a larger fan could be mounted; now that the Raspberry Pi 4 is out, it can use all the cooling help it can get.

We covered the original version of the printed NAS back when it was first released, and it’s always good to see a creator coming back and keeping a project updated; even if it’s because hardware availability forced their hand.

A Raspberry Pi Terminal That’s Always Within Reach

Inspired by films such asĀ The Matrix, where hackers are surrounded by displays and keyboards on articulated arms, [Jay Doscher] created this cyberpunk “floating” terminal so your favorite Linux single board computer is always close at hand. Do you actually need such a thing mounted to the wall next to the workbench? Probably not. But when has that ever stopped a Hackaday reader?

[Jay] has come up with a modular design for the “A.R.M. Terminal” that allows the user to easily augment it with additional hardware. The 3D printed frame of the terminal has hardpoints to bolt on new modules, which thanks to threaded metal inserts, will have no problem surviving multiple configurations.

This initial version features a panel on the left side that holds various buttons and switches attached to the Pi’s GPIO pins. With a bit of code, it’s easy to pick up the status of these controls and use them to fire off whatever tasks your imagination can come up with. On the bottom [Jay] has mounted a stand-alone VFD audio spectrum display that’s hooked up to the Pi’s 3.5 mm jack. It’s totally unnecessary and costs as much as the Raspberry Pi itself, but it sure is pretty.

If there’s a downside to the design, it’s that the only display currently supported is the official Raspberry Pi touchscreen which is only 800×480 and a bit pricey compared to more modern panels. On the other hand, there’s something to be said for the standardized bolt pattern on the back of the official screen; so if you want to use a higher resolution display, be prepared to design your own mounting bracket. Extra points if you share your changes with the rest of the class.

For anyone who likes the look of the A.R.M. Terminal but isn’t too keen on being tethered to the wall, you’re in luck. [Jay] previously created the Raspberry Pi Recovery Kit which shares many of the same design principles but puts them into a ruggedized case that’s ready for life in the field.