Direct 3D printing of metal remains out of reach for the hobbyist at the moment, so casting is often the next best thing, particularly given the limitations of 3D printed metals. [Denny] from Shake the Future shows us how to simplify the process with “print wave metal casting.”
The first step of printing a PLA object will seem familiar to any 3D print to metal process, but the main differentiator here is pouring the investment casting on the printer build plate itself. We like how he used some G-code to shake the build plate to help remove bubbles. Once the plaster solidifies, the plastic and mold are placed in the microwave to soften the plastic for removal.
The plaster is dried in an oven (or air fryer) and then [Denny] bolts the mold together for the casting process. Adding a vacuum helps with the surface finish, but you can always polish the metal with a generous helping of elbow grease.
If [Denny] seems familiar, you might remember his very detailed breakdown of microwave casting. We’ve seen plenty of different approaches to metal casting over the years here. Need a part in another material? How about casting concrete or resin?
Thanks to [marble] on the Hackaday Discord for the tip!
For most of our prototype, hobby, or one-off electronics projects it’s perfectly fine to use a development platform like an Arduino Uno or something to that effect. They’re both easy to program and easy to wire up to projects without breaking the bank. But if you step into an industrial setting where reliability is paramount even in places that are noisy, vibrating all the time, hot, or otherwise unpleasant for electronics, you’ll want to reach for a programmable logic controller (PLC) that are much more robust. There is actually a PLC from Arduino, and if you want to dip your toes into the PLC world then take a look at this drum kit based on the Arduino Opta.
With the PLC at the core of the build, it’s on to making the drumming mechanisms themselves. For that, project creator [JC Audio] is using a series of solenoids attached to camera mounts with a custom 3D printed part that allows for quick assembly and disassembly so he can get the positioning of each drum sound just right. The high hat is taken care of by the noise of an internal solenoid, with the other drums striking various real drums and other solid objects in his shops. The solenoids themselves are driven by a solid-state relay expansion module to ensure there’s enough power
While the build doesn’t sit inside a factory and run for years at a time, a musician’s stage is certainly a rough enough environment that we might reach for a PLC over a standard development board for its benefits. The code for this project is available as well at the project’s GitHub page for those looking for a more advanced timekeeper to play along with their music practice, and for more details on why you might choose a PLC for your project take a look at this Arduino vs PLC showdown from a few years ago.
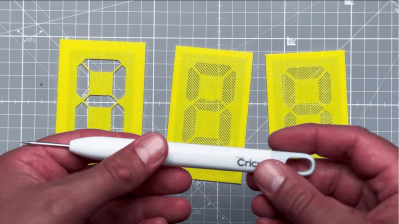
Displays are crucial to modern life; they are literally everywhere. But modern flat-panel LCDs and cheap 7-segment LED displays are, well, a bit boring. When we hackers want to display the progress of time, we want something more interesting, hence the plethora of projects using Nixie tubes and various incantations of edge-lit segmented units. Here is [upir] with their take on the simple edge-lit acrylic 7-segment design, with a great video explanation of all the steps involved.
Engraving the acrylic sheets by hand using 3D printed stencils
The idea behind this concept is not new. Older displays of this type used tiny tungsten filament bulbs and complex light paths to direct light to the front of the display. The modern version, however, uses edge-lit panels with a grid of small LEDs beneath each segment, which are concealed within a casing. This design relies on the principle of total internal reflection, created by the contrast in refractive indices of acrylic and air. Light entering the panel from below at an angle greater than 42 degrees from normal is entirely reflected inside the panel. Fortunately, tiny LEDs have a wide dispersion angle, so if they are positioned close enough to the edge, they can guide sufficient light into the panel. Once this setup is in place, the surface can be etched or engraved using a CNC machine or a laser cutter. A rough surface texture is vital for this process, as it disrupts some of the light paths, scattering and directing some of it sideways to the viewer. Finally, to create your display, design enough parallel-stacked sheets for each segment of the display—seven in this case, but you could add more, such as an eighth for a decimal point.
How you arrange your lighting is up to you, but [upir] uses an off-the-shelf ESP32-S3 addressable LED array. This design has a few shortcomings, but it is a great start—if a little overkill for a single digit! Using some straightforward Arduino code, one display row is set to white to guide light into a single-segment sheet. To form a complete digital, you illuminate the appropriate combination of sheets. To engrave the sheets, [upir] wanted to use a laser cutter but was put off by the cost. A CNC 3018 was considered, but the choice was bewildering, so they just went with a hand-engraving pick, using a couple of 3D printed stencils as a guide. A sheet holder and light masking arrangement were created in Fusion 360, which was extended into a box to enclose the LED array, which could then be 3D printed.
Here’s how it works: The SLS 3D printer uses a laser to fuse powdered nylon together layer by layer to make a plastic part. But to the nylon powder, [Ben] has added a small amount of a specific catalyst (copper chromite), so that prints contains this catalyst. Copper chromite is pretty much inert until it gets hit by a laser, but not the same kind of laser that sinters the nylon powder. That means after the object is 3D printed, the object is mostly nylon with a small amount of (inert) copper chromite mixed in. That sets the stage for what comes next.
Batman is a compelling superhero for enough reasons that he’s been a cultural force for the better part of a century. His story has complex characters, interesting explorations of morality, iconic villains, and of course a human superhero who gets his powers from ingenuity instead of a fantastical magical force. There are a number features of the Batman universe that don’t translate well to the real world, though, such as a costume that would likely be a hindrance in fights, technology that violates the laws of physics, and a billionaire that cares about regular people, but surprisingly enough his legendary Batwing jet airplane actually seems like it might be able to fly.
While this is admittedly a model plane, it flies surprisingly well for its nontraditional shape. [hotlapkyle] crafted it using mostly 3D printed parts, and although it took a few tries to get it working to his standards, now shoots through the air quite well. It uses an internal electric ducted fan (EDF) to get a high amount of thrust, and has elevons for control. There are two small vertical stabilizer fins which not only complete the look, but allow the Batwing to take to the skies without the need for a flight controller.
Not only is the build process documented in the video linked below with some interesting tips about building RC aircraft in general, but the STL files for this specific build are available for anyone wanting to duplicate the build or expand on it. There are plenty of other interesting 3D-printed models on [hotlapkyle]’s page as well that push the envelope of model aircraft. For some other niche RC aircraft designs we’ve seen in the past be sure to check out this F-35 model that can hover or this tilt-rotor Osprey proof-of-concept.
Unless you’re living in a bicycle paradise like the Netherlands, most people will choose to add some sort of illumination to their bicycle to help drivers take note that there’s something other than a car using the road. Generally, simple flashing LEDs for both the front and the rear is a pretty good start, but it doesn’t hurt to add a few more lights to the bicycle or increase their brightness. On the other hand, if you want to add some style to your bicycle lighting system then this persistence of vision (POV) display called the BikeBeamer from [locxter] might be just the thing.
The display uses four LED strips, each housed in their own 3D printed case which are installed at 90-degree angles from one another in between the spokes of a standard bicycle wheel. An ESP32 sits at the base of one of the strips and is responsible for storing the image and directing the four displays. This is a little more complex than a standard POV display as it’s also capable of keeping up with the changing rotational speeds of the bicycle wheels when in use. The design also incorporates batteries so that no wires need to route from the bike frame to the spinning wheels.
This is an ongoing project for [locxter] as well, meaning that there are some planned upgrades even to this model that should be in the pipe for the future. Improving the efficiency of the code will hopefully allow for more complex images and even animations to be displayed in the future, and there are also some plans to improve the PCB as well with all surface-mount components. There are a few other ways to upgrade your bike’s lighting as well, and we could recommend this heads-up headlight display to get started.
While 3D printers have evolved over the past two decades from novelties to powerful prototyping tools, the amount of support systems have advanced tremendously as well. From rudimentary software that required extensive manual input and offered limited design capabilities, there’s now user-friendly interfaces with more features than you could shake a stick at. Hardware support has become refined as well with plenty of options including lighting, ventilation, filament recycling, and tool changers. It’s possible to automate some of these subsystems as well like [Caelestis Workshop] has done with this relay control box.
This build specifically focuses on automating or remotely controlling the power, enclosure lighting, and the ventilation system of [Caelestis Workshop]’s 3D printer but was specifically designed to be scalable and support adding other features quickly. A large power supply is housed inside of a 3D printed enclosure along with a Raspberry Pi. The Pi controls four relays which are used to control these various pieces hardware along with the 3D printer. That’s not the only thing the Pi is responsible for, though. It’s also configured to run Octoprint, a piece of open-source software that adds web interfaces for 3D printers and allows their operation to be monitored and controlled remotely too.
With this setup properly configured, [Caelestis Workshop] can access their printer from essentially any PC, monitor their prints, and ensure that ventilation is running. Streamlining the print process is key to reducing the frustration of any 3D printer setup, and this build will go a long way to achieving a more stress-free environment. In case you missed it, we recently hosed a FLOSS Weekly episode talking about Octoprint itself which is worth a listen especially if you haven’t tried this piece of software out yet.