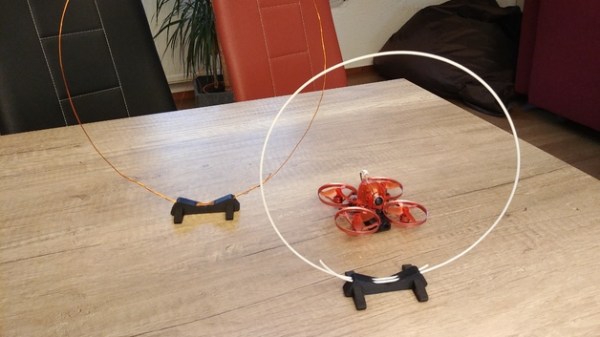
3D Printed ESP8266 Programming Jig

The various development boards such as the NodeMCU or Wemos D1 make working with the ESP8266 an absolute breeze. If they have a downside, it is that they are larger than the bare ESP2866, and of course cost a bit more. Just as with the Arduino, once you have the wiring sorted out and the code more or less finalized, your best bet is to ditch the unnecessary support hardware and use the bare module to save space and money in your final design.

The design took a few revisions to get right

Unfortunately, the ESP8266 form factor isn’t terribly forgiving when it comes time for hooking up a programmer. Rather than having to solder a serial adapter to the chip to flash it, [Ryan] came up with a slick 3D printed programming jig that uses pogo pins. If you have to program these boards in bulk, a jig like this can save a massive amount of time and aggravation.

Beyond the 3D printed holder for the pogo pins, this programmer uses a FTDI USB-to-serial adapter, a couple passive components to smooth out the power going into the chip, and a couple buttons.

In the video after the break, [Ryan] walks through the many iterations it took to get the 3D printed aspect of the jig worked out. The design went through a few rather large revisions, including one that fundamentally changed the whole form factor. Even with the jig now working, he mentions that he might circle back around and try it from a different angle.

Programming jigs are a staple of electronics manufacturing, and we’ve covered quite a few that have helped transformed a proof of concept into a small scale production runs.

Continue reading “3D Printed ESP8266 Programming Jig”

Rechargeable Robot Mows Lawns

Perhaps one day our robot overlords will look back on all of the trivial things that humans made them do and take retribution on us. Until then, though, there’s no problem having them perform all of our chores. [v.loschiavo] is also exploiting our future rulers and built a robot that mows his lawn automatically as his entry into the 2018 Hackaday Prize.

The robot uses a rechargeable battery system to drive a nylon blade for grass cutting. It also has an obstacle detection and avoidance system that allows it to find the borders of your yard and keep from getting stuck against shrubs and flower beds. And don’t worry about safety, either. There’s a built-in system of sensors that prevents any injuries from occurring. The robot also has a 10 Watt solar panel on the top that helps recharge the battery, but it can also recharge at a base station similar to a Roomba.

The whole robot was 3D printed with the exception of some parts like the cutting motor, solar panel, and gear motors. While nothing except for the pictures and a general overview of the robot has been posted to the project page yet, we hope [v.loschiavo] updates the project with the G-code files, code, and schematics so we can build our own.

Arduino Clock Jots Down The Time, In UV

We’re big fans of the impractical around here at Hackaday. Sure there’s a certain appeal to coming up with the most efficient method to accomplish your goal, the method that does exactly what it needs to do without any superfluous elements. But it’s just not as much fun. If at least one person doesn’t ask “But why?”, then you probably left something on the table, design wise.

So when we saw this delightfully complex clock designed by [Tucker Shannon], we instantly fell in love. Powered by an Arduino, the clock uses an articulated arm with a UV LED to write out the current time on a piece of glow-in-the-dark material. The time doesn’t stay up for long depending on the lighting in the room, but at least it only takes a second or two to write out once you press the button.

Things are pretty straightforward inside the 3D printed case. There’s an Arduino coupled with an RTC module to keep the time, which is connected to the two standard hobby servos mounted in the front panel. A UV LED and simple push button round out the rest of the Bill of Materials. The source code is provided, so you won’t have to figure out the kinematics involved in getting the two servos to play nicely together if you want to try this one at home.

We’ve seen many clocks powered by Arduinos over the years, occasionally they even have hands. But few can boast their own robotic arm.

Continue reading “Arduino Clock Jots Down The Time, In UV”

3D Printed Raspberry Pi NAS With Dual Drive Bays

While it might not pack the computational punch you’d usually be looking for in a server platform, you can’t beat how cheap the Raspberry Pi is. As such, it’s at the heart of many a home LAN, serving up files as a network attached storage (NAS) device. But the biggest problem with using the Pi in a NAS is that it doesn’t have any onboard hard drive interface, forcing you to use USB. Not only is this much slower, but doesn’t leave you a lot of options for cleanly hooking up your drives.

This 3D printable NAS enclosure designed by [Paul-Louis Ageneau] helps address the issue by integrating two drive bays which can accommodate 2.25 inch laptop hard disk drives and their associated IB-AC6033-U3 USB adapters. The drives simply slide into the “rails” designed into the case without the need for additional hardware. There’s even space in the bottom of the case for a USB hub to connect the drives, and a fan on the top of the case to help keep the whole stack cool. It still isn’t perfect, but it’s compact and doesn’t look half bad.

The design is especially impressive as it doesn’t require any supports, an admirable goal to shoot for whenever designing for 3D printing. As an added bonus, the entire case is designed in OpenSCAD and licensed under the GPL v3; making modification easy if you want to tweak it for your specific purposes.

This certainly isn’t the strongest Raspberry Pi enclosure we’ve ever seen, that title would have to go to the ammo case that does double duty as a media streamer, but looks like it would make a great home for that new 3 B+ you’ve got on order.

Look Upon Eyepot, And Weep For Mercy

Hope you weren’t looking forward to a night of sleep untroubled by nightmares. Doing his part to make sure Lovecraftian mechanized horrors have lease in your subconscious, [Paul-Louis Ageneau] has recently unleashed the horror that is Eyepot upon an unsuspecting world. This Cycloptic four legged robotic teapot takes inspiration from an enemy in the game Alice: Madness Returns, and seems to exist for no reason other than to creep people out.

Even if you aren’t physically manifesting nightmares, there’s plenty to learn from this project. [Paul-Louis Ageneau] has done a fantastic job of documenting the build, from the OpenSCAD-designed 3D printed components to the Raspberry Pi Zero and Arduino Pro Mini combo that control the eight servos in the legs. If you want to play along at home all the information and code is here, though feel free to skip the whole teapot with an eyeball thing.

A second post explains how the code is written for both the Arduino and Pi, making for some very illuminating reading. A Python script on the Pi breaks down the kinematics and passes on the appropriate servo angles to the Arduino over a serial link. Combined with a web interface for control and a stream from the teapot’s Raspberry Pi Camera module, and you’ve got the makings of the world’s creepiest telepresence robot. We’d love to see this one stomping up and down a boardroom table.

Seems we are on a roll recently with creepy robot pals. Seeing a collaboration between Eyepot and JARVIS might be too much for us to handle. Though we have a pretty good idea how we’d want to control them.

This Big, Bright Seven-Segment Display Is 3D-Printable

Seven-segment LED displays have been around forever, it seems, and the design is pretty optimized by now. Off-the-shelf units are readily available in all sorts of sizes and colors, but if you want a really big display, you might have to roll your own. Scaling up the size doesn’t necessarily mean you have to scale up the complexity, though, if this light-pipeless jumbo seven-segment LED display is any indication.

It’s clear that [Fran Blanche] has a thing for collecting and building oddball numeric displays, like this cathode ray tube Nixie knockoff or her Apollo DSKY electroluminescent display. Her plus-size seven-segment display is far less complicated than either of those, and that’s by design; [Fran] wanted something that was 3D-printable as a single part, rather than an assembly with light pipes and diffusers. To that end, the display is just a pair of X-shaped dividers stacked on top of each other behind the display’s face. They dividers form six triangular compartments and a diamond shaped one, with each compartment opening into a segment-shaped window. One LED goes in each triangular compartment, while the double-sized diamond space gets two. That’s it — the LEDs light up the inside of each compartment to turn on the appropriate segments. Watch it in action below.

The display still needs some tweaking, but it’s big and bright and has a large acceptance angle. What’s more, it’s scalable — imagine a display the size of a sheet of plywood using LED light bulbs. We’re looking forward to [Fran]’s improvements and her next display project, which appears to use hot glue as a light pipe.

Continue reading “This Big, Bright Seven-Segment Display Is 3D-Printable”

3D Printed Stethoscope Makes The Grade

On the off chance that initiatives like the Hackaday Prize didn’t make it abundantly clear, we believe strongly that open designs can change the world. Putting technology into the hands of the people is a very powerful thing, and depending on where you are or your station in life, can quite literally mean the difference between life and death. So when we saw that not only had a team of researchers developed a 3D printable stethoscope, but released everything as open source on GitHub, it’s fair to say we were pretty interested.

The stethoscope has been in development for several years now, but has just recently completed a round of testing that clinically validated its performance against premium brand models. Not only does this 3D printed stethoscope work, it works well: tests showed its acoustic performance to be on par with the gold standard in medical stethoscopes, the Littmann Cardiology III. Not bad for something the researchers estimate can be manufactured for as little as $3 each.

All of the 3D printed parts were designed in OpenSCAD (in addition to a Ruby framework called CrystalSCAD), which means the design can be evaluated, modified, and compiled into STLs with completely free and open source tools. A huge advantage for underfunded institutions, and in many ways the benchmark by which other open source 3D-printable projects should be measured. As for the non-printed parts, there’s a complete Bill of Materials which even includes links to where you can purchase each item.

The documentation for the project is also exceptional. It not only breaks down exactly how to print and assemble the stethoscope, it even includes multi-lingual instructions which can be printed out and distributed with kits so they can be assembled in the field by those who need them most.

From low-cost ultrasounds to truly personalized prosthetics, the future of open source medical devices is looking exceptionally bright.

[Thanks to Qes for the tip]