Al and I were talking on the podcast today about a sweet 3D printed wide-format camera build, and we got to musing on why we 3D-print.
For Al, it’s an opportunity to experiment with 3D printing itself: tweaking his machines to get the best performance out of them. Other people make small, functional objects that they need in their daily life, like bag clips or spare parts for broken appliances. Some folks go for the ornamental or the aesthetic. The kids in my son’s class all seem obsessed with sci-fi props and fidget toys. The initial RepRap ideal was to replace all commercial fabrication with machines owned by the individual, rather than by companies – it was going to be Marxist revolutionary.
But there’s another group of 3D printer enthusiasts that I think doesn’t get enough coverage, and I’m going to call them the hobbyist industrial designers. These are the people who design a custom dog-poop-bag holder that exactly fits their extra-wide dog leash, not because they couldn’t find one that fit in the pet store, but because it’s simply fun to design and fabricate things. (OK, that’s literally me.)
It’s fun to learn CAD tools, to learn about how things are designed, how they work, and how to manufacture them at least in quantity one. Dreaming, designing, fabricating, failing, and repeating until you get it right is a great joy. And then you get to use the poop-bag holder every day for a few years, until you decide to refine the design and incorporate the lessons learned on the tough streets of practical use.
Of course none of this is exclusive to 3D printing. There were always people who designed-and-built things in the metal machine shop, or made their creations out of wood. In that sense, the 3D printer is just another tool, and the real fun isn’t in using the 3D printer, but rather in the process of bringing things out of your mind and into the world. So maybe there is nothing new here, but the latitude that 3D printing affords the hobby designer is amazing, and that makes it all the more fun, and challenging.
So do you 3D print for necessity, to stick it to the man, to pimp your printer, for the mini-figs, or simply for the joy of the process of making things? It’s all good. 3D printing is a big tent.


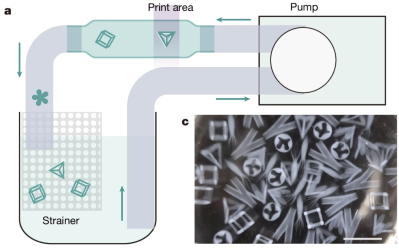 Normal volumetric printing uses a rotating volume of photosensitive resin to print nearly any geometry desired. However, this method presents issues when printing at high speeds. If you rapidly rotate a liquid, it won’t exactly stay still. So why not rotate the projector itself? This change also allows the use of less viscous resins, which is particularly useful if you want to pump fluid around.