Custom Control Panels With Photogrammetry

One of the best applications for desktop 3D printing is the creation of one-off bespoke components. Most of the time a halfway decent pair of calipers and some patience is all it takes to model up whatever part you’re after, but occasionally things get complex enough that you might need a little help. If you ever find yourself in such a situation, salvation might be just a few marker scribbles away.

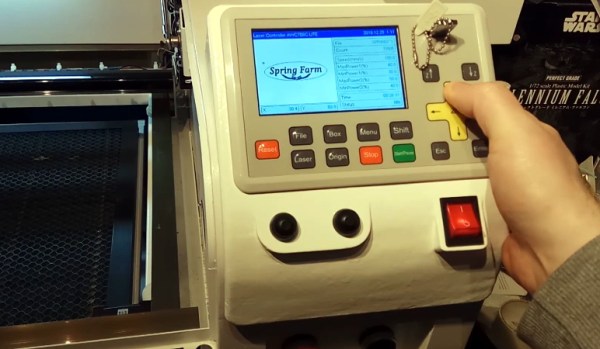
As [Mangy_Dog] explains in a recent video, he wanted to model a control panel for a laser cutter he’s been working on, but thought the shapes involved were a bit more than he wanted to figure out manually. So he decided to give photogrammetry a try. For the uninitiated, this process involves taking as many high-resolution images as possible of a given object from multiple angles, and letting the computer stitch that into a three dimensional model. He reasoned that if he had a 3D model of the laser’s existing front panel, it would be easy enough to 3D print some replacement parts for it.

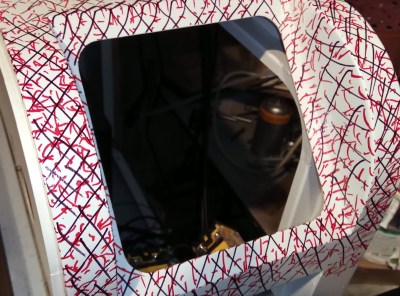
That would be a neat enough trick on its own, but what we especially liked about this video was the tip that [Mangy_Dog] passed along about increasing visual complexity to improve the final results. Basically, the software is looking for identifiable surface details to piece together, so you can make things a bit easier for it by taking a few different colored markers and drawing all over the surface like a toddler. It might look crazy, but all those lines give the software some anchor points that help it sort out the nuances of the shape.

Unfortunately the markers ended up being a little more permanent than [Mangy_Dog] had hoped, and he eventually had to use acetone to get the stains off. Certainly something to keep in mind. But in the end, the 3D model generated was accurate enough that (after a bit of scaling) he was able to design a new panel that pops right on as if it was a factory component.

Hackaday readers may recall that when we last heard from [Mangy_Dog] he was putting the finishing touches on his incredible “Playdog Blackbone” handheld gaming system, which itself is a triumph of mating 3D printed components with existing hardware.

Continue reading “Custom Control Panels With Photogrammetry”

How To 3D Print Your Identical Twin

It’s possible to have an enjoyable weekend touring a city with a stolen cardboard cutout from some advertising display or other. However, it’s 2019, and 3D printing means you can go so much further. [Simon] of RCLifeOn went so far as to print a lifesized body double of himself, and it’s only slightly creepy! (Video, embedded below.)

The model was sourced from a 3D scan [Simon] had done with commercial hardware. An Optimus P1 industrial-grade 3D printer was used to print the parts, with total printing time being around 200 hours. Adhesive was used to join the various segments together, and the assembly was then sanded and primed, ready for paint.

Unwilling to tackle the task alone, [Simon] enlisted a professional painter to help put the finishing touches on the piece. The end result is impressive, particularly from a distance. [Simon 2.0] was then sent out to the city centre, aiming to raise money from bewildered passers by.

We suspect the market for custom body doubles will only increase as the technology to create them becomes more widespread. If you’ve tackled a similar project, be sure to let us know. Video after the break.

Continue reading “How To 3D Print Your Identical Twin”

This 3D Scanner Is Your Ticket To Photogrammetry

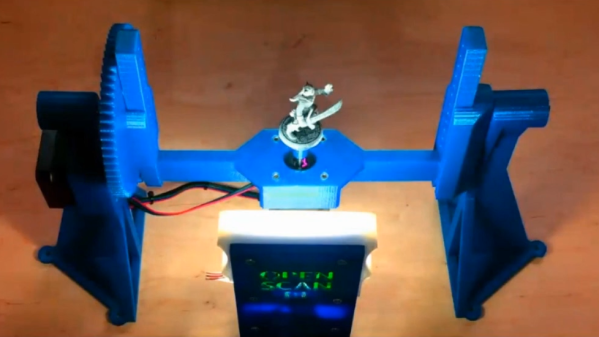
It seems 3D printers have been around for ages and still we don’t have a good solution for turning physical 3D objects into digital ones. Yes, 3D scanners exist, but the OpenScan is the best 3D scanner we’ve seen. It’s a 3D printed device meant to take pictures of an object that can then be used by photogrammetry software to construct a point cloud. From there, it’s just a matter of messing with meshes to create a 3D printed copy of anything you want.

The latest version of the scanner is an improvement over the previous version that kind of, sort of looked like the Machine from Contact. This was a gigantic hubless ring, with a smartphone attached to the rim. Put an object in the center, and the phone would rotate around the object in every axis, snapping pictures the entire time. Needless to say, a simpler design prevailed. That doesn’t mean the old version didn’t look awesome. The electronics are simply an Arduino clone, two stepper drivers, a character display for control and some headers for connections and power supplies. This is pretty normal stuff for the RepRap crew.

Running this machine is as simple as putting an object in the device and taking a few pictures. There is some support for remotely controlling some cameras, but everything is universal if you have a remote shutter release. This can be plugged into the electronics, and once everything is done you have a few dozen pictures of an object with optimal lighting conditions that can be thrown into your photogrammetry software of choice. (Ed note: at least one that doesn’t rely on the object remaining stationary with respect to the background to estimate camera position.)

Get Great 3D Scans With Open Photogrammetry

Not long ago, photogrammetry — the process of stitching multiple photographs taken from different angles into a 3D whole — was hard stuff. Nowadays, it’s easy. [Mikolas Zuza] over at Prusa Printers, has a guide showing off cutting edge open-source software that’s not only more powerful, but also easier to use. They’ve also produced a video, which we’ve embedded below.

Basically, this is a guide to using Meshroom, which is based on the AliceVision photogrammetry framework. AliceVision is a research platform, so it’s got tremendous capability but doesn’t necessarily focus on the user experience. Enter Meshroom, which makes that power accessible.

Meshroom does all sorts of cool tricks, like showing you how the 3D reconstruction looks as you add more images to the dataset, so that you’ll know where to take the next photo to fill in incomplete patches. It can also reconstruct from video, say if you just walked around the object with a camera running.

The final render is computationally intensive, but AliceVision makes good use of a CUDA on Nvidia graphics cards, so you can cut your overnight renders down to a few hours if you’ve got the right hardware. But even if you have to wait for the results, they’re truly impressive. And best of all, you can get started building up your 3D model library using nothing more than that phone in your pocket.

If you want to know how to use the models that come out of photogrammetry, check out [Eric Strebel]’s video. And if all of this high-tech software foolery is too much for you, try a milk-based 3D scanner.

Continue reading “Get Great 3D Scans With Open Photogrammetry”

3D Scanning Via DIY Photogrammetry

For those with 3D printers, taking a 3D model and spitting out a physical object is so routine as to be blasé. The reverse is something a little different. There are many ways to create a digital 3D model of a physical object, of varying complexity. [Eric Strebel] favors photogrammetry, and has shared a useful guide for those interested in using this technique.

In its most basic sense, photogrammetry refers to taking measurements from photographs. In the sense being discussed here, it more precisely refers to the method of creating a 3D model from a series of photographs of a physical object. By taking appropriate images of an object, and feeding them through the right software, it’s possible to create a digital representation of the object without requiring any special hardware other than a camera.

[Eric] shares several tips and tricks for getting good results. Surface preparation is key, with the aim being to create a flat finish to avoid reflections causing problems. A grey primer is first sprayed on the object, followed by a dusting of black spots, which helps the software identify the object’s contours. Camera settings are also important, with wide apertures used to create a shallow depth-of-field that helps the object stand out from the background.

With the proper object preparation and camera technique taken care of, the hard work is done. All that’s then required is to feed the photos through the relevant software. [Eric] favors Agisoft Metashape, though there are a variety of packages that offer this functionality.

We first reported on photogrammetry back in 2016. If cameras aren’t your thing, you can always give lasers a try. Video after the break.

Continue reading “3D Scanning Via DIY Photogrammetry”

Doomba Transports Your Living Room To Hell

Despite being over 25 years old, the original DOOM is still a favorite among gamers and hackers alike. For years now, running the 1993 demonic shooter has been a critical milestone when hacking or reverse engineering a piece of gear, and at this point we’ve seen it run on everything from voting machines to cameras.

But this time around, DOOM isn’t actually running on the device being hacked. Instead, the Roomba 980 that [Rich Whitehouse] has doing his bidding is being used to generate new DOOM levels based on the maps it makes of rooms while going about its business. To be fair they’re pretty simplistic maps, and most of us don’t live in a home quite palatial enough to even fill out shareware trial of id Software’s classic, but it’s still a neat trick.

For those who might not be up to date with the latest and greatest in the world of robotic helpers, newer model Roomba vacuums are equipped with a camera and the ability to generate 3D maps of its environment using a technique called Vision Simultaneous Localization and Mapping (VSLAM). Ostensibly this capability is used to create accurate maps of hazards in the cleaning area, but of course it did set off some privacy alarm bells when introduced due to the possibility that scans of users homes could end up being used for nefarious purposes. Roomba manufacturer iRobot swears they aren’t doing anything suspect with the data their robots collect while traveling through the user’s home, but that hasn’t stopped [Rich] from using the technology as a portal to Hell.

Using “DOOMBA”, the user is able to download the mapping data off of their Roomba 980 (it might work on other models, but hasn’t been tested yet) over the local network and import it into Noesis, a 3D model viewing program developed by [Rich]. The imported map is essentially just a 2D diagram of the home’s floor plan, which on its own wouldn’t make for a terribly interesting DOOM level, so the software will take the liberty of seeding it with weapons, baddies, and all the other varied delights of the netherworld. The user can fiddle around with these settings to try and fine-tune their homespun hellscape, or just let “DOOMBA” randomize it all so they can get on with the ripping and tearing.

If you’ve got Roomba in hand but aren’t a DOOM fan, have no fear. We’ve seen plenty of hacks and mods for everyone’s favorite house-cleaning hockey puck which happen to be of the non-demonic variety. If you just can’t get enough DOOM, stick around for tomorrow’s 25th anniversary celebration article. You will want to copy the banner art and use it as your new desktop background.

Manual 3D Digitizer Works A Bit Like 3-Dimensional Measuring Tape

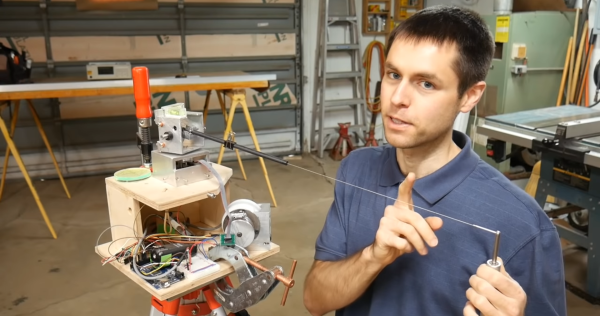
Digitizing an object usually means firing up a CAD program and keeping the calipers handy, or using a 3D scanner to create a point cloud representing an object’s surfaces. [Dzl] took an entirely different approach with his DIY manual 3D digitizer, a laser-cut and 3D printed assembly that uses rotary encoders to create a turntable with an articulated “probe arm” attached.

Each joint of the arm is also an encoder, and by reading the encoder values and applying a bit of trigonometry, the relative position of the arm’s tip can be known at all times. Manually moving the tip of the arm from point to point on an object therefore creates measurements of that object. [Dzl] successfully created a prototype to test the idea, and the project files are available on GitHub.

We remember the earlier version of this project and it’s great to see how it’s been updated with improvements like the addition of a turntable with an encoder. DIY 3D digitizing takes all kinds of approaches, and one example was this unit that used four Raspberry Pi Zeros and four cameras to generate high quality 3D scans.