Low-Power Orientation Tracker And An Optimized Math Library For The MSP430

MSP430 Orientation Tracker

Orientation trackers can be used for a ton of different applications: tracking mishandled packages, theft notification of valuables, and navigation are just a few examples! A recent blog post from Texas Instruments discusses how to build a low-cost and low-power orientation tracker with the MSP430.

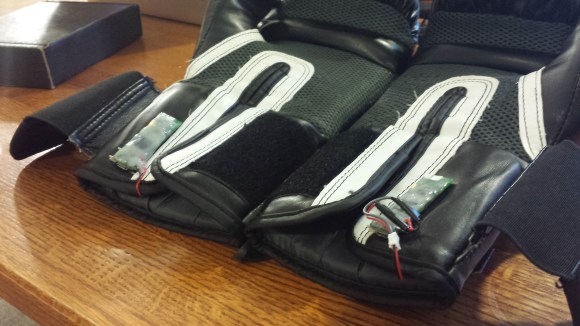
Based on the MSP430 LaunchPad and CircuitCo’s Educational BoosterPack, the orientation tracker is very simple to put together. It can also be made wireless using any of the wireless BoosterPacks with a Fuel Tank BoosterPack, or by using the BLE Booster Pack with a built in Lithium Battery circuitry. TI provides all the necessary code and design files in their reference application for getting your orientation tracker up and running. Be sure to see the device in action after the break! This project not only involves building a low-power orientation tracker, but also showcases IQmathLib, a library of optimized fixed point math functions on the MSP430. One of the more challenging aspects of using small MCUs such as the MSP430 or Arduino is how inefficient built in math libraries are. Check out the IQmathLib, it greatly improves upon the built in math functions for the MSP430.

It would be interesting to see this project modified to be a DIY pedometer or be used on a self-balancing robot. It would also be interesting to see the IQmathLib ported to other micros, such as the Arduino. Take a look and see how you can use this reference design in your own projects!

Continue reading “Low-Power Orientation Tracker And An Optimized Math Library For The MSP430”

Step Into The Ring With Fight Coach

box01


As MMA continues to grow in popularity, the competition is getting tougher. There’s always someone else out there who’s training harder and longer than you are. So how do you get the advantage over your competitors? More push-ups? Sit-ups? Eat more vegetables? What about installing custom 2 by 1 inch, 5 gram PCB’s armed with an ATmega32U4, a MPU-6050 6 axis accelerometer and an RN-41 Bluetooth module into each of your gloves? Now that’s what we’re talking about.

[Vincent] and [Jooyoung] of Cornell joined their classmates in turning out another cool piece of electrical engineering. Fight Coach records data from the fighter’s gloves so that it can not only be analyzed to improve performance, but also interact with the fighter in real-time.  Though not quite as immersive as some fighter training techniques we’ve seen, Fight Coach might just give a fighter a slight edge in the ring.

Fight Coach offers 3 modes of training: Defense mode, Damage mode and Free-Training mode. As usual with Cornell projects, all code, schematics and a wealth of information on the project is just a click away. And stick around after the break for a video demonstration of Fight Coach.

Continue reading “Step Into The Ring With Fight Coach”

Web Interface For The FRAM LaunchPad

webUILaunchpad 
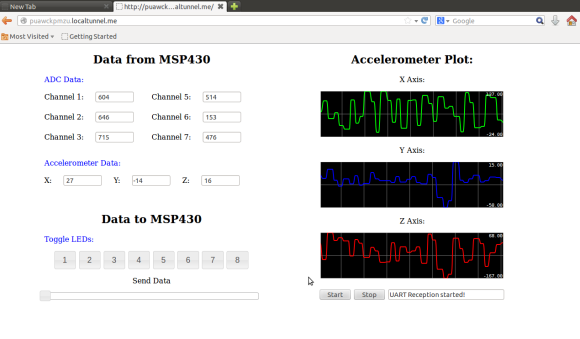
The Internet of Things is here in full force. The first step when adding to the Internet of Things is obvious, adding a web interface to your project. [Jaspreet] wrote in to tell us about his project that adds a web interface to his MSP430 based project, making it easy to add any project to the internet of things.

Creating a web interface can be a bit overwhelming if you have never done it before. This project makes it easy by using a dedicated computer running Linux to handle all of the web related tasks. The LaunchPad simply interfaces with the computer using USB and Python, and the computer hosts the webpage and updates it in real time using Node.js. The result is a very professional looking interface with an impressively responsive display that can control the on-board LEDs, read analog values from the integrated ADC, and stream accelerometer data. Be sure to see it in action after the break!

We could see this project being expanded to run on the Raspberry Pi with a multitude of sensors. What will you add a web interface to next? Home automation? A weather station? Let us know!

Continue reading “Web Interface For The FRAM LaunchPad”

3D Printed RGB LED Bracelet

3dprintedrgbbraclet

[Marcus’s] 3D-printed LED bracelet has moved through a number of revisions recently, but each iteration is impressive in both simplicity and functionality. Inspired to experiment with his print of [nervoussystem’s] Diagrid Bracelet, [Marcus] took the opportunity to add some LEDs with his first build, which combined a strip of RGB LEDs, a small battery, and an Adafruit Trinket microcontroller.

A second build soon followed, which overhauled the bracelet’s design into a more solid form and managed to double the amount of LEDs by upgrading to a different strip. The bracelet is currently in its third revision, cycling through the spectrum for around 3.5 hours on a single charge. This build also sports a 3-axis accelerometer: when the wearer shakes the bracelet, the colors skip around. If shaken long enough, the bracelet will enter a dazzling flurry of color flickering. Stick around after the break for a few demonstration videos. If you want to print your own, head over to [Marcus’s] Thingiverse file.

Continue reading “3D Printed RGB LED Bracelet”

Stylish OLED Watch Uses Accelerometer Instead Of Buttons

A few days ago [Andrew] contacted us to offer his help for the design of the mooltipass project case. While introducing himself, he casually mentioned his OLED watch that you can see above.

The watch is based on the low-power MSP430F microcontroller from Texas Instruments. It can consume as little as 1.5uA while maintaining a real-time clock and monitoring interrupts. It also uses ferroelectric RAM, which doesn’t need any power to retain its memory contents. That means there’s no need to set the time again if you remove the CR2016 battery that powers the watch.

[Andrew] chose an 0.96″ OLED display that only consumes up to 7mA. He also included an accelerometer that allows him to interact with the watch through its single and double tap detecting feature. He modeled his PCB using EagleCAD and the whole assembly using Sketchup. Most of the components were soldered in his reflow (toaster) oven. The final result is a mere 8.8mm thick and looks very professional in our opinion.

Accelerometer Poi

accelerometerPoi

Even if you’ve never attended a rave, you have probably seen one portrayed on film or television. Those glowing spheres-on-a-string being swung around are called poi, and [Matt Keeter] has designed a pair with an accelerometer upgrade. Poi have a long history and were originally made from plants, but contemporary examples usually feature some kind of light, whether it’s fire, LEDs, or even glowsticks tied to shoelaces.

This build required double-sided PCBs and [Matt] had to custom make the protective covering that slips over the board. The poi are powered by 2 AA batteries fed into a 5V boost regulator. But wait, no microcontroller and no PWM? Actually, we think it’s quite clever that [Matt] took the output from the accelerometer and fed into an inverting amplifier. This keeps the voltage constant while allowing the accelerometer to vary the current. Had he used PWM, the fast motion of the swinging poi would instead produce a blinking effect.

An additional trimmer potentiometer accounts for variability in the accelerometers’ output by adjusting the default brightness. If the recent recap of Burning Man has you excitedly planning to attend next summer, you’d probably find plenty of opportunities to use these in the desert.

24-hour Hackathon Produces Respectable Accelerometer Labyrinth

hackathon-labyrinth

We’re not sure if this was some type of corporate team building, but if it was sign us up for the next one. [Filipp], [Saluka], and [Michael] participated in a recent 24-hour hackathon hosted by Microsoft. They whipped up this labyrinth game controlled by a Nexus 4 Android phone.

This thing looks so well crafted we’re shocked that it’s a 24-hour build. Just putting together the walls of a maze that size takes some time. They then mounted it in a gimbaled frame which tilts the using servos. Check out the demo video below to get a look at the underpinnings. There are several elastic bands connecting the base to the maze. These act as shock absorbers to help keep the movement smooth and to prevent any oscillations from the frame flexing. For us this is an important design element that we’ll keep in mind (just in case we need to win another competition by designing a labyrinth).

An Arduino controls the servos, using Bluetooth to communicate with the phone. The team mentions some filtering used to help make the user experience more natural but we didn’t see many details on this aspect of the hack.

Continue reading “24-hour Hackathon Produces Respectable Accelerometer Labyrinth”