Useful Build Tips For Making LED Panel Frames

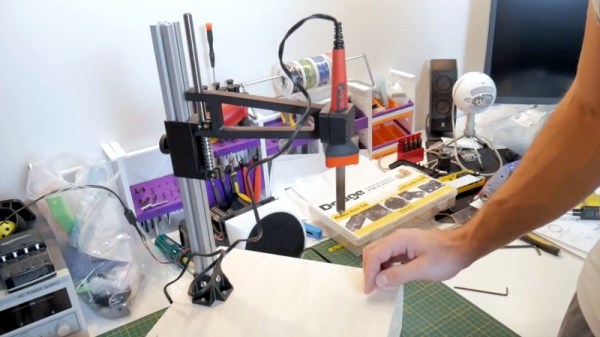
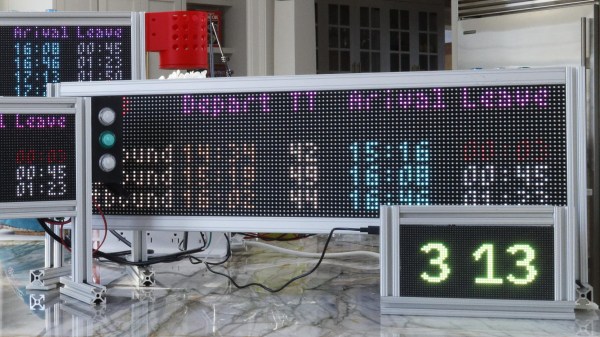
[NotLikeALeafOnTheWind] has created many LED-based display projects, and shares his method for making attractive LED panel frames and mounts. At first glance it may look as though slapping a rectangle of aluminum extrusion around a display is all it takes, there is also the mounting and management of wiring, power supply, and possibly a Raspberry Pi to deal with. The process of building an attractive frame also has a few hidden gotchas that can be avoided with a bit of careful planning.

Magnetic feet on the LED panels makes mounting much easier and more flexible.

Here is one tip that will resonate with some readers: don’t rely on specified dimensions of parts; measure the actual parts yourself. There can be small differences between what a data sheet says to expect, and the dimensions of the actual part in one’s hands. It may not be much, but it can be the difference between an ideal fit, and something that looks like a bit of a hack job.

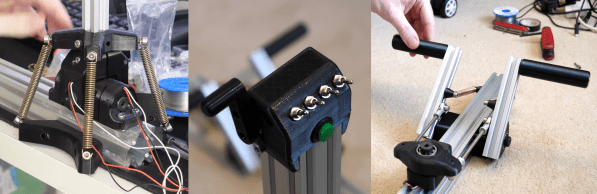
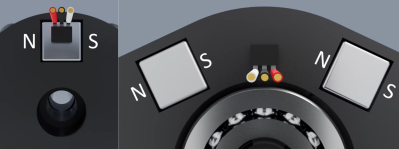
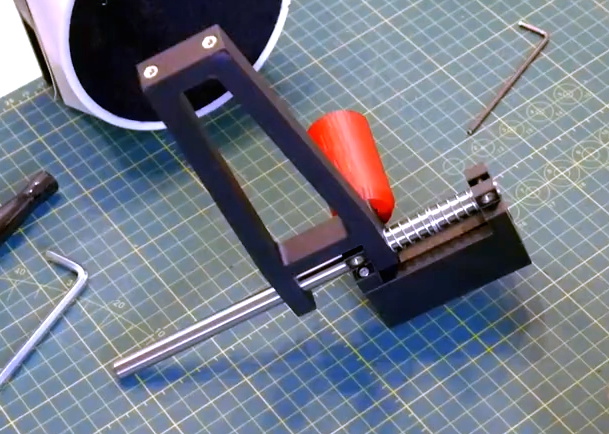
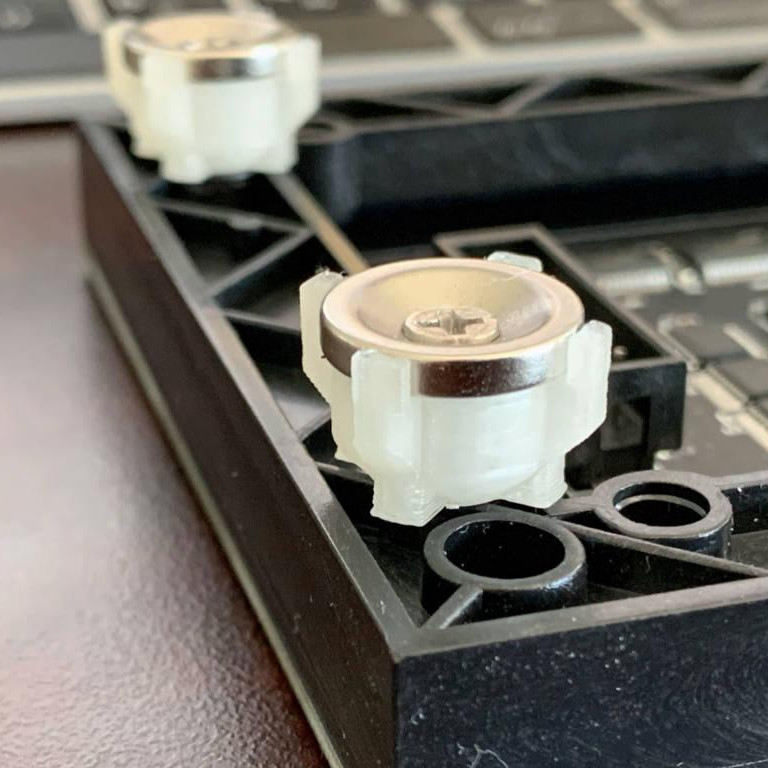
[NotLikeALeafOnTheWind] provides some basic frame layouts, and suggests using two- or three-channel extrusions to provide a flat bezel around the display edge if desired. Mounting the LED panel itself is done with magnetic feet and providing a length of steel bar to which the display can attach. This can provide a flush mount while avoiding the whole issue of screw-mounting the display panels themselves, or sliding them into channels. For mounting all the other hardware, a piece of DIN rail and some 3D-printed parts takes care of that.

The result looks slick and sturdy, and some of the tips are sure to be useful even if the whole process isn’t applied. We like the way the basic design scales and is flexible about the thickness and size of the LED panels themselves, making it a promising way to accommodate perfectly functional oddball panels that end up in the trash.

Complete Flight Sim Controller Set With 3D Printing And Hall-Effect Sensors.

[Tom Stanton] has been playing Microsoft Flight Simulator a lot recently, and decided his old desktop joystick needed an upgrade. Instead of just replacing it with a newer commercial model, he built a complete controller system with a long joystick that pivots at floor level, integrated rudder pedals and a throttle box. You can see it in action after the break.

The throw of the joystick is limited by [Tom]’s legs and chair, with only 12° of travel in either axis, which is too small to allow for high resolution with a potentiometer. Instead, he used hall effect sensors and a square magnet for each axis, which gives good resolution over a small throw angle. The pivot that couples the two rudder pedals also makes use of a hall effect sensor, but needs more travel. To increase the size of the magnetic field, [Tom] mounted two magnets on either side of the sensor with their poles aligned. To center the rudder pedals and joystick, a couple of long tension springs were added.

The joystick (left) and rudder pedals (right) magnet configurations with a hall effect sensor.

A normal potentiometer was used in the throttle lever, and [Tom] also added a number of additional toggle switches and buttons for custom functions. The frame of the system is built with T-slot extrusions, so components can quickly moved to fit a specific user, and adjust the preload on the centering springs. All the electronic components are wired to an Arduino Micro, and thanks to a joystick library, the code is very simple.

At a total build cost of £212/$275 it’s certainly not what anyone would call cheap, but it’s less than what you’d pay for a commercial offering. All the design files and build details are linked in the second video if you want to build your own.

The flight sim controller builds are coming in thick and fast with the release of the latest MS Flight Simulator. With 3D printing you can augment an Xbox controller with a joystick and throttle, or just use tape and a few electronic components turn a desk drawer into a flight yoke.

Building An Affordable Press For Heat Set Inserts

If you’re building mechanical assemblies with 3D printed parts, you’ll quickly realize that driving machine screws into thermoplastic isn’t exactly an ideal solution. It can work in a pinch, but you can easily strip the threads if you crank down too hard. The plastic holes can also get worn down from repeated use, which is a problem if you’re working on something that needs to be taken apart and reassembled frequently. In those situations, using brass heat set inserts gives the fasteners something stronger to bite into.

You can install these inserts by hand, but if you plan on doing a lot of them, a dedicated press station like the one [Chris Chimienti] recently put together will save you a lot of aggravation in the long run. In the video after the break he walks viewers through the design and use of the device, which itself relies on a number of 3D printed parts using the very same inserts it’s designed to install.

The spring-loaded arm can slide up and down the extrusion to adjust for height.

To build this tool you’ll need a piece of aluminum extrusion, some smooth rod, a couple springs, and an assortment of fasteners. Nothing that wouldn’t likely be in the parts bin of anyone who’s been tinkering with 3D printers for awhile, though even if you had to buy everything, the Bill of Materials will hardly break the bank. For the base you can use a piece of scrap wood, though [Chris] has opted to make it a storage compartment where he can store the inserts themselves. We really like this approach, but obviously you’ll need to have access to woodworking tools in that case.

Clearly shopping on the top shelf, [Chris] purchased a kit that actually came with a Weller soldering iron and the appropriate tips for the various sized inserts. If you’re like us and just buy the inserts that come in a plastic baggie, you may need to adapt the arm to fit your iron of choice. That said, the idea of having a dedicated iron that you can leave mounted in the press makes a lot of sense to us if you can swing it.

[Joshua Vasquez] wrote up a phenomenal guide to getting started with heat set inserts last year that’s an absolute must-read for anyone interested in the concept. Whether you build a dedicated press or just push them in freehand, his tips and tricks will help insure you get the best result possible.

Continue reading “Building An Affordable Press For Heat Set Inserts”

The Redesigned CNC Scroll Saw Rides Again

When [Andrew Consroe] tried to build a CNC scroll saw, he quickly learned how tricky of a design problem it is. With a blade that only cuts in one direction, you can’t simply move the tool in the X and Y dimensions like you can with a laser or router; either the work piece or the blade itself needs to continuously rotate towards the direction of the cut.

He’s recently shown off the third version of the machine, and while it’s still not exactly a practical tool, there’s no question it’s a brilliantly designed one, or that it works, slowly. Earlier attempts used a rotating table to spin the work piece, but [Andrew] found this to be an imperfect solution. Building a mechanism heavy duty enough to spin the material being cut while remaining accurate enough not to break the blade was a tall order, though he did get pretty close.

The earlier version used a rotating table.

This time around he’s decided to simply rotate the blade itself. This can be accomplished with a single stepper motor and some suitably sized pulleys, while maintaining an exceptionally high degree of accuracy. The whole blade assembly moves up and down on an aluminum extrusion rail with a motor and crank arrangement. By synchronizing the rotation of the blade with the vertical movement of the saw, the software can be sure that everything is where it needs to be before the cutting stroke actually happens.

Judging by the video after the break, the system works quite well. The complex rounded shapes he cuts out of the piece of plywood look essentially perfect, and it sounds like this new version of the machine isn’t breaking blades due to positional errors like the previous one did. Unfortunately, it’s also very slow. There’s so many moving parts and careful positioning required that even when the video is sped up 10x, the saw still appears to only be creeping its way through the  material.

On the back half of the video, [Andrew] details another approach to rotating the blade that would reduce the amount of moving mass in the saw. This would give the machine a considerable speed boost, and we’d love to see him implement it. By the way, before anyone says it: using a spiral blade is cheating.

Continue reading “The Redesigned CNC Scroll Saw Rides Again”

Building A Faux Retro Portable Computer

The modern laptop has its origins in the mid to late 1980s, when shrinking computer hardware and improvements to battery technology finally made mobile computing practical. But before the now iconic clamshell form factor became the standard, there was a market for so-called “portable” computers. These machines often resembled pieces of luggage with keyboards attached, and even at their peak, they were nowhere near as practical as today’s ultra-thin notebook computers. But for the more nostalgic among us, these vintage portables do have a special sort of charm about them.

Looking to recapture some of that magic with modern components, [davedarko] has started working on his own Raspberry Pi portable computer. Just like those machines of yore, his build is designed to be a self-contained computing experience that you can lug around, but not exactly something you’d be popping open on the train. Its extruded aluminum frame holds the display, power supply, and audio hardware, with plenty of room to spare for additional hardware should he decide to pack in a couple hard drives or something more exotic.

The skeletal frame has plenty of room for activities.

We particularly like the 3D printed hinge and lock mechanism he designed that holds the keyboard closed against the front of the frame. Sufficiently old experienced readers will recall this particular feature being a defining characteristic of portables such as the Osborne 1 and Compaq Portable, and it’s great to see it included here. All it needs now is a leather handle on the side to complete the look.

[davedarko] still has some work ahead of him, as ultimately he’d like to completely enclose his computer’s frame with laser cut panels. But the build is certainly progressing nicely, and frankly, it’s already at the point where we’d have no problem pulling it out at the next hackerspace meetup. Between builds like this and the growing collection of cyberdecks we’ve covered recently, it looks as though 1980s design aesthetic is alive and well within the hacker community.

Continue reading “Building A Faux Retro Portable Computer”

A 3D Printer Scratch Built For Your Viewing Pleasure

Today it’s almost always cheaper to buy an imported 3D printer kit than it is to source your own parts and build one yourself. But that doesn’t stop people from doing it anyway. Whether they’re looking for something a bit more solid, or just want to do things their own way, there are still valid reasons to design and build your own machine. Luckily for us in the audience, [Rob Mech] decided to document the build of his custom “LayerFused C201” printer on his YouTube Channel.

If you’ve ever dreamed of taking the plunge and building a 3D printer exactly the way you want, but were never able to manage the time, this seven video series might be the next best thing. Each video takes you through a different step of the construction, from building the frame out of aluminum extrusion all the way to wiring up the endstop switches and the 32-bit SKR v1.3 controller. There’s even a video that introduces the viewer to the concept of a “Frankenstein” printer that uses cobbled together parts just long enough to produce its own final components.

All told, [Rob] says the Bill of Materials for the LayerFused C201 comes to at least $200, but that’s going to take shopping around for the lowest possible prices and potentially even salvaging some components from other machines and projects. Like we said, building a cheap printer is absolutely not the goal here; it’s all about building a printer you want to use. Continue reading “A 3D Printer Scratch Built For Your Viewing Pleasure”

3D Printed Pen Plotter Is As Big As You Need It To Be

There’s nothing quite like building something to your own personal specifications. It’s why desktop 3D printers are such a powerful tool, and why this scalable plotter from the [Lost Projects Office] is so appealing. You just print out the end pieces and then pair it with rods of your desired length. If you’ve got some unusually large computer-controlled scribbling in mind, this is the project for you.

The design, which the team calls the Deep Ink Diver (d.i.d) is inspired by another plotter that [JuanGg] created. While the fundamentals are the same, d.i.d admittedly looks quite a bit more polished. In fact, if your 3D printed parts look good enough, this could probably pass for a commercial product.

For the electronics, the plotter uses an Arduino Uno and a matching CNC Shield. Two NEMA 17 stepper motors are used for motion: one to spin the rod that advances the paper, and the other connected to a standard GT2 belt and pulley to move the pen back and forth.

We particularly like the way [Lost Projects Office] handled lifting the pen off the paper. In the original design a solenoid was used, which took a bit of extra circuitry to drive from the CNC Shield. But for the d.i.d, a standard SG90 servo is used to lift up the arm that the pen is attached to. A small piece of elastic puts tension on the assembly so it will drop back down when the servo releases.

If this plotter isn’t quite what you’re after, don’t worry. There’s more where that came from. We’ve seen a number of very interesting 3D printed plotters that are just begging for a spot in your OctoPrint queue.