African man hunched over a small robot car chassis

The Dar Es Salaam Hacker Scene And Gamut Detection

We’re on a sort of vacation in Tanzania at the moment and staying in a modest hotel away from the tourist and government district. It’s a district of small shops selling the same things and guys repairing washing machines out on the sidewalk. The guys repairing washing machines are more than happy to talk. Everybody’s amazingly friendly here, the hotel guy grilled us for an hour about our home state. But I really didn’t expect to end up in a conversation about computer vision.

In search of some yogurt and maybe something cooler to wear, we went on a little walk away from the hotel. With incredible luck we found a robotics shop a few blocks away. Mecktonix is a shop about two meters each way, stuffed full of Arduinos, robots, electronics components, servos, and random computer gear, overseen by [Yohanna “Joe” Harembo]. Nearby is another space with a laser engraver and 3D printer. The tiny space doesn’t stop them from being busy. A constant stream of automotive tech students from the nearby National Institute of Transport shuffle in for advice and parts for class assigned projects.

In between students, Joe demos an autonomous car he’s working on. In classic hacker fashion, he first has to reattach the motor driver board and various sensors, but then he demos the car and its problem –  the video frame rate is very slow. We dive in with him and try to get some profiling using time.monotonic_ns(). He’s never done profiling before, so this is a big eye opener. He’s only processing one video frame every 4.3 seconds, using YOLO on a Pi 3, and yup, that’s the problem.  I suggest he change to gamut detection or a Pi 4. Continue reading “The Dar Es Salaam Hacker Scene And Gamut Detection”

Simple Hack Lets Smartphone Take Resin Printer Time-Lapses

With how cheap they’re getting, everyone seems to be jumping on the resin printer bandwagon. They may not be able to fully replace your trusty old FDM printer, but for certain jobs, they just can’t be beaten. Sadly though, creating those smooth time-lapse videos of your prints isn’t quite as easy to do as it is on their filament-based counterparts.

Not as easy, perhaps, but not impossible. [Fraens] found a way to make time-lapses on any resin printer, and in a wonderfully hacky way. First, you need to find a smartphone, which shouldn’t be too hard, given how often we all tend to upgrade. [Fraens] recommends replacing the standard camera app on the phone with Open Camera, to prevent it from closing during the long intervals with nothing happening. The camera is triggered by any readily available Bluetooth dongle, which is connected via a simple transistor circuit to an Arduino output. To trigger the shutter, a light-dependent resistor (LDR) is connected to one of the microcontroller’s inputs. The LDR is placed inside the bed of the resin printer — an Anycubic Photon in this case — where light from the UV panel used to cross-link the resin can fall on it. A simple bit of Arduino code triggers the Bluetooth dongle at the right moment, capturing a series of stills which are later stitched together using DaVinci Resolve.

The short video below shows the results, which look pretty good to us. There are other ways to do this, of course, but we find the simplicity of this method pleasing.

Continue reading “Simple Hack Lets Smartphone Take Resin Printer Time-Lapses”

Upgraded Toy Guitar Plays Music

Getting the finishing details on a Halloween costume completed is the key to impressing friends and strangers alike on the trick-or-treat rounds. Especially when it comes to things like props, these details can push a good Halloween costume to great with the right touches. [Jonathan]’s friend’s daughter will be well ahead of the game thanks to these additions to a toy guitar which is part of her costume this year.

The toy guitar as it was when it arrived had the capability to play a few lackluster sound effects. The goal here was to get it to play a much more impressive set of songs instead, and to make a couple upgrades along the way as well. To that end, [Jonathan] started by dismantling the toy and investigating the PCBs for potential reuse. He decided to keep the buttons in the neck of the guitar despite their non-standard wiring configuration, but toss out the main board in favor of an ESP32. The ESP32 is tasked with reading the buttons, playing a corresponding song loaded on an SD card, and handling the digital to analog conversion when sending it out to be played on the speaker.

The project doesn’t stop there, though. [Jonathan] also did some custom mixing for the songs to account for the lack of stereo sound and a working volume knob, plus he used the ESP32’s wireless capabilities to set the guitar up as a local file server so that songs can be sent to and from the device without any wires. He also released the source code on the project’s GitHub page for anyone looking to use any parts of this project. Don’t forget there’s a Halloween contest going on right now, so be sure to submit the final version of projects like these there!

Continue reading “Upgraded Toy Guitar Plays Music”

Framework Motherboard Turned Cyberdeck

The beauty of a modular ecosystem lies in how it allows individuals to repurpose components in unconventional ways. This is precisely what [Ben Makes Everything] has achieved by using a Framework laptop’s motherboard and battery to create a slab-style cyberdeck. (Video, embedded below.)

The Framework motherboard presents an excellent choice for custom portable computer projects due to its relatively compact size and built-in modular I/O port options, all based on USB-C. Framework even released additional documentation to support this use-case. It’s significantly more powerful than the standard Raspberry PI, which is typically employed in similar projects. Ben chose a 2400 x 900 IPS display that can draw power and video through a single USB-C cable. For user input, he opted for an Apple keyboard and an optical trackball with a PS2 interface. He utilized a Arduino Pro Micro as a PS2-to-USB adaptor, using the remaining pins on the Arduino as a versatile interface for electronic projects.

The enclosure is crafted from machined aluminum plates with 3D printed spacers to secure all components. The screen can be tilted up to 45 degrees for more ergonomic desktop use. The Framework motherboard is equipped with four USB-C ports for peripheral devices; [Ben] allocated one for the display and another for a USB hub which connects the keyboard, Arduino, and external USB and HDMI connectors. The remaining USB-C ports are still available for original Framework expansion cards.

The completed project not only looks fantastic but may also be highly functional. It would have been a great entry in our recent Cyberdeck Challenge.

Humble Arduino As PLC

On the surface, a programmable logic controller (PLC) might seem like nothing more than a generic microcontroller, perhaps outfitted to operate in industrial settings with things like high temperatures or harsh vibrations. While this is true to some extent, PLCs also have an international standard for their architecture and programming languages. This standard is maintained by the International Electrotechnical Commission, making it so that any device built under these specifications will be recognizable to control engineers and maintenance personnel worldwide. And, if you use this standard when working with certain Arduinos, this common platform can become a standard-compliant PLC as well.

The IDE itself supports programming ladder diagrams, functional block diagrams, and other programming systems covered under the IEC 61131-3 standard. Not only that, it allows the combination of these types of PLC programming with Arduino sketches. The system offers many of the perks of PLC programming alongside the familiar Arduino platform, and supports a number of protocols as well including CANOpen, Modbus RTU, and Modbus TCP. It can also be used for monitoring a PLC system, essentially adding IoT capabilities to existing systems, enabling continuous monitoring, debugging, and program updates.

While not every Arduino is a great platform to build a PLC around, there are a few available for those looking for a system a little less proprietary and a little more user-friendly than typical PLC systems tend to be. There’s a reason that PLCs are built around an international standard and generally have certain hardware in mind to run it, though, and this comparison of a Raspberry Pi with an off-the-shelf PLC goes into detail about why certain components aren’t good choices for PLCs.

Simple Circuit Keeps Process Control Loops In Tune

Spare a moment’s pity for the process engineer, whose job it is to keep industrial automation running no matter what. These poor souls seem to be forever on call, fielding panicked requests to come to the factory floor whenever the line goes down. Day or night, weekends, vacations, whatever — when it breaks, the process engineer jumps.

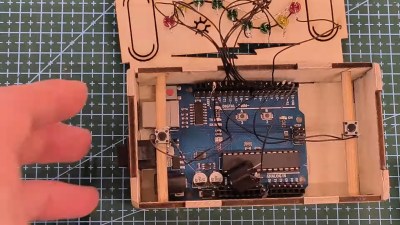
The pressures of such a gig can be enormous, and seem to have weighed on [Tom Goff] enough that he spent a weekend building a junk bin analog signal generator to replace a loop calibrator that he misplaced. Two process control signaling schemes were to be supported — the 0 to 10 VDC analog signal, and the venerable 4-20 mA current loop. All that’s needed for both outputs is an Arduino and an LM358 dual op-amp, plus a few support components. The 0-10 V signal starts as a PWM output from the Arduino, with its 0-5 V average amplified by one of the op-amps set up as a non-inverting amp with a gain of 2. With a little filtering, the voltage output is pretty stable, and swings nicely through the desired range — see the video below for that.

The current loop output is only slightly more complicated. An identical circuit on a separate Arduino output generates the same 10 V max output, but a code change limits the low end of the range to 1 V. This output of the op-amp is fed through a 500-Ω trimmer pot, and the magic of Ohm’s Law results in a 4-20 mA current. The circuit lives on a piece of perf board in a small enclosure and does the job it was built for — nothing fancy needed.

And spoiler alert: [Tom] found the missing loop calibrator — after he built this, of course. Isn’t that always the way?

Continue reading “Simple Circuit Keeps Process Control Loops In Tune”

Noble Graphs: Displaying Data With Neon Like Its 1972

In the days before every piece of equipment was an internet-connected box with an OLED display, engineers had to be a bit more creative with how they chose to communicate information to the user. Indicator lights, analog meters, and even Nixie tubes are just a few of the many methods employed, and are still in use today. There are, however, some more obscure (and arguably way cooler) indicators that have been lost to time.

[Aart Schipper] unearthed one such device while rummaging around in his father’s shed: a pair of Burroughs Bar Graph Glow-Transfer Displays. These marvelous glowing rectangles each have two bars (think the left and right signals on an audio meter, which is incidentally what they were often used for), each with 201 neon segments. Why 201, you may ask? The first segment on each bar is always illuminated, acting as a “pilot light” of sorts. This leaves 200 controllable segments per channel. Each segment is used to “ignite” its neighboring segment, something the manufacturer refers to as the “Glow-Transfer Principle.” By clever use of a three-phase clock and some comparators, each bar is controlled by one analog signal, keeping the wire count reasonably low.

Don’t get us wrong, the warm, comforting glow of Nixie tubes will always have a special place in our hearts, but neon bar graphs are just hard to beat. The two do have a similar aesthetic though, so here’s hoping we see them used together in a project soon.

Thanks to [Jan] for the tip!