Programming The ATtiny10 With An Arduino

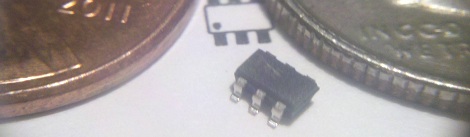
The ATtiny10 – along with its younger siblings that go by the names ATtiny 4, 5, and 9 – are the smallest microcontrollers Atmel makes. With only 32 bytes of RAM and 1 kB of Flash, there’s still whole lot you can do with this tiny six-pin chip. [feynman17] figured out a way to program this chip using an Arduino, allowing him to throw just about anything at this absurdly small microcontroller.

The ATtiny10 doesn’t use the familiar ISP programming header found on other Atmel-based boards. Instead, it uses the exceedingly odd Tiny Programming Interface to write bits to the Flash on the chip. [feynman17] realized he could use the Arduino SPI library to communicate with this chip and built a small programming shield with just a few resistors and a 8-pin DIP socket to mount an ATtiny10 breakout board.

After writing a sketch to upload a .hex file from the Arduino serial console, [feynman] had a programmed ATtiny10, ready to be dropped into whatever astonishingly small project he had in mind.

As for what you can do with this small microcontroller, chiptunes are always an option, as is making a very, very small Simon clone. It may not be a powerhouse, but there’s still a lot you can do with this very inexpensive microcontroller.

No Secret Knocks Required At [Steve’s] House – Your Subway Pass Will Do

rfid-door-lock

[Steve] is often host to all sorts of guests, and he was looking for an easy way to let his friends come and go as they please. After discovering that his front door came equipped with an electronic strike, he decided that an RFID reader would be a great means of controlling who was let in, and when.

Giving all your friends RFID cards and actually expecting that they carry them is a bit of a stretch, but lucky for [Steve] he lives near Boston, so the MBTA has him covered. Just about everyone in town has an RFID subway pass, which pretty much guarantees that [Steve’s] cohorts will be carrying one when they swing by.

He crafted a stylish set of wooden boxes to contain both the RFID reader and the Arduino that controls the system, matching them to the Victorian styling of his home. A single button can control the setup, allowing him to add and remove cards from access lists without much fuss. For more granular control however, [Steve] can always tweak settings from the Arduino serial console.

The card system is both stylish and useful – a combination that’s hard to beat.

Arduino WiFi Shield Available, Costs $85 USD

Over on the Arduino blog, the release of the official Arduino WiFi shield was just announced. On the spec page for this WiFi shield. we can see this new board isn’t a slouch; it’s powered by a 32-bit ATMega 32UC3 microcontroller, has provisions for WEP and WPA2 encryption, and supports both TCP and UDP with the Arduino WiFi library. It also costs €69/$85/£55 from the Arduino store.

Now that the announcement of the Arduino WiFi shield is over with, we’ll take this opportunity to go through a few other WiFi adapters for the Arduino that don’t cost an arm and a leg.

The WiFly shield – available from Sparkfun – is a WiFi adapter with the same form factor as the ever popular XBee modules. Of course, it’s possible to make your own breakout board; the WiFly only needs a TX, RX, power and ground connection to connect your Arduino project to the Internet.

We’ve seen a few projects use the WiShield from async labs. It’s a WiFi module packaged in the familiar Arduino shield form factor, and costs $55 USD.

For the hardcore hackers out there, you could always get a bare Microchip WiFi module and get it to work with an AVR as [Quinn Dunki] attempted to. In all fairness, [Quinn] was trying to de-Arduinofy the WiFi library; if you’re cool with Arduino code swimming around in your project, this method will probably work.

There’s also the very, very cool Electric Imp. Basically, it’s an SD card with a built-in WiFi module. After configuring the Imp by holding it up to patterns flashing on your smartphone screen, this device serves as a transparent bridge to the magical ‘cloud’ we’ve been hearing about. The Electric Imp was supposed to have been released in late July/early August, and we’ll put a post up when this cool device actually launches.

Of course we’re neglecting the simplest solution to getting WiFi running on an Arduino project: just use a wireless router. Really, all you need is a pair of TX and RX pins and a copy of OpenWRT. Easy, and you probably have the necessary hardware lying around.

We’re missing a few methods of Arduinofying a WiFi connection (or WiFying an Arduino…), but we’ll let our readers finish what we started in the comments.

Lite Brites Fade, But LED Clocks Are Forever

litebrite-clock

Ahh, the Lite Brite.

What could be more fun than pushing dozens of little plastic pegs through a piece of black paper in order to create a pixelated, though colorful image? Well, I can think of quite a few things more engaging than that, and luckily so can [Lonnie Honeycutt] over at MeanPC.

While contemplating what to build with a pile of LEDs, his daughter came into the room with her portable Lite Brite. He thought that the pegs she was using looked awfully similar to the LEDs on his desk, so he did some test fitting and was surprised to see that they fit almost perfectly.

[Lonnie] thought that the toy would make an excellent clock, and his daughter happily agreed to let Dad do some tinkering. A few hours, an Arduino, and some Charlieplexing later, he had a nice looking clock that his kids were sure to enjoy.

If you’re interested in seeing more about how constructed, be sure to check out his YouTube channel and Instructable, where he happily provides all of the build details.

Toorcamp: Nibble Node.js Widget

The hardware hacking village at Toorcamp provided space and tools to work on hardware. It was interesting to see what hardware hacks people had brought to work on. One example is [Owen]’s Nibble Node.js Widget. The widget combines the popular node.js platform and custom hardware to create a node for the “internet of things.” The hardware consists of a Arduino Pro Micro, a bluetooth module, a LCD display, and a speaker in a laser cut box.

By using a custom package in node.js, the Nibble becomes an object which can be controlled by its methods. This allows for the developer to push messages to the display and control the device without worrying about the details of the hardware. Since node.js is designed for web applications, it’s simple to make the device controllable from the web.

[Owen] also wrote an emulator for the DCPU from the upcoming game, 0x10c. DCPU assembly is passed in from node.js, which compiles it and sends it to the Nibble. The device can then run the application using the DCPU emulation, which also allows for control of the display and the speaker.

There’s a lot of neat things that can be done with this minuscule cube, and [Owen] plans to release an NPM package for the node.js code.

Making The Arduino Sleep The Long Sleep

Earlier this week, I showed you [Naim Busek’s] kickstarter for his turn signal helmet. In that article I explained that, while the helmet is a neat idea, I was really interested in what [Naim] had told me about his power consumption.  To put it the shortest way, he has made his arduino sleep so efficiently, it can be waiting for input longer than the battery’s optimum shelf life.

After that article, [Naim] wrote in to give me the details on what he did to achieve such an efficient system. You can read his entire explanation, un altered here.

Continue reading “Making The Arduino Sleep The Long Sleep”

Water Glider Prototype

[Byrel Mitchell] wrote in to share some details on this water glider which he has been working on with his classmates at the Nonlinear Autonomous Systems lab of Michigan Technological University. As its name implies, it glides through the water rather than using propulsion systems typically found on underwater ROVs. The wings on either side of the body are fixed in place, converting changes in ballast to forward momentum.

The front of the glider is at the bottom right of the image above. Look closely and you’ll see a trio of syringes pointed toward the nose. These act as the ballast tanks. A gear motor moves a pinion connected to the syringe plungers, allowing the Arduino which drives the device to fill and empty the tanks with water. When full the nose sinks and the glider moves forward, when empty it rises to the surface which also results in forward movement.

After the break you can find two videos The first shows off the functionality and demonstrates the device in a swimming pool. The second covers the details of the control systems.

Continue reading “Water Glider Prototype”