Get More Freedom With This Guitar Pedal

When the electric guitar was first produced in the 1930s, there was some skepticism among musicians as to whether or not this instrument would have lasting impact or be a flash-in-the-pan novelty. Since this was more than a decade before the invention of the transistor, it would have been hard then to imagine the possibilities that a musician nowadays would have with modern technology to shape the sound of an instrument like this. People are still innovating in this space as well as new technology appears, like [Gary Rigg] who has added a few extra degrees of freedom to a guitar effects pedal.

A traditional expression pedal, like a wah-wah pedal, uses a single motion to change an aspect of the sound of the guitar, and is generally controlled with the musician’s foot. [Gary]’s pedal, on the other hand, can be manipulated in three different ways to control separate elements of the instrument’s sound. It can be pitched forward and back like a normal effects pedal, but also rolled side-to-side and twisted around its yaw axis. The pedal has a built-in IMU to measure the various position changes of the pedal, which is then translated by an RP2040 microcontroller to a MIDI signal which controls the three different aspects of the sound digitally.

While the yaw motion might be difficult for a guitarist to create with their foot while playing, the idea for this pedal is still excellent. Adding in a few more degrees of freedom gives the musician more immediate control over the sound of their instrument and opens up ways of playing that might not be possible or easy with multiple pedals, with the MIDI allowing for versatility that might not be available in many analog effects pedals. Not every pedal needs MIDI though; with the help of a Teensy this digital guitar pedal has all its effects built into a self-contained package.

Continue reading “Get More Freedom With This Guitar Pedal”

Japanese Lab Builds 5-Axis 3D Printer

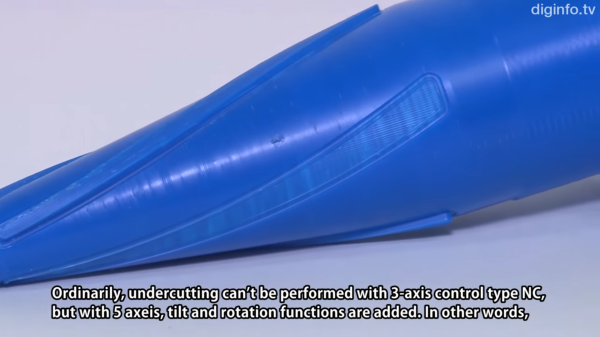
A Japanese lab is investing some time in the possibilities of a 5-axis 3D printer. They show it printing using five axis as well as doing finish machining on a printed part. We’ve covered parts of why this is the right direction to go for 3D printing in another post.

It looks like they have modified an existing industrial machining center for use with a 3D printing nozzle. This feels like cheating, but it’s the right way to go if you want to start playing with the code early. The machines are intensely accurate and precise. After all, building a five axis machine is a well known science, 3D printing with one opens a whole new field of research.

There isn’t too much to show in the video, other than it’s possible and people are doing it. The Five-axis 3D printing and machining is uninteresting, we have been able to machine plastic for a long time.

However, they show one blue part in which the central axis of the part was printed vertically, but revolute splines along its outer perimeter were printed normal to the surface of the already printed 3D part. Which is certainly not commonly done. Video after the break.

Continue reading “Japanese Lab Builds 5-Axis 3D Printer”

A 3-Axis Paper Cutting Mini Laser

LaserCutter

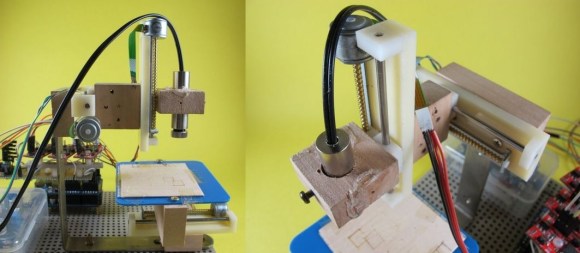
Laser are awesome, and so are projects that use lasers. A recent Instructable by [kokpat] gives an overview of how to create a fully functional laser paper cutter using CDROM stepper motors and an Arduino.

What is special about this build, is that it showcases how easy it can be to build a 3-axis mechanical system used for laser cutters, CNC machines, and 3D printers. Using a stepper stage that consist of a motor screw with a nut slider based carriage, the mechanical system can be put together quite easily and cost effectively. Luckily, from an electronics and software perspective, everything is quite standardized with the proliferation of the RepRap and similar machines. Simply pick any three stepper drivers, find the most pertinent firmware, and voilà! You’re done! Well, almost. Don’t forget a 100mW violet laser!

We have seen a ton of really cool laser cutters before, but this has to be one of the cheapest. See the laser cutter in action after the break.

Continue reading “A 3-Axis Paper Cutting Mini Laser”

Ask HackADay: Network Security Camera

Today we received the question,

“How to control a web cam via internet,
i want to use it for security reasons, always out of the house and my PC connected want to open the cam from time to time to checkout if something wrong!!”

– [Mohamed Saleh]

What a fun project we thought! And so many different ways of tackling it. Find out what we suggested to [Mohamed] after the break. Continue reading “Ask HackADay: Network Security Camera”

DIYLILCNC: Do-it-yourself CNC Mill

DIYLILCNC

The DIY LIL CNC project is the newest member of the homebrew fabrication scene. This is a three-axis CNC mill that can be built by anyone with basic shop skills and about $700 in their pocket. Many of the materials can be acquired from the likes of Home Depot: the basic framework is assembled from Masonite, while other cost-cutting measures include the use of skate bearings and a common Dremel tool for powering the cutting bit. About half of the cost is for the HobbyCNC driver and stepper motor package that runs the show.

The instructions for the DIY LIL CNC are distributed under a Creative Commons license, allowing for modification and distribution with few restrictions. They’re well-written and quite thorough, including all patterns and a complete bill of materials with suppliers, part numbers and costs. As documented, the ’bot can produce parts up to 12 x 14 x 2 inches, but the project’s creators offer some suggestions on adapting the design for larger work. It’s not self-replicating like the RepRap aims for; you’ll need access to a laser cutter for some of the parts. If you can clear that hurdle, this looks like a great introduction to CNC production.

Harmonic Keyboard Controller

harmonic

[aris] is continuing work on his harmonic table keyboard midi controller. Instead of the traditional linear keyboard layout, keys are laid out in a hexagonal pattern. This is the same idea as the C-Thru AXiS, which you can find a video demo of here. Along the left edge is a row of buttons to transpose the layout up or down. Switches for octave up and down along with a generic slider are also included. The final controller will include a 16×2 LCD character display. The core of the controller is MIDIBox, and he’s using the SDK to write the custom C code. Embedded below is the first test with just four buttons wired.

Continue reading “Harmonic Keyboard Controller”

CNC Engraver Upgrades

cnc

We’ve been following [glaciawanderer]’s CNC build for quite some time and he’s recently added a few upgrades to make for an even more interesting machine. He’s been trying out new bearing blocks, anti-backlash nuts, and z-axis plates hoping to get some improvements. In the case of the bearing blocks, he went back to the older style because of the added safety and smoother movement. The final addition he made was a dust collection system. It’s just a couple support hoops and duct tape, but it should keep dust out of the threads and rails.