Electromagnets Make Vertical CNC Cutter A Little Stickier

Workholding is generally not a problem on a big CNC plasma cutter.; gravity does a pretty good job of keeping heavy sheet steel in place on the bed. But what if your CNC table isn’t a table? The answer: magnets — lots of magnets.

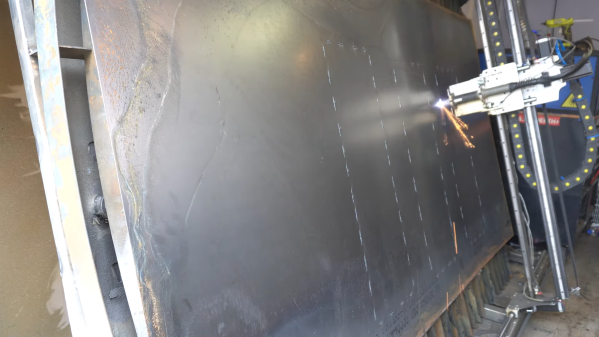
The backstory on this is a bit involved, but the condensed version is that [Lucas] needed a CNC plasma cutter big enough to cut full-sized sheets of steel, but lacked the floor space in his shop for such a beast. His solution was to build a custom CNC machine that stands more or less vertically, allowing him to cut full sheets in a mere fraction of the floor space. It’s a fantastic idea, one that he put a lot of effort into, but it’s not without its problems. Chief among them is the tendency for the sheet metal to buckle and bulge during cutting since gravity isn’t working for him, along with the pesky problem of offcuts slipping away.

To help hold things in place, [Lucas] decided to magnetize the bed of his cutter. That required winding a bunch of magnets, which is covered in the video below. Mass production of magnets turns out not to be as easy as you’d think. Also unexpected was the need to turn off magnets when the cutting torch is nearby, lest the magnetic field bork the cutting plasma. [Lucas] grabbed some code from the LinuxCNC forum that streams the gantry coordinates over serial and used an Arduino to parse those messages. When the torch is getting close to one of the magnets, a relay board cuts power to just that magnet. You can see it in action in the video below; at around the 18:15 mark, you can see the sheet bulging up a bit when the torch comes by, and sucking back down when it moves on.

The amount of work [Lucas] put into this project is impressive, and the results are fantastic. This isn’t the first time he’s relied on the power of magnets to deal with sheet steel, and it probably won’t be the last.

Continue reading “Electromagnets Make Vertical CNC Cutter A Little Stickier”

Modular Vacuum Table Custom-Fits The Parts

[enhydra] needed to modify a bunch of side inserts from some cheap ABS enclosures, and to save time and effort, he created a simple vacuum table with swappable inserts to precisely fit the parts. Suction is provided by a shop vacuum (plugged in near the bottom in the photo above) and it worked very well! Sealing and gaskets weren’t even required.

A vacuum table provides a way to hold workpieces flat and secure while a CNC machine does its thing, and because no clamps are involved, it can really speed up repetitive work. [enhydra]’s solution combines a vacuum table with a jig that ensures every rectangular piece is held exactly where the machine expects it to be, making the whole process of modifying multiple units significantly more efficient.

The whole thing — vacuum table and modular top — was straightforward to CNC cut out of what looks like particle board and worked as-is, no added gaskets or seals required, making this a very economical solution.

Vacuum tables can be pretty versatile and applied in more than one way, so keep that in mind the next time you’re wondering how best to approach a workshop problem. We’ve seen a well-engineered table used to speed up PCB milling, and we’ve also seen a DIY vacuum table combined with a heat gun and plastic plates from the dollar store make a bare-bones thermoforming rig.

A SPIF-fy Way Of Forming Metal

Thanks to 3D printing, most of us are familiar with the concept of additive manufacturing, and by extension, subtractive manufacturing. But what is it when you’re neither adding material nor taking it away to create something? Generally speaking, that’s called forming, and while there are tons of ways to do it, one you might not have heard of is single-point incremental forming (SPIF), and it’s pretty cool.

To explore SPIF as a method for making small parts, [Russell Makes] gave it a go on a small CNC mill. The idea is pretty simple, and the video below makes it pretty clear what’s going on. A forming tool is moved over a sheet metal blank that’s held very securely to the mill’s table. The tool has no cutting edges, just a smooth, hard, spherical tip — [Russell] made his own by brazing a carbide ball to a piece of drill rod. The tool is driven slightly into the blank along the Z-axis, while simultaneously tracing out a tool path in the XY plane. The tool spins, but very slowly; ideally, the spindle speed is controlled to keep a single point of contact with the metal as the tool works around its tool path. The tool steps downward incrementally, drawing the metal down with it as it forms the desired shape.

[Russell]’s experiments were pretty promising. He started with titanium sheet, which behaved pretty well except for some galling thanks to lack of lubrication. Aluminum and stainless worked pretty well too, at least for simple hemispherical and cone shapes. More complex shapes proved trickier, but with time he was able to figure out the correct speeds and feeds to keep the metal intact. The amount of tension built up in the metal is impressive, though, and is especially evident when cutting the finished part free from the blank.

Could this work with a hobbyist-grade machine? Possibly, but we’d be afraid that the forces involved might be a bit much for light-duty machines, especially in the Z-axis. And it’s a slow process, so it’s probably only good for one-offs and low-volume work. Once you’ve got a prototype, die stamping might be a more efficient way to go.

Continue reading “A SPIF-fy Way Of Forming Metal”

Autofeeding CNC Lathe Cranks Out Parts All By Itself

The trouble with building a business around selling low-margin widgets is that you have to find a way to make a lot of them to make it worth your while. And if the widget in question is labor-intensive to make, you’ve got to find ways to reduce your inputs. That sounds like a job for industrial automation, a solution that’s often out of reach of small shops, for all the obvious reasons. Not if you’re clever about things, though, as this fully automated CNC lathe work cell shows.

This build comes to us from the woodshop of [Maher Lagha], where he’s making wooden honey dippers. Wooden dowel blanks are dispensed from an infeed rack and chucked between centers on the headstock and pneumatic tailstock. A two-axis stage in front of the workpiece moves a tool against the spinning stock, carving out the honey dipper in just a few minutes. When the lathe work is done, the spindle stops, the tailstock pulls the honey dipper back off the headstock, and a pneumatic piston unceremoniously whacks the almost-finished part — it looks like it still needs a little manual post-processing — into a bin. Lather, rinse, repeat, profit.

[Maher] doesn’t provide many details, but just looking at the work cell shows a veritable feast of industrial automation equipment. The spindle and tailstock of the lathe sit on a bed made from a massive slab of aluminum extrusion, and the X- and Y-axes use linear rails and ballscrews. And mindful of the effects of wood chips on delicate mechanisms, [Maher] did a good job of containing the mess with a host of acrylic guards.

As we said when we saw [Maher]’s wooden coaster work cell a while back, the wood widget business must be pretty good to justify automation like this. What’s nice with both these rigs is that they look like they could be quickly reprogrammed and retooled to create other products. Pretty impressive.

Continue reading “Autofeeding CNC Lathe Cranks Out Parts All By Itself”

Mega-CNC Router Carves Styrofoam Into A Full-Size Flying Delorean

When you own an enormous CNC router, you’ve got to find projects that justify it. So why not shoot for the sky — literally — and build the 1980s-est possible thing: a full-scale flying Delorean.

Attentive readers will no doubt remember [Brian Brocken] from his recent attempt to bring a welding robot out of retirement. That worked quite well, and equipped with a high-speed spindle, the giant ABB robot is now one of the biggest CNC routers we’ve ever seen. As for the flying Delorean, short of the well-known Mr. Fusion mod, [Brian] had to settle for less fictional approaches. The project is still in its early phase, but it appears that the flying car will basically be a huge quadcopter, with motors and propellers hidden under the chassis. That of course means eschewing the stainless steel of the OEM design for something lighter: expanded polystyrene foam (EPS).

The video below shows the fabrication of most of the body, which starts as large blocks of EPS and ends up as shaped panels and an unthinkable amount of dust. Individual pieces are glued together with what looks like plain old PVA adhesive. The standard Delorean “frunk” has been replaced by a louvered assembly that will act as an air intake; we presume the rear engine cover will get the same treatment. Interestingly, the weight of the finished model is almost exactly what Fusion 360 predicted based on the 3D model — a mere 13.9 kg.

[Brian] is currently thrust-testing motors and propellers and has some interesting details on that process in his write-up. There’s obviously a lot of work left on this project, and a lot more dust to be made, and we’ll be eagerly following along. Continue reading “Mega-CNC Router Carves Styrofoam Into A Full-Size Flying Delorean”

Make Carbon Fiber Tubes With An Open Source Filament Winder

Result of winding a carbon fiber tube. (Credit: Andrew Reilley)

Carbon fiber (CF) is an amazing material that provides a lot of strength for very little weight, making it very useful for a lot of applications, ranging from rods in CoreXY 3D printers to model- and full-sized rockets. The model rocketry hobby is the reason why [Andrew Reilley] developed his own CF tube winding machine called Contraption. A tutorial video (also embedded below) shows how this machine is prepped for a winding run, followed by the winding progress and finalizing before admiring the result.

The entire machine’s design with 3D printed parts and off-the-shelf components is open source, as is the TypeScript and NodeJS-based Cyclone software that creates the toolpath specifying the parameters of the tube, including number of layers and the tow angle.

As a wet winding tow machine, the carbon fiber strands are led through the liquid resin before being wound onto the prepared mandrel. During winding some excess resin may have to be removed, and after the winding has been finished the tube is wound with shrink tape. This is followed by a heat gun session to shrink the tape and letting the resin cure. Following curing, the tape and mandrel are removed, resulting in a rather fancy looking CF tube that can find a loving home in a lot of applications, except perhaps ones that involving crushing outside pressures like those found deep below the ocean surface.

Continue reading “Make Carbon Fiber Tubes With An Open Source Filament Winder”

Wooden Game Boy Is A Challenging Intro CNC Project

[Sebastian] describes himself as “a total noob” when it comes to CNC, so in an attempt to get to know his new CNC router, he chose about the most complex possible project — replicating an original Game Boy case in wood. And spoiler alert: he nailed it.

Of course, he did have a few things going for him. At least from a straight woodworking perspective, it’s hard to go wrong by choosing walnut as your material. Then again, it can be unforgiving at times, and picky about tooling, which is probably why [Sebastian] used nine different tools to get the job done. But where he upped the difficulty level was in reproducing so many of the details of the original injection-molded plastic case. There are top and bottom shells, each of which has to be milled from both sides. This makes registration tricky when the parts are flipped. Specific indexing holes were used for that, along with the old “blue tape and CA glue” fixturing trick, which seemed to work quite well. For our money, though, the best bit is the lettering on the front face, which was milled out with an engraving bit and then filled with a spritz of white spray paint. A surfacing bit then came along to knock the overspray down, leaving labels that contrast beautifully with the dark wood. Gorgeous!

It wasn’t all easy sailing, though. There are just some things plastic can do that wood can’t, like holding screw threads in small studs without splitting. So, the case had to be glued shut once the mix of salvaged and new components went in. Still, it looks fabulous, and [Sebastian] says what we see in the video below is the one and only piece. Pretty sweet for the first try. Surprisingly, it doesn’t seem as if we’ve seen a wooden Game Boy before — a wooden NES, sure, but not a Game Boy.

Continue reading “Wooden Game Boy Is A Challenging Intro CNC Project”