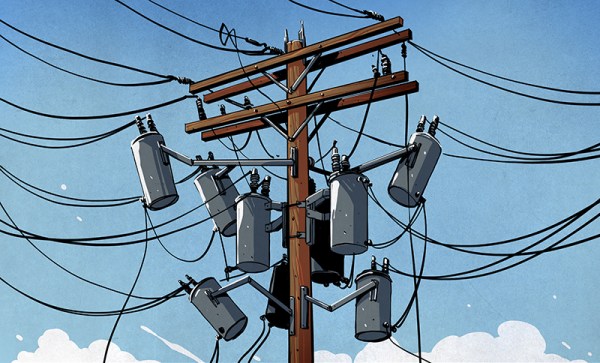
We live under the umbrella of an intricate and fascinating web of infrastructure that enables every aspect of modern technology. But how often do we really look at it? I’ve been intrigued by utility poles for years, and I’ve picked up a thing or two that I’d like to share. Bear in mind these are just my observations from the ground in my area; I’m sure utility professionals will have better information, and regional practices will no doubt lead to very different equipment arrangements. But here’s a little of what I’ve picked up over my years as a pole geek.
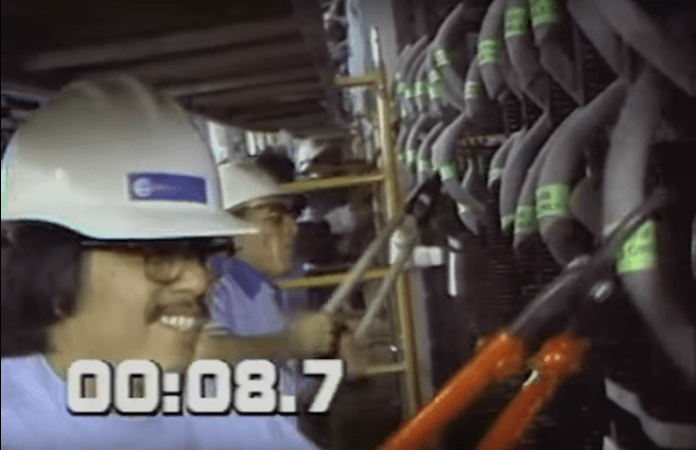
In this short but intense classic of corporate cinematography, we get to watch as the Pacific Bell central office in Glendale, California is converted to electronic switching in a 47-second frenzy of cable cutting in 1984.
In the 1970s and 1980s, conversion of telephone central office (CO) switch gear from older technologies such as crossbar (XBar) switches or step-by-step (SxS) gear to electronic switching systems (ESS) was proceeding apace. Early versions of ESS were rolling out as early as the 1950s, but telcos were conservative entities that were slow to adopt change and even slower to make changes that might result in service outages. So when the time finally came for the 35,000 line Glendale CO to cutover from their aging SxS gear to ESS, Pacific Bell retained Western Electric for their “Speedy Cutover Service.”
Designed to reduce the network outage time to a minimum, cuts like these were intricately planned and rehearsed. Prep teams of technicians marked the cables to be cut and positioned them for easy access by the cutters. For this cut, scaffolding was assembled to support two tiers of cutters. It looks like the tall guys got the upper deck, and the shorter techs – with hard hats – worked under them.
At 11PM on this cut night, an emergency coordinator verified that no emergency calls were in progress, and the cut began. In an intense burst of activity, each of the 54 technicians cut about 20 cables. Smiles widened as the cut accelerated, and sparks actually flew at the 35.7 second mark. When done, each tech turned around and knelt down so the supervisors knew when everyone was done. At least one tech couldn’t help but whoop it up when the cut was done. Who could blame him? It must have been a blast.
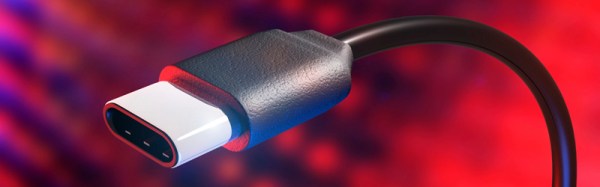
USB has been on our desktops and laptops since about 1997 or so, and since then it has been the mainstay of computer peripherals. No other connector is as useful for connecting mice, keyboards, webcams, microcontroller development boards, and everything else; it’s even the standard power connector for phones. The latest advance to come out of the USB Implementers Forum is the USB Type-C connector, a device with gigabits of bandwidth and can handle enough current to power a laptop. It’s the future, even if Apple’s one-port wonder isn’t.
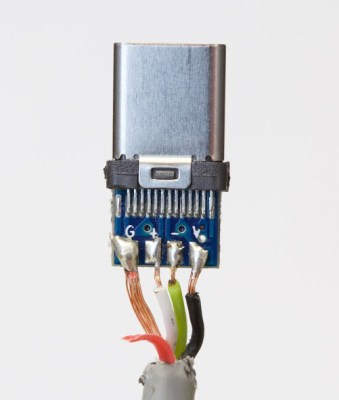
The cable of the future is, by default, new. This means manufacturers are still figuring out the port, and how to wire it up. You would think remembering ‘red = power, black = ground’ is easy, but some manufacturers get it so terribly wrong.
The cable in question was a SurjTech 3M cable that has thankfully been taken down from Amazon. Swapping GND and Vbus weren’t the only problem – the SuperSpeed wires were missing, meaning this was effectively only a USB 2 cable with a Type-C connector. The resistor required by USB spec was the wrong value, and was configured as a pull-down instead of a pull-up.
This isn’t an issue of a cable not meeting a design spec. Ethernet cables, specifically Cat6 cables, have been shown to work but fail to meet the specs for Cat6 cables. That’s shady manufacturing, but it won’t break a computer. This is a new low in the world of computer cables, but at least the cable has disappeared from Amazon.
Though we’ve never used their cables, [Blue Jeans Cable] out of Seattle, WA sure does seem to take the black art of cable manufacture seriously. When they read the Cat 6 specification, they knew they couldn’t just keep building the cables the way they used to. So they did some research and purchased a Fluke certification tester for a measly 12,000 US dollars. While they were purchasing the device, they ran across an interesting tidbit in the fluke knowledge base. Fluke said that 80% of the consumer Cat 6 cables they tested didn’t begin to meet the Cat 6 specification.
This is the part where [Blue Jeans Cable] earns our respect; like good scientists, they set out to replicate Fluke’s results. Sure enough, 80% of the Cat 6 cables they tested from big box stores etc. failed the specification. More surprising, many of them didn’t even pass the Cat 5e specification. [Blue Jeans Cable] asserts that this is possible because the Ethernet cable specification is policed via the honor system, allowing manufacturers to be fairly brazen about what they label as Cat 6.
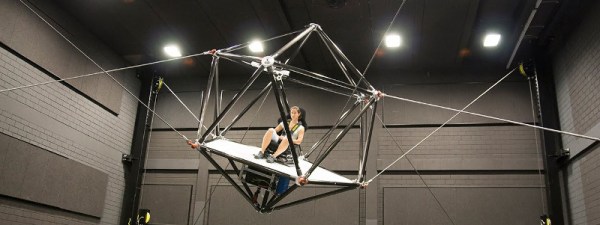
Straight from the Max Planck Institute for Biological Cybernetics, and displayed at this year’s Driving Simulation Conference & Exhibition is the coolest looking simulation platform we’ve ever seen. It’s a spherical (or icosahedral) roll cage, attached to the corners of a building by cables. With the right kinematics and some very heavy-duty hardware, this simulation platform has three degrees of translation, three degrees of rotation, and thousands of people that want to drive a virtual car or pilot a virtual plane with this gigantic robot.
The Cable Robot Simulator uses electric winches attached to the corners of a giant room to propel a platform with 1.5g of acceleration. The platform can move back and forth, up and down, and to and fro, simulating what a race car driver would feel going around the track, or what a fighter pilot would feel barreling through the canyons of the Mojave. All you need for a true virtual reality system is an Oculus Rift, which the team has already tested with driving and flight simulation programs
An earlier project by the same research group accomplished a similar feat in 2013, but this full-motion robotic simulator was not made of cable-based robotics. The CyberMotion Simulator used a robotic arm with a cockpit of sorts attached to the end of the arm. Inside the cockpit, stereo projectors displayed a wide-angle view, much like what a VR display does. In terms of capability and ability to simulate different environments, the CyberMotion Simulator may be a little more advanced; the Cable Robot Simulator cannot rotate more than about sixty degrees, while the CyberMotion Simulator can turn you upside down.
The Cable Robot Simulator takes up a very large room, and requires some serious engineering – the cables are huge and the winches are very powerful. These facts don’t preclude this technology being used in the future, though, and hopefully this sort of tech will make its way into a few larger arcades.
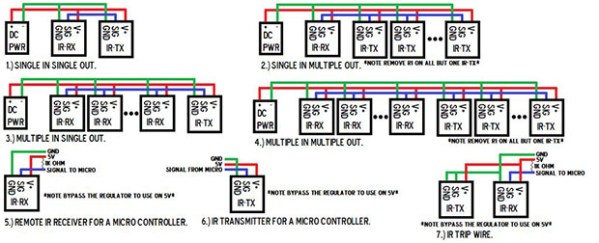
[Peter]’s folks’ cable company is terrible – such a surprise for a cable TV provider – and the digital part of their cable subscription will only work with the company’s cable boxes. The cable company only rents the boxes with no option to buy them, and [Peter]’s folks would need five of them for all the TVs in the house, even though they would only ever use two at the same time. Not wanting to waste money, [Peter] used coax splitters can take care of sending the output of one cable box to multiple TVs, but what about the remotes? For that, he developed an IR remote control multidrop extender. With a few small boards, he can run a receiver to any room in the house and send that back to a cable box, giving every TV in the house digital cable while still only renting a single cable box.
The receiver module uses the same type of IR module found in the cable box to decode the signals from the remote. With a few MOSFETs, this signal is fed over a three-position screw terminal to the transmitter module stationed right next to the cable box. This module uses a PIC12F microcontroller to take the signal input and translate it back into infrared.
[Peter]’s system can be set up as a single receiver, and single transmitter, single receiver and multiple transmitter, many receivers to multiple transmitters, or just about any configuration you could imagine. The setup does require running a few wires through the walls of the house, but even that is much easier than whipping out the checkbook every month for the cable company.
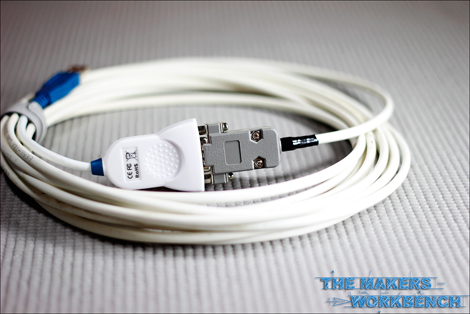
If you’re serious about astronomy these days, you want to have a computer controlled telescope. Although you can easily purchase a pre-made cable that connects the two devices, where’s the fun in that? [Charles], being an avid Maker, has created a nice step by step guide so you can build your own.
This is a great weekend project, and one that even a novice electronics hobbyist should be able to tackle. It’s straight forward, rather quick, and very easy. Strip some insulation off both ends of the cable, then cut off the unneeded wires. (You’ll only be working with three of them.) Prep everything with heat shrink tubing. Crimp one end of the wires into an RJ10 plug, then solder the other end of the wires into a DB9 connector. Secure the heat shrink tubing in place, attach the housings, and you can call it finished!
[Charles] said the whole procedure only took him around 15 minutes. Total cost? Less than $17 in parts.