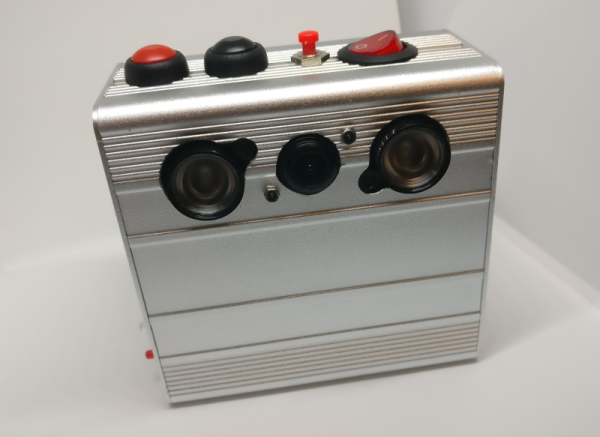
The ‘Pola’ in the PolaPi is a giveaway for what this Hackaday.io project is. This polaroid-like camera, created by [Muth], is a sort of black and white, blast from the past mixed with modern 3D printing. It is based on a Raspberry-pi Zero with a camera module, a Sharp memory LCD for viewing the image, and a Nano thermal printer to print the actual photo. Throw in some buttons, a battery and a slick 3D printed case and you have your own PolaPi.
Right now it’s already on the second iteration as [Muth]s gave the first prototype to some lucky person. As he had to rebuild the whole camera from scratch, he took advantage of what he learned in the first prototype and improved on it. The camera has a ‘live’ 20fps rate on the LCD and you can take your photo, review it, and if you like the shot, print it. The printed photo is surprisingly good, check it out in the video after the break.
Currently the software is being actively developed and the latest version has, among other things, a slit-scan mode. For those who don’t know, slit-scan photography is a technique that can create some crazy warped and psychedelic effects (in this case, as psychedelic as a black and white photo can be).
We know you want one for yourself. If you don’t want to spend the time installing and configuring your RPi Zero, [Muth] kindly shared an SD card image with everything ready.
Like any Moore’s Law-inspired race, the megapixel race in digital cameras in the late 1990s and into the 2000s was a harsh battleground for every manufacturer. With the development of the smartphone, it became a war on two fronts, with Samsung eventually cramming twenty megapixels into a handheld. Although no clear winner of consumer-grade cameras was ever announced (and Samsung ended up reducing their flagship phone’s cameras to sixteen megapixels for reasons we’ll discuss) it seems as though this race is over, fizzling out into a void where even marketing and advertising groups don’t readily venture. What happened?
The Technology
A brief overview of Moore’s Law predicts that transistor density on a given computer chip should double about every two years. A digital camera’s sensor is remarkably similar, using the same silicon to form charge-coupled devices or CMOS sensors (the same CMOS technology used in some RAM and other digital logic technology) to detect photons that hit it. It’s not too far of a leap to realize how Moore’s Law would apply to the number of photo detectors on a digital camera’s image sensor. Like transistor density, however, there’s also a limit to how many photo detectors will fit in a given area before undesirable effects start to appear.
Image sensors have come a long way since video camera tubes. In the ’70s, the charge-coupled device (CCD) replaced the cathode ray tube as the dominant video capturing technology. A CCD works by arranging capacitors into an array and biasing them with a small voltage. When a photon hits one of the capacitors, it is converted into an electrical charge which can then be stored as digital information. While there are still specialty CCD sensors for some niche applications, most image sensors are now of the CMOS variety. CMOS uses photodiodes, rather than capacitors, along with a few other transistors for every pixel. CMOS sensors perform better than CCD sensors because each pixel has an amplifier which results in more accurate capturing of data. They are also faster, scale more readily, use fewer components in general, and use less power than a comparably sized CCD. Despite all of these advantages, however, there are still many limitations to modern sensors when more and more of them get packed onto a single piece of silicon.
While transistor density tends to be limited by quantum effects, image sensor density is limited by what is effectively a “noisy” picture. Noise can be introduced in an image as a result of thermal fluctuations within the material, so if the voltage threshold for a single pixel is so low that it falsely registers a photon when it shouldn’t, the image quality will be greatly reduced. This is more noticeable in CCD sensors (one effect is called “blooming“) but similar defects can happen in CMOS sensors as well. There are a few ways to solve these problems, though.
First, the voltage threshold can be raised so that random thermal fluctuations don’t rise above the threshold to trigger the pixels. In a DSLR, this typically means changing the ISO setting of a camera, where a lower ISO setting means more light is required to trigger a pixel, but that random fluctuations are less likely to happen. From a camera designer’s point-of-view, however, a higher voltage generally implies greater power consumption and some speed considerations, so there are some tradeoffs to make in this area.
Another reason that thermal fluctuations cause noise in image sensors is that the pixels themselves are so close together that they influence their neighbors. The answer here seems obvious: simply increase the area of the sensor, make the pixels of the sensor bigger, or both. This is a good solution if you have unlimited area, but in something like a cell phone this isn’t practical. This gets to the core of the reason that most modern cell phones seem to be practically limited somewhere in the sixteen-to-twenty megapixel range. If the pixels are made too small to increase megapixel count, the noise will start to ruin the images. If the pixels are too big, the picture will have a low resolution.
There are some non-technological ways of increasing megapixel count for an image as well. For example, a panoramic image will have a megapixel count much higher than that of the camera that took the picture simply because each part of the panorama has the full mexapixel count. It’s also possible to reduce noise in a single frame of any picture by using lenses that collect more light (lenses with a lower f-number) which allows the photographer to use a lower ISO setting to reduce the camera’s sensitivity.
Gigapixels!
Of course, if you have unlimited area you can make image sensors of virtually any size. There are some extremely large, expensive cameras called gigapixel cameras that can take pictures of unimaginable detail. Their size and cost is a limiting factor for consumer devices, though, and as such are generally used for specialty purposes only. The largest image sensor ever built has a surface of almost five square meters and is the size of a car. The camera will be put to use in 2019 in the Large Synoptic Survey Telescope in South America where it will capture images of the night sky with its 8.4 meter primary mirror. If this was part of the megapixel race in consumer goods, it would certainly be the winner.
With all of this being said, it becomes obvious that there are many more considerations in a digital camera than just the megapixel count. With so many facets of a camera such as physical sensor size, lenses, camera settings, post-processing capabilities, filters, etc., the megapixel number was essentially an easy way for marketers to advertise the claimed superiority of their products until the practical limits of image sensors was reached. Beyond a certain limit, more megapixels doesn’t automatically translate into a better picture. As already mentioned, however, the megapixel count can be important, but there are so many ways to make up for a lower megapixel count if you have to. For example, images with high dynamic range are becoming the norm even in cell phones, which also helps eliminate the need for a flash. Whatever you decide, though, if you want to start taking great pictures don’t worry about specs; just go out and take some photographs!
(Title image: VISTA gigapixel mosaic of the central parts of the Milky Way, produced by European Southern Observatory (ESO) and released under Creative Commons Attribution 4.0 International License. This is a scaled version of the original 108,500 x 81,500, 9-gigapixel image.)
If you are a fan of nature documentaries you will no doubt have been wowed by their spectacular underwater sequences. So when you buy a GoPro or similar camera and put it in a waterproof case accessory, of course you take it with you when you go swimming. Amazing footage and international documentary stardom awaits!
Of course, your results are disappointing. The professionals have years of experience and acquired skill plus the best equipment money can buy, and you just have your hand, and a GoPro. The picture is all over the place, and if there is a subject it’s extremely difficult to follow.
[Steve Schmitt] has an answer to this problem, and it’s a refreshingly simple one. He’s built an underwater glider to which he attaches his camera and launches across the submerged vista he wishes to film. Attached to a long piece of line for retrieval, it is set to glide gently downwards at a rate set by the position of the camera on its boom.
Construction is extremely simple. The wing is a delta-shaped piece of corrugated plastic roofing sheet, while the fuselage is a piece of plastic pipe. A T-connector has the camera mount on it, and this can slide along the fuselage for pre-launch adjustments. It’s that simple, but of course sometimes the best builds are the simple ones. He’s put up a video which you can see below the break, showing remarkable footage of a test flight through a cold-water spring.
Proper documentation is important, and when traveling it is commonly achieved via photography. Redundant documentation is often inefficient, and the Camera Restricta — in a commentary on the saturation of photographed landmarks and a recent debate on photographic censorship in the EU — aims to challenge the photographer into taking unique photographs.
Camera Restricta has a 3D-printed body, housing a smartphone for gps data, display and audio output, while an ATTiny85 serves to control the interdicting function of the camera. When the user sets up to take a picture using Camera Restricta, an app running on the phone queries a node.js server that trawls Flikr and Panoramio for geotagged photos of the local area. From that information, the camera outputs a clicking audio relative to the number of photos taken and — if there are over a certain number of pictures of the area — the screen trips a photocell connected to the ATTiny 85 board, retracting the shutter button and locking down the viewfinder until you find a more original subject to photograph.
It’s 2017 and even GoPro cameras now come with voice activation. Budding videographers, rest assured, nothing will look more professional than repeatedly yelling at your camera on a big shoot. Hackaday alumnus [Jeremy Cook] heard about this and instead of seeing an annoying gimmick, saw possibilities. Could they automate their GoPro using Arduino-spoken voice commands?
It’s an original way to do automation, for sure. In many ways, it makes sense – rather than mucking around with trying to make your own version of the GoPro mobile app (software written by surfers; horribly buggy) or official WiFi remote, stick with what you know. [Jeremy] decided to pair an Arduino Nano with the ISD1820 voice playback module. This was then combined with a servo-based panning fixture – [Jeremy] wants the GoPro to pan, take a photo, and repeat. The Arduino sets the servo position, then commands the ISD1820 to playback the voice command to take a picture, before rotating again.
[Jeremy] reports that it’s just a prototype at this stage, and works only inconsistently. This could perhaps be an issue of intelligibility of the recorded speech, or perhaps a volume issue. It’s hard to argue that a voice control system will ever be as robust as remote controlling a camera over WiFi, but it just goes to show – there’s never just one way to get the job done. We’ve seen people go deeper into GoPro hacking though – check out this comprehensive guide on how to pwn your GoPro.
Video resolution is always on the rise. The days of 640×480 video have given way to 720, 1080, and even 4K resolutions. There’s no end in sight. However, you need a lot of horsepower to process that many pixels. What if you have a small robot powered by a microcontroller (perhaps an Arduino) and you want it to have vision? You can’t realistically process HD video, or even low-grade video with a small processor. CORTEX systems has an open source solution: a 7 pixel camera with an I2C interface.
The files for SNAIL Vision include a bill of materials and the PCB layout. There’s software for the Vishay sensors used and provisions for mounting a lens holder to the PCB using glue. The design is fairly simple. In addition to the array of sensors, there’s an I2C multiplexer which also acts as a level shifter and a handful of resistors and connectors.
Some of the most enjoyable projects tend to have the terrible drawback of also having the most potential to cause bodily harm, like getting zapped by the capacitor when digging into a disposable camera. But often — if you’re careful — this curiosity pays off and you wind up learning how to make something cool like this coil gun from a camera flash’s capacitor. This handheld launches a small nail, and is packed in a handheld form factor with a light switch trigger.
[LabRatMatt] dispels any illusions of potential harm upfront and then repeatedly urges caution throughout his detailed guide. He breaks down the physics at work while maintaining a lighthearted tone. This coil gun uses a capacitor and charging circuit ripped from a disposable camera — [LabRatMatt] decided to double up with another capacitor that he had on hand from a previous project. The coil was repurposed from an old doorbell, but make sure to use a few hundred windings if you make your own coil. A light switch ended up being suitable for a trigger since it is able to handle the voltage spikes.
When assembled, it almost looks like something you’d expect to see in a post-apocalyptic wasteland, but it works!