Brighten Your Day With Studio Strobe Power Hack

large capacitor bank for flash circuit

[OiD] picked up a couple of cheap studio strobes off eBay and was not happy with the power control. So he rewired it. These lights are like supercharged flashes for professional photographers, and contain some very large capacitor banks. His first hack didn’t work out too well, and he wound up welding the innards of a switch together. He was successful however, in his second attempt to tame the large voltages.

He’s using two 1N5408 diodes, which are rated at 3 amps, for charging the capacitor bank. A massive 60EPS08 diode, rated at 60 amps with a Frankenstein worthy surge rating of 950 amps is used to separate the charge between the two capacitor banks, and allows one to discharge into the flash tube.

Consisting of just a handful of components, [OiD]’s hack greatly improves the performance of the strobe’s power adjustment settings. He does an excellent job at documenting the hack for all to see. Be sure to check out his bog for full details.

THP Entry: OpenMV

OpenMV

The future is a scary place, full of robots, drones, and smart appliances with cameras and vision systems that will follow your dog, your child, or your face around, dutifully logging everything they see, reporting back to servers, and compiling huge datasets that can be sold to marketing companies. We’re not too keen on this view of the future, but the tech behind it – cheap cameras in everything – is very cool. [Ibrahim] is doing his part to bring about the age of cheap cameras that are easy to interface with his entry to The Hackaday Prize, the OpenMV.

The idea of a digital camera that is easy to interface with microcontrollers and single board computers isn’t new. There are serial JPEG cameras and the CMUcam5 Pixy, but they cost somewhere around $70. It’s not something you would design a product around. [Ibrahim]’s OpenMV costs about $15, and offers some interesting features like on-board image processing, a huge amount of RAM, and even a wireless expansion thanks to TI’s CC3000 WiFi module.

Currently, the OpenMV is capable of doing face detection at 25fps, color detection at better than 30fps, all thanks to the STM32F4 ARM micro running at 180MHz. There’s support for up to 64MB of RAM on board, with IO available through serial, SPI, I2C, USB 2.0, and WiFi.

It’s an interesting project on its own, but the really cool thing about this build is the price: if [Ibrahim] can actually produce these things for $15 a pop, he has an actual product on his hands, one that could easily be stuffed inside a drone or refrigerator for whatever cool – or nefarious – purposes you can imagine.


SpaceWrencherThe project featured in this post is an entry in The Hackaday Prize. Build something awesome and win a trip to space or hundreds of other prizes.

1980’s Ingenuity Yields Mechanical Intervalometer

DIY Intervalometer

Let’s go back in time to the 1980’s, when shoulder pads were in vogue and the flux capacitor was first invented. New apartment housing was being built in [Vince’s] neighborhood, and he wanted some time-lapse footage of the construction. He had recently inherited an Elmo Super-8mm film camera that featured a remote control port and a speed selector. [Vince] figured he might be able to build his own intervalometer get some time-lapse footage of the construction. He was right.

An intervalometer is a device which counts intervals of time. These are commonly used in photography for taking time-lapse photos. You can configure the intervalometer to take a photo every few seconds, minutes, hours, etc. This photographic technique is great when you want see changes in a process that would normally be very subtle to the human eye. In this case, construction.

[Vince] started out by building his own remote control switch for the camera. A simple paddle-style momentary micro switch worked perfectly. After configuring the camera speed setting to “1”, he found that by pressing the remote button he could capture one single frame. Now all he needed was a way to press the button automatically every so often.

Being mechanically minded, [Vince] opted to build a mechanical solution rather than an electronic circuit. He first purchased a grandfather clock mechanism that had the biggest motor he could find. He then purchased a flange that allowed him to mount a custom-made wooden disk to the end of the minute hand’s axle. This resulted in a wheel that would spin exactly once per hour.

He then screwed 15 wood screws around the edge of the wheel, placed exactly 24 degrees apart. The custom paddle switch and motor assembly were mounted to each other in such a way that the wood screws would press the micro switch as they went by. The end result was a device that would automatically press the micro switch 15 times per hour. Continue reading “1980’s Ingenuity Yields Mechanical Intervalometer”

Hack A Camera, Win A Nikon

nikonchallenge_620x250_01jbr1

Several juicy prizes from Nikon are ripe for the plucking. Our friends at MAKE are hosting a Nikon sponsored challenge. Grand prize is an Nikon 1 V3 with three extra lenses, and there are two runner-up prizes which offer the same without the extras. They’re basically asking for your best camera hack. Now the submission process is a one-shot deal (no posting and iterating) which may explain why the contest — which started 4/15 and ends 5/13 — only has two entries. Still, we’d love to see a Hackaday reader waltz in and claim the loot.

Need some examples to get you rolling? Connectivity is a fun topic; try interfacing your camera with something like a Nintendo DS. Everyone needs to make at least one motion rig like this Ikea slider. We can’t stop listing examples without at least one shutter trigger. Here’s a sound activated one to capture things that happen extremely quickly.

If you end up winning make sure to tell us so we can share in your delight.

Cheap Under-Cabinet Lights Reimagined As Photography Lighting

diy photography lights

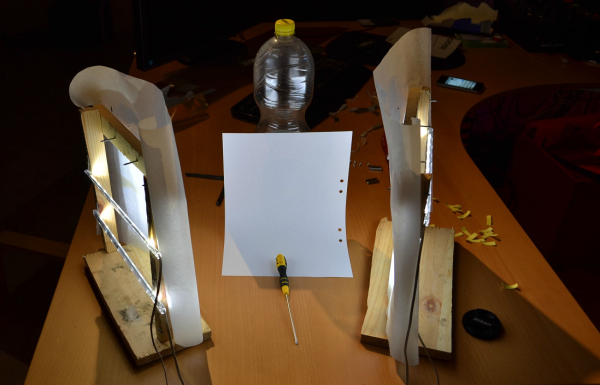
Professional photography lighting can be expensive. Sometimes the professional photographer may not want (or need) to spend the big bucks on lighting. [Alex] is one of those folks. He needed a specialized light source and instead of going out and buying some, he made exactly what he needed out of components unlikely to be found in a photography studio.

The project started off with some off the shelf $12 Home Depot under-cabinet lights. Foam core board was attached to the sides of each light to adjust the beam’s width. Opening and closing these foam flaps allow the light beam to be adjusted to ensure the perfect shot.  The entire assembly was then taped to long, thin pieces of wood. The wood’s sole purpose is to facilitate mounting of the light.

Continue reading “Cheap Under-Cabinet Lights Reimagined As Photography Lighting”

Lux: A 100% Open Source Camera

luxCamera

[Kevin Kadooka] recently finished his open source camera. The Lux Camera is 100% open source. Lux uses no parts from other cameras – not even a lens! To date we’ve only seen this with achieved with pinhole cameras. [Kevin] isn’t new to camera hacking. He was the man behind the Duo camera, which had a successful Kickstarter campaign in February of 2013. Duo is a DIY camera, but it still required lenses from Mamiya-Sekor, and a shutter from Seiko. Lux is a different animal. It has a manual focus 65mm f/5.6 Single Element lens. The shutter is [Kevin’s] own solenoid based leaf shutter design. Just as in the original shutter, an Arduino controls shutter operation and timing.

The main camera body and many of its parts are 3D printed. [Kevin] got some very nice quality parts from Shapeways 3D printing service. We have to say that some of the assemblies look a bit complex for desktop printers. However since everything is open source, anyone willing to put the time in could adapt them for the average RepRap or Ultimaker. [Kevin] has posted detailed build photos, as well as some photos taken with the Lux on his flickr stream. The pictures have  a decidedly holga-esque look to them, due in part to the single element lens. Even with this limitation, we love the idea of having a brownie style camera built completely from scratch.

Elinchrom EL-Skyport Triggered By Arduino

Screenshot 2013-12-25 08.39.33

[Toby] has an Elinchrom EL-Skyport, which is a wireless flash trigger. He decided to see if he could trigger it using an Arduino, and came up with a nice proof of concept. This little device was not meant to be user serviceable, as can be seen in what [Toby] uncovered while taking it apart. But once he had it disassembled, he cataloged everything inside, and then he awesomely went to the trouble of drawing up a schematic. With that knowledge, he began reverse engineering the SPI protocol used, which almost deserves an article by itself.

It was a long road to get there, but in the end [Toby] built a prototype Arduino shield that houses an nRF24L01+ module. These are very cheap to pick up on eBay. He gives us the details on hooking up the module, though he had to go through extra hoops since he was using the Arduino Leonardo. Still, once you’re up and running, you can make use of one of the existing libraries specifically for this module.

Thanks to his effort, the rest of us have one more device to hack on. Thanks [Toby]!

Continue reading “Elinchrom EL-Skyport Triggered By Arduino”