Touch Piano Hits All The Right Notes

We love a good musical build, and this one is no exception. For their ECE4760 final project, [Wendian Jiang], [Hanchen Jin], and [Lin Wang] of Cornell built the nicest-looking touch piano we’ve seen in a while. It has five 4051 multiplexers that take input from 37 capacitive touch keys fashioned from aluminium foil and copper tape. Thanks to good debounce code, the sounds are clean even though the keyboard is capable of four-note polyphony.

A PIC32 and a Charge Time Measurement Unit (CTMU) module generate a small, steady current that charges up the keys. The PIC scans the pins continuously waiting for touch input. When human capacitance is detected, the value is compared with the base capacitance using the ADC and the sound is generated with the Karplus-Strong algorithm.

The group’s original plans for the project included a TFT screen to show the notes on a staff as they are played. While that would have been awesome, there was just too much going on already to be able to accurately capture the notes as well as their duration. Check it out after the break.

Continue reading “Touch Piano Hits All The Right Notes”

Play Music With Your Painting Using Teensy

[sab-art], a collaboration between [Sophia Brueckner] and [Eric Rosenbaum], has created a touch-sensitive musical painting. Initially, basic acrylic paint is used for the majority of the canvas. Once that is dry, conductive paint is used to make the shapes that will be used for the capacitive touch sensing. As an added step to increase the robustness, nails are hammered through each painted shape and connected with wiring in the back of the painting. These wires are then connected to the inputs of a Teensy++ 2.0, using Arduino code based on MaKey MaKey to output MIDI. The MIDI is then sent to a Mac Mini which then synthesizes the sound using Ableton Live.  Any MIDI-processing software would work, though. For this particular painting, external speakers are used, but incorporating speakers into your own composition is certainly possible.

A nice aspect of this project is that it can be as simple or as complex as you choose. Multiple conductive shapes can be connected through the back to the same Teensy input so that they play the same sound. While [sab-art] went with a more abstract look, this can be used with any style. Imagine taking a painting of Dogs Playing Poker and having each dog bark in its respective breed’s manner when you touch it, or having spaceships make “pew pew” noises. For a truly meta moment, an interactive MIDI painting of a MIDI keyboard would be sublime. [sab-art] is refining the process with each new painting, so even more imaginative musical works of art are on the horizon. We can’t wait to see and hear them!

Continue reading “Play Music With Your Painting Using Teensy”

Slick Bathroom Mirror Is All Tricked Out

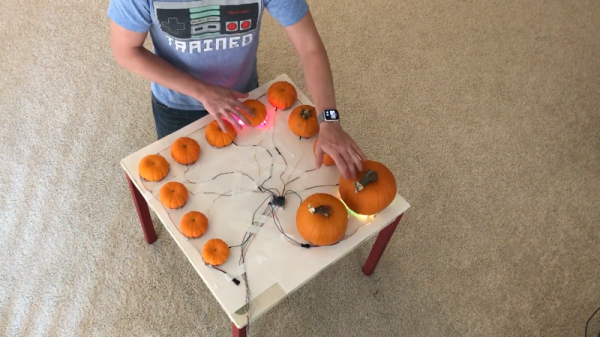
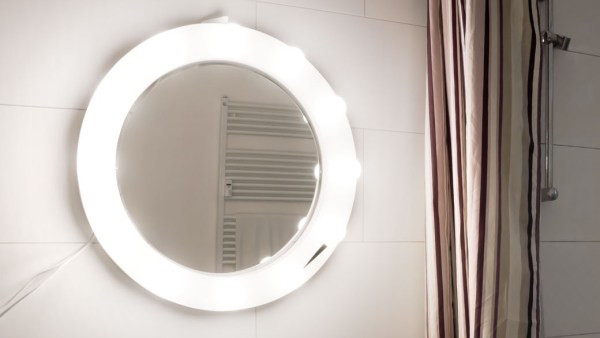
A Mirror surrounded by a string of brightly lit lamps is something you usually get to see in a Movie Star’s dressing room. [pickandplace] was inspired by the Movies, and a dark bathroom, to come up with a Bathroom Mirror equipped with some bells and whistles. To start with, his planning was quite detailed, sketching out the features and constraints for his design. He chose to use a round mirror with 12 LED bulbs (which are safer than 220V bulbs) so it can work as a clock. User input is handled by a motion sensor to automatically switch it on/off and a capacitive touch dimmer. Under the hood there’s an RTC (for clock and brightness adjustment based on time of day), simple boost PWM LED driver, thermal management for the LEDs which are 10W, temperature sensor to pipe down the current if the LEDs get too hot, and even an anti-fogging heater strip – phew!

His execution is no less brilliant. Starting with building the wooden frame and ending with the code for driving all the electronics. Along the way, you will find detailed notes on the LED’s, PWM Driver, Heat sinking, and capacitive Touch dimmer using Atmel’s AT42QT2160 Qslide – Matrix Sensor IC. He had some trouble with the Motion Sensor PIR module, and hasn’t yet written the code to implement it. His first version used a PIC18F87J50, and the next iteration had an ATXmega256A3BU – but he asks us not to get into the Microchip vs. Amtel debate. We have to agree on that. Sharp readers will point out that neither of the two micro’s can provide 12 PWM channels. Well, worry not, he has it all figured out. He also coded up a simple control interface which is handy when the unit is hooked up over USB to a computer. To top it off, he built a miniature LED ring to use as a “Simulator” while working on the code so he didn’t have to lug the heavy Mirror in and out of the bathroom. How’s that for doing a good job better! Source files are on his Github repo, and links to the hardware schematics are peppered throughout his blog.

If you don’t want to build something so fancy, look up the Bathroom Mirror with HUD which displays Time and Weather

Continue reading “Slick Bathroom Mirror Is All Tricked Out”

Capacitive Christmas Organ With Living Lenses Of Slappable Light

We’ve seen capacitive touch organs manifest in pumpkin form. Though they are a neat idea, there’s something about groping a bunch of gourds that stirs a feeling of mild discomfort every time I play one. [mcreed] probably felt the same way and thus created this light-up Jello organ, so he can jiggle-slap Christmas carols, removing any sense of doubt that touching food to play music is weird…

This take on the capacitive tone producing instrument makes clever use of the transparent properties of Jello as well as its trademark wiggling. [mcreed] fills several small mold forms with festively colored strawberry and lime mix. One end of a wire connection is submerged in the liquid of each cup before it has a chance to solidify along with a bright LED. Once chilled and hardened, the gelatinous mass acts as a giant light emitting contact pad. An Arduino is the micro-controller used for the brain, assigning each Jello shape with a corresponding note. By holding onto a grounding wire and completing the acting circuit, one can play songs on the Jello by poking, spanking, or grazing the mounds.

Though I’m not entirely sure if the video is Jello propaganda or not, the idea is applaudable. I prompt anyone to come up with a more absurd item to use for a capacitive organ (zucchinis have already been done).

Continue reading “Capacitive Christmas Organ With Living Lenses Of Slappable Light”

Make A Capacitive Clothespin Keyboard For Your IPad

Even with all the optimization and style of new technology, the keyboard is a difficult thing to replace. Touch screens just don’t deliver the tactile feedback that connects us to the medium. [Adam Kumpf] remedies this by building his own keyboard interface to work with an iPad piano app, all from craft materials you’d likely find lying around in the kitchen.

To make your own, you’d first need a bunch of clothespins which will ultimately act as your keys. [Adam] shows how to stitch the separated halves of the clothespins onto a piece of cardboard with some basic rubber bands. These tension the keys so that they can rock back and forth over a pen or pencil placed beneath them. When you press down on one end, the other lifts causing an opposing pin to press the corresponding key of the iPad, just like a hammer inside a piano. With a little aluminum foil for conductivity wrapped around the side making contact, you’ve got yourself a quick solution for your itch to rock some Chopin.

You can see how well the project works in action below in his video:

Continue reading “Make A Capacitive Clothespin Keyboard For Your IPad”

Garage Door Opener

Capacitive Garage Door Opener Hides Behind Your Dash

[Pyrow] wanted to upgrade his garage door opener remote. It worked just fine, but changing those tiny batteries out can be an inconvenience. Plus, the remote control was taking up valuable storage space and would always rattle around while driving. [Pyrow] decided to make use of an Omron E2K-F10MC2 capacitive touch sensor to fix these issues.

[Pyrow’s] circuit still makes use of the original remote control. He just added some of his own components to get it to do what he wanted. The circuit is powered by the car’s battery, so it never needs a battery replacement. The circuit is protected with a fuse and the power is regulated to prevent electrical spikes from burning up the original remote control. The actual circuit is pretty simple and uses mostly discrete components. It’s all soldered onto proto board to keep it together. He only had to solder to three places on the original remote control in order to provide power and simulate a button press.

Next, [Pyrow] took his dash apart. He used double-sided tape to attach the touch sensor to the back of the dash.  After securing the electronics in place with tape, he now has a working hidden garage door opener. Full schematics are available in the writeup linked above. Also, be sure to watch the demonstration video below.

Continue reading “Capacitive Garage Door Opener Hides Behind Your Dash”

An Automated Flappy Bird Player

game Flappy Bird has been ported to just about every system imaginable, including but not limited to the Apple II, Commodores, pretty much every version of the Atari, and serves as a really great demonstration of the TI-99’s graphics capabilities. Porting is one thing, but having a computer automate Flappy Bird is another thing entirely. [Ankur], [Sai], and [Ackerly] in [Dr. Bruce Land]’s advanced microcontroller design class at Cornell have done just that. They’re playing Flappy Bird with a camera, FPGA, and a penny wired up to a GPIO pin to guide the little 8-bit-bird through Mario pipes.

The setup the team is using consists of a webcam that records the screen of a smartphone, an FPGA, and a little bit of circuitry to emulate screen taps. Inside the FPGA, the team is looking at the video stream from the phone to detect the bird, pipes, and gaps. The ‘tapper’ unit is a US penny, placed right above the ‘tap’ button, wired to a GPIO port. This was found to be the ideal contact for a capacitive touch screen – taps that were too small weren’t registered, and taps that were too big registered as two taps.

For spending an entire semester on automating Flappy Bird, the team has a lot of knowledge to show for it, but not the high score: the bird only makes it through the first pipe 10% of the time, and the second pipe 1% of the time. The high score is three. That’s alright – getting the algorithm right to play the game correctly was very, very difficult, and to nail that problem down, they estimate it would take at least another semester.