Cassette Tape Plays MP3s

Cassette tapes were a major way of listening to (and recording) music througout the 1980s and 1990s and were in every hi-fi stereo, boom box, and passenger vehicle of the era. Their decline was largely as a result of improvements in CD technology and the rise of the MP3 player, and as a result we live in a world largely absent of this once-ubiquitous technology. There are still a few places where these devices crop up, and thanks to some modern technology their capabilities as a music playback device can be greatly enhanced.

The build starts, as one might expect, by disassembling the cassette and removing the magnetic tape from the plastic casing. With the interior of the cassette empty it’s capable of holding a small battery, USB-C battery charger, and a Bluetooth module. The head of an old tape deck can be wired to the audio output of the Bluetooth module and then put back in place in the housing in place of the old tape. With the cassette casing reassembled, there’s nothing left to do but pair it to a smartphone or other music-playing device and push play on the nearest tape deck.

As smartphones continue to lose their 3.5 mm headphone jacks, builds like this can keep lots of older stereos relevant and usable again, including for those of us still driving older vehicles that have functioning tape decks. Of course, if you’re driving a classic antique auto with a tape technology even older than the compact cassette, there are still a few Bluetooth-enabled options for you as well.

Continue reading “Cassette Tape Plays MP3s”

Watch A 3D Scan Become A Car Body Model

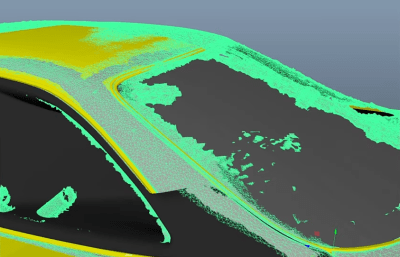
Not all 3D scanning is alike, and the right workflow can depend on the object involved. [Ding Dong Drift] demonstrates this in his 3D scan of a project car. His goal is to design custom attachments, and designing parts gets a lot easier with an accurate 3D model of the surface you want to stick them on. But it’s not as simple as just scanning the whole vehicle. His advice? Don’t try to use or edit the 3D scan directly as a model. Use it as a reference instead.

Rather than manipulate the 3D scan directly, a better approach is sometimes to use it as a modeling reference to fine-tune dimensions.

To do this, [Ding Dong Drift] scans the car’s back end and uses it as a reference for further CAD work. The 3D scan is essentially a big point cloud and the resulting model has a very high number of polygons. While it is dimensionally accurate, it’s also fragmented (the scanner only captures what it can see, after all) and not easy to work with in terms of part design.

In [Ding Dong Drift]’s case, he already has a 3D model of this particular car. He uses the 3D scan to fine-tune the model so that he can ensure it matches his actual car where it counts. That way, he’s confident that any parts he designs will fit perfectly.

3D scanning has a lot of value when parts have to fit other parts closely and there isn’t a flat surface or a right angle to be found. We saw how useful it was when photogrammetry was used to scan the interior of a van to help convert it to an off-grid camper. Things have gotten better since then, and handheld scanners that make dimensionally accurate scans are even more useful.

Continue reading “Watch A 3D Scan Become A Car Body Model”

Train Speed Signaling Adapted For Car

One major flaw of designing societies around cars is the sheer amount of signage that drivers are expected to recognize, read, and react to. It’s a highly complex system that requires constant vigilance to a relatively boring task with high stakes, which is not something humans are particularly well adapted for. Modern GPS equipment can solve a few of these attention problems, with some able to at least show the current speed limit and perhaps an ongoing information feed of the current driving conditions., Trains, on the other hand, solved a lot of these problems long ago. [Philo] and [Tris], two train aficionados, were recently able to get an old speed indicator from a train and get it working in a similar way in their own car.

The speed indicator itself came from a train on the Red Line of the T, Boston’s subway system run by the Massachusetts Bay Transportation Authority (MBTA). Trains have a few unique ways of making sure they go the correct speed for whatever track they’re on as well as avoid colliding with other trains, and this speed indicator is part of that system. [Philo] and [Tris] found out through some reverse engineering that most of the parts were off-the-shelf components, and were able to repair a few things as well as eventually power everything up. With the help of an Arduino, an I/O expander, and some transistors to handle the 28V requirement for the speed indicator, the pair set off in their car to do some real-world testing.

This did take a few tries to get right, as there were some issues with the power supply as well as some bugs to work out in order to interface with the vehicle’s OBD-II port. They also tried to use GPS for approximating speed as well, and after a few runs around Boston they were successful in getting this speed indicator working as a speedometer for their car. It’s an impressive bit of reverse engineering as well as interfacing newer technology with old. For some other bits of train technology reproduced in the modern world you might also want to look at this recreation of a train whistle.

Continue reading “Train Speed Signaling Adapted For Car”

Car Becomes A Massive Bubble Machine

You’ve probably seen street performers or family members making giant bubbles at some point in your life. But what if you could go ever bigger…even approaching a bubble of infinite length? That’s precisely what [Engineezy] tried to do.

The common technique behind blowing big bubbles involves attaching a thick rope to two sticks, then dipping the sticks in bubble fluid. The two sticks can then be spread apart to act as a big triangular bubble wand to create massive bubbles.

So the idea here to create a giant bubble-blowing frame using the same technique, continually feed it with bubble fluid, and stick it on top of a car. Spread the wings of the bubble wand, and watch the bubble grow. Oh, and this setup uses special bubble fluid—made by mixing soap, water, and veterinary J-Lube in specific ratios. Feeding the car-mounted wand with fluid was achieved by tubing delivering a continuous flow. Early small-scale attempts created wild 25 foot bubbles, while the car version made one over 50 feet long. Not infinite, but very cool.

As it turns out, the science of bubbles is deep and interesting.

Continue reading “Car Becomes A Massive Bubble Machine”

3D-Printed RC Drift Car Comes With Smoke Effects

Drift cars are cool, but they’re also expensive. If you don’t have money for endless tires, fuel, and engine rebuilds, you might like to get involved at the RC scale instead. [Max Imagination] has just the build to get you started.

The design uses 3D printing for the majority of the chassis. Rigidity is front of mind, as is creating the right  steering and suspension geometry for smooth, controllable drifts. The drivetrain is 3D-printed too, using plastic gears and universal-joint axles combined with off-the-shelf bearings. Steering is controlled via an off-the-shelf servo, with a brushless motor putting power down to all four wheels. While drifting at full scale is best achieved with rear-wheel-drive, it’s easier to control at the small scale with four driven wheels.

True to the DIY ethos, an Arduino-based RC system is used to drive the steering servo and motor speed controller, with a home-built pistol-grip controller. It also activates a small power supply which runs little humidifier modules, which turn water into a visible vapor for a fun smoke effect. It doesn’t really imitate tire smoke, since it disappears nearly the instant the car moves, but it’s still a neat effect.

It’s a neat build that makes a great starting point for your dive into RC. Meanwhile, if you’re more about speed than getting sideways, we’ve seen a homebrew RC car designed to that end as well. Video after the break. Continue reading “3D-Printed RC Drift Car Comes With Smoke Effects”

Hackaday Links Column Banner

Hackaday Links: March 31, 2024

Battlelines are being drawn in Canada over the lowly Flipper Zero, a device seen by some as an existential threat to motor vehicle owners across the Great White North. The story started a month or so ago, when someone in the government floated the idea of banning devices that could be “used to steal vehicles by copying the wireless signals for remote keyless entry.” The Flipper Zero was singled out as an example of such a nefarious device, even though relatively few vehicles on the road today can be boosted using the simple replay attack that a Flipper is capable of, and the ones that are vulnerable to this attack aren’t all that desirable — apologies to the 1993 Camry, of course. With that threat hanging in the air, the folks over at Flipper Devices started a Change.org petition to educate people about the misperceptions surrounding the Flipper Zero’s capabilities, and to urge the Canadian government to reconsider their position on devices intended to explore the RF spectrum. That last bit is important, since transmit-capable SDR devices like the HackRF could fall afoul of a broad interpretation of the proposed ban; heck, even a receive-only SDR dongle might be construed as a restricted device. We’re generally not much for petitions, but this case might represent an exception. “First they came for the Flipper Zero, but I did nothing because I don’t have a Flipper Zero…”

Continue reading “Hackaday Links: March 31, 2024”

A new display wedged into a car-based fridge

New Brains Save 12 V Fridge From The Scrap Heap

Recently [nibbler]’s Evakool 55L vehicle fridge started to act strangely, reporting crazy temperature errors and had no chance of regulating. The determination was that the NTC thermistor was toast, and rather than trying to extricate and replace this part, it was a lot easier to add a new one at a suitable location

Bog-standard fridge internals

A straight swap would have been boring, so this was a perfect excuse for an overboard hack. Reverse engineering the controller wouldn’t be easy, as the data wasn’t available, as is often the case for many products of this nature.

While doing a brain transplant, the hacker way, we can go overboard and add the basics of an IoT control and monitoring system. To that end, [nibbler] learned as much as possible about the off-the-shelf ZH25G compressor and the associated compressor control board. The aim was to junk the original user interface/control board and replace that with a Raspberry Pi Pico W running CircuitPython.

For the display, they used one of the ubiquitous SH1106 monochrome OLED units that can be had for less than the cost of a McDonald’s cheeseburger at the usual purveyors of cheap Chinese electronics.  A brief distraction was trying to use a DS18B20 waterproof thermometer probe, which they discovered didn’t function, so they reverted to tried and trusted tech — a simple NTC thermistor.

Continue reading “New Brains Save 12 V Fridge From The Scrap Heap”