Pen Plotter Uses Polar Coordinates

To keep track of a location in a two-dimensional space, two measurements are needed. Most of the time, we would naturally think to do this by the Cartesian method, measuring position along one axis and then again along a second axis. But this isn’t the only way of keeping track of position. Polar coordinates, where the distance from the origin and an angle are used as the two measurements, works just as well, and sometimes can be a preferred method. This pen plotter tosses the expected Cartesian methodology we would typically expect in favor of this polar system.

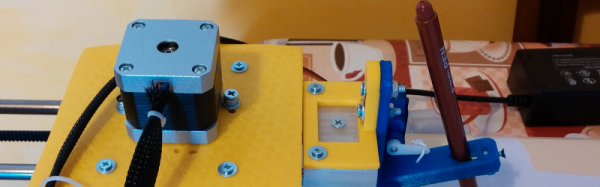
The first prototype that [André] built was a good proof of concept. A pen attached to a movable carriage on a single rotating arm produced passable drawings, but as all prototypes go this one needed some refinement. Limit switches at the ends of the table, as well as within the arm, served to orient the plotter so that it didn’t manually need to be zeroed out every time. A linear actuator was added to give finer control over the pen’s pressure on the table, and finally an encoder was added to the base of the plotter to more accurately correct positional errors in the rotating arm mechanism.

With everything said and done, the polar coordinate plotter seems to work just as well as its Cartesian cousins might, orienting it like this has some advantages as well. Specifically, it is more adapted to drawing curves or circles than an X-Y device might be able to, like we saw with this similar sand-drawing plotter. Also, if allowed to rotate its entire 360-degree reach instead of just the 90 degrees shown in the video, a machine like this could theoretically reach a wider workspace more easily than other plotters.
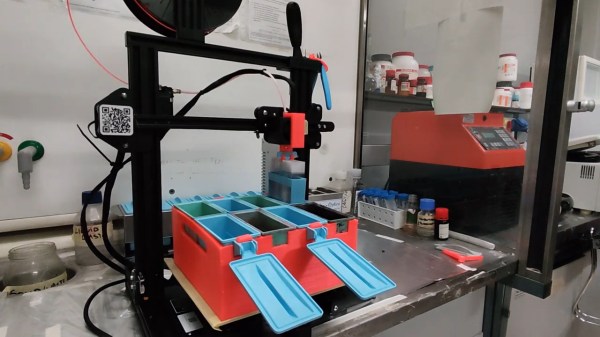
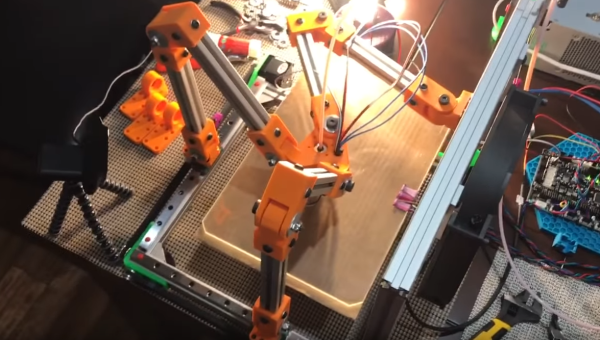
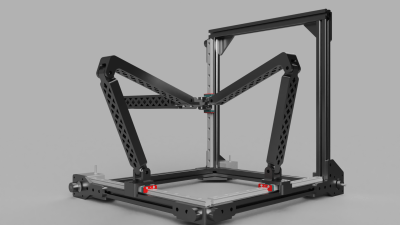
Continue reading “Pen Plotter Uses Polar Coordinates”

3D Printer Repurposed For Light-Duty Lab Automation Tasks

Laboratory automation equipment is expensive stuff, to such a degree that small labs are often priced out of the market. That’s a shame, because there are a lot of tedious manual tasks that even modest labs would benefit from automating. Oh well — that’s what grad students are for.

But it actually isn’t that hard to bring a little automation to the lab, if you follow the lead of [Marco], [Chinna], and [Vittorio] and turn a 3D printer into a simple lab robot. That’s what HistoEnder is — a bog-standard Creality Ender 3 with a couple of special modifications that turn it into a tool for automating histology slide preparation. Histology is the study of the anatomy of tissues and uses various fixing and staining techniques to make microscopic features visible. In practice, this means moving baskets of glass slides back and forth between jars of different solutions, a job that’s perfect for a simple Cartesian gantry lab robot with a small work envelope and light loads.

None of the printer modifications are permanent; the 3D printed accessories — a hook for the slide basket and a carrier for standard histology staining jars — can quickly come off the printer to return it to its regular duty. All it takes to run HistoEnder is a bit of custom G-code and some careful alignment of the jar carrier on the print bed. We suppose the bed heater could even be used to warm up the fixing and staining solutions. There’s a brief video of HistoEnder in action embedded in the tweet below.

This isn’t the first time this team has repurposed technology for the lab — remember the fitness band that was turned into an optical densitometer?

Continue reading “3D Printer Repurposed For Light-Duty Lab Automation Tasks”

LED Matrix Hack Chat

Join us on Wednesday, June 9 at noon Pacific for the LED Matrix Hack Chat with Garrett Mace!

It’s pretty amazing how quickly light-emitting diodes went from physics lab curiosity to a mainstream commodity product made in the millions, if not billions. Everything about LEDs has gotten better, smaller, and cheaper over the years, going from an “any color you want as long as it’s red” phase to all the colors of the rainbow and beyond in a relatively short time. LEDs have worked their way into applications that just didn’t seem likely not that long ago, like architectural lighting, automotive applications, and even immense displays covering billboards, buildings, and sporting venues with multicolor, high-resolution displays.

It’s that latter application that seems to have provided a boon to electronics hobbyists, in the form of cheap and plentiful LED matrix modules. These are easily sourced at the usual places, and with their tightly packed pinpoints that can show any color at any intensity, they have a ton of fun and useful applications for the hacker. But how exactly do you put them to use? Usually the electronics end is pretty straightforward, but some of the math involved in figuring out how to address all these LEDs can be a little mind-bending.

To help us sort all this out, Garrett Mace will drop by the Hack Chat. You’ve probably seen Garrett’s cool LED matrix shades, which have gone through a ton of revisions and are a much-copied fashion accessory among the cool hackers. They look simple, but there are tricks to making them work right, and Garrett will share his secrets. Come with your questions on putting LED matrix modules to work, especially those odd-size modules and strange arrangements that defy simple Cartesian coordinates.

join-hack-chatOur Hack Chats are live community events in the Hackaday.io Hack Chat group messaging. This week we’ll be sitting down on Wednesday, June 9 at 12:00 PM Pacific time. If time zones have you tied up, we have a handy time zone converter.

Click that speech bubble to the right, and you’ll be taken directly to the Hack Chat group on Hackaday.io. You don’t have to wait until Wednesday; join whenever you want and you can see what the community is talking about.

Third Time’s A Charm For This Basketball-Catching Robot

We all know that version one of a project is usually a stinker, at least in retrospect. Sure, it gets the basic idea into concrete form, but all it really does is set the stage for a version two. That’s better, but still not quite there. Version three is where the magic all comes together.

At least that’s how things transpired on [Shane Wighton]’s quest to build the perfect basketball robot. His first version was a passive backboard that redirected incoming shots based on its paraboloid shape. As cool as the math was that determined the board’s shape, it conspicuously lacked any complicated systems like motors and machine vision — you know, the fun stuff.  Version two had all these elaborations and grabbed off-target shots a lot better, but still, it had a limited working envelope.

Enter version three, seen in action in the video below. Taking a page from [Mark Rober]’s playbook, [Shane] built a wickedly overengineered CoreXY-style robot to cover his shop wall. Everything was built with the lightest possible materials to keep inertia to a minimum and ensure the target ends up in the right place as quickly as possible. [Shane] even figured out how to mount the motor that tilts the backboard on the frame rather than to the carriage. A Kinect does depth-detection duty on the incoming ball — or the builder’s head — and drains pretty much every shot it can reach.

[Shane] has been doing some great work automating away the jobs of pro athletes. In addition to basketball, he has tackled both golf and baseball, bringing explosive power to each. We’re looking forward to versions two and three on both of those builds as well.

Continue reading “Third Time’s A Charm For This Basketball-Catching Robot”

Review: LinkSprite Mini CNC

It’s a great time to be a hobbyist. No matter how you feel about the Arduino/Raspberry Pi effect, the influx of general enthusiasm and demand it has created translates to better availability of components, a broader community, and loads of freely available knowledge. When people have access to knowledge and ideas, great things can happen. Tools that were once restricted to industrial use become open source, and the price of entry-level versions goes into a nosedive.

As we’ve seen over the last several years, the price of cheap 3D printers keeps falling while the bar of quality keeps rising. It’s happening with laser cutters and carving tools, too. Strolling through Microcenter a few weeks ago, I spotted a new toy on the back wall next to the 3D printers. It was LinkSprite’s desktop mini CNC. They didn’t have one out on display, but there were two of them in boxes on the shelf. And boy, those boxes were small. Laughably small. I wondered, could this adorable machine really be any good? To some, the $200 price tag suggests otherwise. To me, the price tag made it justifiable, especially considering that the next price point for a hobby CNC mill is at least twice as much. I took my phone out and stood there frantically looking for reviews, documentation, anything that was available. It seemed that the general, if sparse consensus is that this thing isn’t a total waste of money. Oh, and there’s a wiki.

According to LinkSprite’s wiki, this little machine will engrave wood, plastic, acrylic, PVC, and PCBs. It will specifically not engrave metal (PCB copper notwithstanding). I’m a bit leery of the chemicals used in the PCB etching process, so the idea of engraving them instead was especially tempting. I pulled the trigger.

Continue reading “Review: LinkSprite Mini CNC”

Dawn Of The Tripteron 3D Printer

Cartesian 3D printers were the original. Then delta printers came along, and they were pretty cool too. Now, you can add tripteron printers to the mix.  The tripteron is an odd mix of cartesian and delta. The system was invented at the robotics laboratory at Université Laval in Quebec, Canada. The team who created it say that it is “isotropic and fully decoupled, i.e. each of the actuators is controlling one Cartesian degree of freedom, independently from the others.” This means that driving the bot will be almost as simple as driving a standard X/Y/Z Cartesian printer. The corollary to that are of course delta robots, which follow a whole different set of kinematic rules.

trioptera-renderA few people have experimented with tripteron printers over the years, but as far as we can see, no one has ever demonstrated a working model. Enter [Apsu], who showed up about a month ago. He started a post on the RepRap forums discussing his particular design. [Apsu] works fast, as he has now demonstrated a working prototype making prints. Sure they’re just calibration cubes, but this is a huge step forward.

[Apsu] admits that he still has a way to go in his research – especially improving the arm and joint implementation. However, he’s quite pleased that his creation has gone from a collection of parts to a new type 3D printer.  We are too — and we can’t wait to see the next iteration!

Continue reading “Dawn Of The Tripteron 3D Printer”

Meet Cartesio, Robot Artist

[Robottini] released plans for his robot, Cartesio, that is essentially an Arduino-controlled plotter made to create artwork. The good part about Cartesio is the low cost. [Robottini] claims it cost about $60 to produce.

The robot has an A3-size drawing bed and is practically the XY part of a 3D printer. In fact, most of the parts are 3D printed and the mechanical parts including M8 smooth rod. LM8UU bearings, and GT2 belts and pulleys. If you’ve built a 3D printer, those parts (or similar ones) should sound familiar.

The Arduino uses GRBL to drive the motors from GCODE. [Robottini] has three different workflows to produce drawings from applications like Inkscape. You can see some of the resulting images below.

We’ve covered GRBL before, and it is the heart of many motion control projects. If you’d rather draw on something less permanent, you might try this project.

Continue reading “Meet Cartesio, Robot Artist”