Hackaday Superconference: 3D Printing For Electronics

For her day job, Amie D Dansby works as a software simulation developer, creating simulations for video games. In her free time, she’s implanting the key to her Tesla in her arm, building cordwood jewelry and cosplay swords, and seeking out other adventures in electronics and 3D printing. Amie has made a name for herself in the 3D printing community, and she is surrounded by fans when she attends the RepRap meetups and Maker Faires.

She was also popular at this year’s Hackaday Superconference, where she gave a talk on the integration of 3D printing and electronics. Amie’s work concentrates on props and cosplay, which is a skill unto itself, and you only need to look at some of the old Mythbusters, the documentary footage from ILM, or even model makers to realize this is an arcane art that takes a lot of skill. Lucky for us, Amie was there to show us the tricks she’s picked up over the years to make building a one-off piece easier than you could imagine.

Continue reading “Hackaday Superconference: 3D Printing For Electronics”

Glowing Eyes For Regular Guys

Cosplayers continually push the boundary of what’s possible in live costuming, often taking effects from the silver screen and creating them in real life. [KyleofAsgard] is no exception, bringing Thor’s glowing eyes to life in this impressive build.

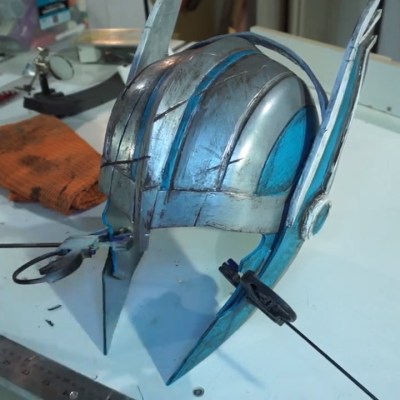
The helmet is a 3D printed piece from Thingiverse, painted and distressed by hand.

The build relies on special contact lenses, which [Kyle] suggests are best sourced by searching for “electric blue contact lenses”. These glow in the presence of UV light, which here is provided by a strip of UV LEDs embedded into Thor’s helmet from the recent Marvel movies.

The concept is simple, but the attention to detail is what makes this project a winner. Not content with an earlier build that was a tangle of wires and uncomfortable to use, [KyleofAsgard] made some smart upgrades. The battery for the LEDs and all circuitry is built into the helmet, making it easy to take on and off on those long convention days. For a more impressive effect, a relay is used to turn the LEDs on by remote control with a 433MHz module. This allows [Kyle] or an assistant to trigger the effect covertly, adding plenty of drama when the eyes suddenly begin to shine. It’s all done with off-the-shelf parts that even a novice could put together.

Giving credit where it’s due, [Kyle] notes that his work was inspired by that of Instagram cosplayer [missxboof], who executed a similar concept earlier this year. It’s great to see the cosplay community coming together and sharing tips and techniques online. Of course, if your tastes are more Metroid than Marvel, you might prefer this arm cannon build. Video after the break.

[Thanks to NZSmartie for the tip!]

Continue reading “Glowing Eyes For Regular Guys”

Wearable Speeder Bikes Are Ready For A Night Out

While Hackaday is about as far from a fashion blog as you can possibly get, we have to admit we’re absolutely loving the [bithead942] Winter 2018 Collection. His wife and daughter recently got to model his latest must have design: wearable Star Wars speeder bikes; and judging by the video after the break they were certainly some of the best dressed at the Thanksgiving parade.

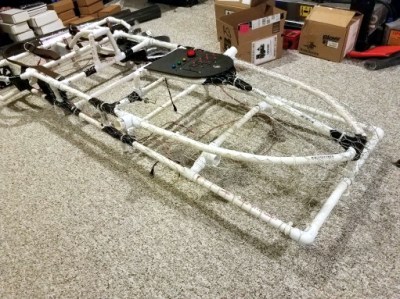
[bithead942] started the build by taking careful measurements of a vintage speeder bike model kit his wife had, which allowed to accurately recreate the iconic look of the vehicles as they were seen in Return of the Jedi . But to do them justice, the final “bikes” would need to be around three meters (ten feet) long, which immediately posed a problem. What kind of material could support itself over that length while still being light enough to wear for extended periods of time?

The answer came, as it often does, from the local hardware store. He found that a combination of Schedule 80 and 40 PVC pipe was a perfect material: strong enough to support the desired dimensions without bending, light enough that the final bike wouldn’t be uncomfortable to wear, easy to bend with heat, and perhaps best of all, cheap and readily available. The PVC frame was then covered with chicken wire and thin flexible foam to give it a filled out look without weighing them down.

Even though he had a strict weight limit on the build, [bithead942] couldn’t help but add in some electronics to complete the effect. The LED festooned control panel allows the ladies to trigger different sound effects from the movie stored on a Adafruit Mini FX Sound Board, which is connected to a 20W Class D amplifier and a pair of 400 watt car stereo speakers. He says the resulting playback was loud enough to hear outside during the parade, and only added a few pounds to the overall build.

These may be the bikes you’re looking for, but they’re definitely not the first we’ve featured on Hackakday. Meanwhile you’d be wise not to underestimate the lowly PVC pipe when designing your next project. From a hacked together drill press for your Dremel to a planetarium for you and your closest dozen or so friends, there’s little you can’t build with this plentiful material.

Continue reading “Wearable Speeder Bikes Are Ready For A Night Out”

Magic Wand Learns Spells Through Machine Learning And An IMU

Jennifer Wang likes to dress up for cosplay and she’s a Harry Potter fan. Her wizarding skills are technological rather than magical but to the casual observer she’s managed to blur those lines. Having a lot of experience with different sensors, she decided to fuse all of this together to make a magic wand. The wand contains an inertial measurement unit (IMU) so it can detect gestures. Instead of hardcoding everything [Jennifer] used machine learning and presented her results at the Hackaday Superconference. Didn’t make it to Supercon? No worries, you can watch her talk on building IMU-based gesture recognition below, and grab the code from GitHub.

Naturally, we enjoyed seeing the technology parts of her project, and this is a great primer on applying machine learning to sensor data. But what we thought was really insightful was the discussions about the entire design lifecycle. Asking questions to scope the design space such as how much money can you spend, who will use the device, and where you will use it are often things we subconsciously answer but don’t make explicit. Failing to answer these questions at all increases the risk your project will fail or, at least, not be as successful as it could have been.

Continue reading “Magic Wand Learns Spells Through Machine Learning And An IMU”

Lightsaber Uses Pogo Pins To Make Assembly A Breeze

There was an endless supply of fantastic projects at Supercon this year, but one whose fit and finish really stood out was [Scott]’s lightsaber. If you were walking around and saw someone with a very bright RGB device with a chromed-out handle hanging off their belt it was probably this, though it may have been hard to look at directly. On the outside, the saber looks like a well-polished cosplay prop, and it is! But when Scott quickly broke down the device into component pieces it was apparent that extra care had been put into the assembly of the electronics.

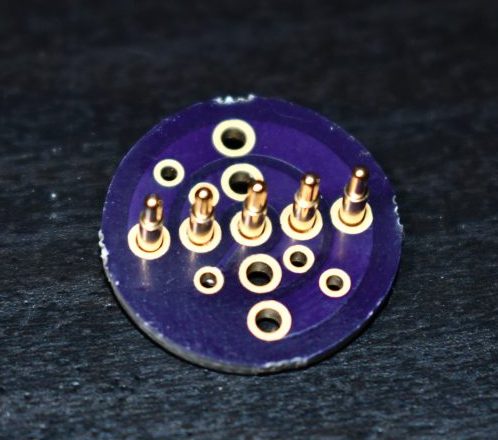
Like any good lightsaber replica the blade is lit, and wow is it bright. The construction is fairly simple, it’s a triplet of WS2812B LED strips back to back on a triangular core, mounted inside a translucent polycarbonate tube with a diffuser. Not especially unusual. But the blade can be popped off the hilt at a moments notice for easy transport and storage, so the strips can’t be soldered in. Connectors would have worked, but who wants flying wires when they’re disconnecting their lightsaber blade. The answer? Pogo pins! Scott runs the power, ground, and data lines out of the strips and into a small board with slip ring-style plated rings. On the hilt, there is a matching array of pogo pins to pass along power and data. The data lines from all the strips are tied together minimizing the number of connections to make, and the outer two power rings have more than one pin for better current-carrying capacity. A handy side effect is that there is nowhere on the blade where there aren’t LEDs; the strips go down to the very end of the blade where it meets the main board inside the hilt.

The hilt is filled with an assembly of 18650’s and a Teensy mounted with a custom shield, all fit inside a printed midframe. The whole build is all about robust design that’s easy to assemble. The main board is book-ended by perpendicular PCBs mounted to the ends, one at the top to connect to the blade and one at the bottom to connect to a speaker. Towards the bottom there is space for an optional Bluetooth radio to allow remote RGB control.
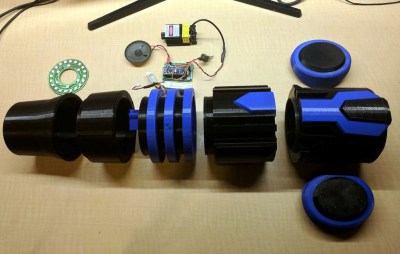
Scott is selling this as a product but also provides detailed instructions and parts lists for each component. Assembly instructions for the blade are here. The hilt is here. And pogo adapters are on OSH Park here. An overview of the firmware with links to GitHub is here. Check out a walkthrough of the handle assembly and blade attachment after the break!

Continue reading “Lightsaber Uses Pogo Pins To Make Assembly A Breeze”

Laser Arm Cannon Scares More Than Metroids

There’s an interesting side effect of creating a popular piece of science fiction: if you wait long enough, say 30 or 40 years, there’s a good chance that somebody will manage to knock that pesky “fiction” bit off the end. That’s how we got flip phones that looked like the communicators from Star Trek, and rockets that come in for a landing on a tail of flame. Admittedly it’s a trick that doesn’t always work, but we’re not in the business of betting against sufficiently obsessed nerds either.

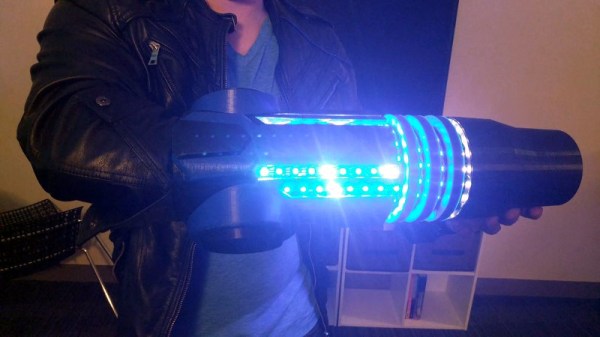
Coming in right on schedule 32 years after the release of Metroid on the Nintendo Entertainment System, we now have a functional laser arm cannon as used by the game’s protagonist Samus Aran, courtesy of [Hyper_Ion]. It’s not quite as capable as its video game counterpart, but if your particular corner of the solar system is under assault from black balloons you should be in good shape. Incidentally no word yet on a DIY Power Suit that folds the wearer up into a tiny ball, but no rush on that one.

Modeled after the version of the weapon Samus carried in 2002’s iconic Metroid Prime, [Hyper_Ion] 3D printed the cannon in a number of pieces that screw together in order to achieve the impressive final dimensions. He printed it at 0.3 mm layers to speed up the process, but as you can probably imagine, printing life-size designs like this is not for the faint of heart or short of time. While the use of printed threads does make the design a bit more complex, the fact that the cannon isn’t glued together and can be broken down for maintenance or storage is a huge advantage.

Ever popular NeoPixel strips give the cannon a bit of flash, and a speaker driven by a 2N2222 transistor on an Arduino Nano’s digital pin allows for some rudimentary sound effects with nothing more than a PWM signal. In the video after the break you can see how the lights and sounds serve as a warning system for the laser itself, as the cannon can be seen “charging up” for a few seconds before emitting a beam.

Of course, this is the part of the project that might have some readers recoiling in horror. To provide some real-world punch, [Hyper_Ion] has equipped his arm cannon with a 2.5W 450nm laser module intended for desktop engraving machines. To say this thing is dangerous is probably an understatement, so we wouldn’t blame you if you decided to leave the laser module off your own version. But it certainly looks cool, and as long as you’ve got some proper eye protection there’s (probably) more dangerous things you can do in the privacy of your own home.

Shame this kind of technology wasn’t really practical back when [Ryan Fitzpatrick] made this fantastic Power Suit helmet for a Metroid fan production.

Continue reading “Laser Arm Cannon Scares More Than Metroids”

The Latest 3D Printed Fad: Flexible Armor And Pangolin Cosplay

Last week, [David Shorey] came along to the monthly Hackaday meetup in Pasadena. These meetups feature speakers and drinks, projects and chit-chat, and sometimes a few demos of what the local Hackaday community has been working on. [David]’s impromptu demo was something no one had ever seen before. It’s 3D printed tiles embedded in fabric. This is the beginning of 3D printed flexible armor, a great method for cosplay builds, and a really cool way to add another trick to your 3D printing toolkit.

Hexagons tesselate. Image credit: DrainSmith

The steps to reproduce this project are actually very easy. The most important bit is the fabric itself. This is just a piece of tulle, a fine fabric mesh that’s usually used for bridal veils. According to members of the 3D printing community, you can pick up some tulle in the fabric department of any WalMart. The steps to reproduce this technique are simply to print three layers, pause the print and move the head out of the way, lay the tulle down on the print, and hit resume.

Judging from the commentary surrounding this new technique, there are a few tips and tricks to get the most out of this 3D printable fabric. The fabric should be taut and held down with either tape or binder clips. Melting or burning doesn’t seem to be an issue, but tulle made out of nylon is fairly common, and printing 3D panels with exotic filaments that require high temperatures may result in a mess.

While very cool, there are some limitations to the technique. If, for example, you are building a suit of body armor out of bendable tessallatable panels, you will have to assemble a quilt made out of panels as large as your print bed. This could be made easier by sewing (or gluing) the tulle/scale assembly onto a larger piece of fabric. Alternatively, the process could be modified for use with an Infinite Build Volume printer. This would give you yards and yards of 3D printed scales, ready to be fashioned into an outfit.

This is one of the most interesting techniques to bring 3D printing into the domain of ‘soft’ hacks and fashion we’ve ever seen. If you want to check out what’s possible with this, be sure to follow [David] on Twitter and out his Instagram. There are a lot of really great ideas there.

As with most ideas in 3D printing, this is one that’s been done before, albeit at not such a high level. [Drato] a.k.a. [RobotMama] did pretty much the same thing a few months ago, and we thank her for her contribution to the community.