To Lovers Of Small Boxes: A 3D Printable Design Just For You

Print them at 50% scale for a far cuter (and much less useful) result.

[Jacob Stanton]’s design for 3D-printable, stacking and locking boxes is a great example of design for manufacturability (DFM). MicroStacks show how part of good DFM is taking the manufacturing method’s strengths and weaknesses into account. [Jacob]’s boxes are created specifically with 3D printing in mind, which is great design whether somebody is making one, or dozens.

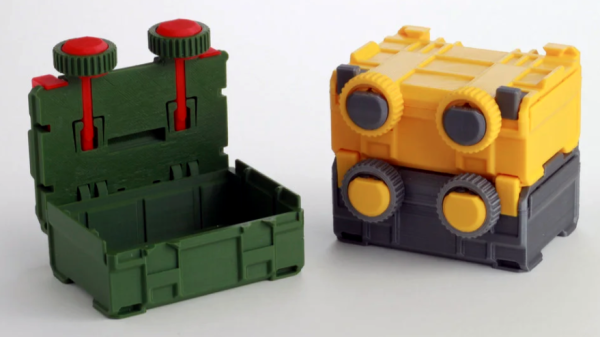
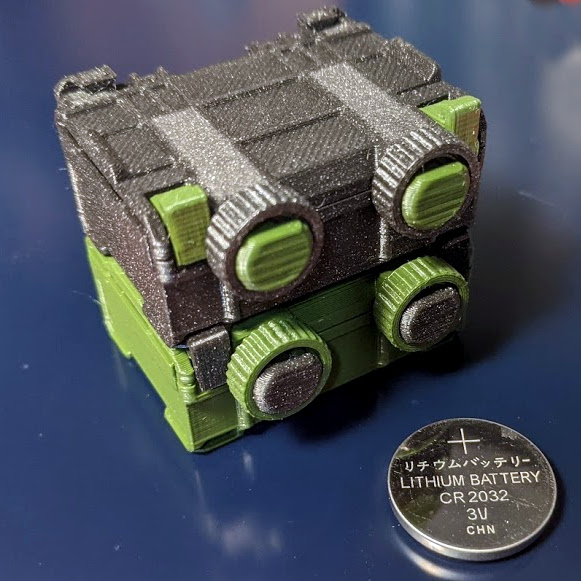
The boxes have sturdy parts that all print without any need for supports, fasteners, or post-processing. In addition, since no two 3D printers are quite alike and some print better than others, the parts are also designed to be quite forgiving of loose tolerances. Even on a printer that is less well-tuned than it could be, the design should still work. The boxes also have a nice stacking feature: a sturdy dovetail combined with a sliding tab means that once boxes are stacked, they’re not coming apart by accident unless something breaks in the process.

The boxes as designed are about big enough to store AA cells. Not the right size for you? One nice thing about a 3D-printable design that doesn’t need supports is that it’s trivial to uniformly scale the size of the models up or down to match one’s needs without introducing any print complications in the process. You can watch [Jacob] assemble and demonstrate his design in the video, embedded below.

Continue reading “To Lovers Of Small Boxes: A 3D Printable Design Just For You”

Retrotechtacular: Design For Assembly, 1980s-Style

To get its engineers thinking about design for assembly back in the 1980s, Westinghouse made a video about a product optimized for assembly: the IBM Proprinter. The technology may be dated, but the film presents a great look at how companies designed not only for manufacturing, but also for ease of assembly.

It’s not clear whether Westinghouse and IBM collaborated on the project, but given the inside knowledge of the dot-matrix printer’s assembly, it seems like they did. The first few minutes are occupied by an unidentified Westinghouse executive talking about design for assembly in general terms, and how it impacts the bottom line. Skip ahead to 3:41 if talking suits aren’t your thing.

Once the engineer gets going on the printer, though, things get really interesting. The printer’s guts are laid out before him, ready to be assembled. What’s notably absent from the table are tools — the Proprinter was so well designed that the only tool needed is a pair of human hands. And they don’t have to be particularly dexterous hands, either — the design favors motions that are straight down, letting gravity assist the assembly process and preventing assemblers from the need to contort their bodies. Almost everything is held in place by compliant mechanisms built into the plastic parts. There are a few gems in the film, like the plastic lead screw that drives the printhead, obviating the need to string a fussy timing belt, or the unique roller that twists to lock onto a long shaft, rather than having to be pushed to its center.

We found this film which we’ve placed below the break to be very instructive, and the fact that a device as complex as a printer can be assembled in just a few minutes without picking up a single tool is pretty illustrative of the power of designing for assembly. Slick designs that can’t be manufactured at scale are all too common in this age of powerful design tools and desktop manufacturing, so these lessons from the past might be worth relearning.

Continue reading “Retrotechtacular: Design For Assembly, 1980s-Style”

Adding Crush Ribs To 3D Printed Parts For A Better Press Fit

[Dan Royer] shared a tip about how to get a reliably tight fit between 3D printed parts and other hardware (like bearings, for example.) He suggests using crush ribs, a tried-and-true solution borrowed from the world of injection molding and repurposed with 3D printing in mind. Before we explain the solution, let’s first look at the problem a little more closely.

Imagine one wishes to press-fit a bearing into a hole. If that hole isn’t just the right size, the bearing won’t be held snugly. If the hole is a little too big, the bearing is loose. Too small, and the bearing won’t fit at all. Since a 0.1 mm difference can have a noticeable effect on how loose or snug a fit is, it’s important to get it right.

Crush rib locations highlighted with blue arrows.

For a 3D printed object, a hole designed with a diameter of 20 mm (for example) will come out slightly different when printed. The usual way around this is to adjust printer settings or modify the object until the magic combination that yields exactly the right outcome is found, also known as the Goldilocks approach. However, this means the 3D model only comes out right on a specific printer, which is a problem for a design that is meant to be shared. Since [Dan] works on robots with 3D printed elements, finding a solution to this problem was particularly important.

The solution he borrowed from the world of injection molding is to use crush ribs, which can be thought of as a set of very small standoffs that deform as a part is press-fit into them. Instead of a piece of hardware making contact with the entire inside surface of a hole, it makes contact only with the crush ribs. Press fitting a part into crush ribs is far easier (and more forgiving) than trying to get the entire mating surface exactly right.

Using crush ribs in this way is a bit of a hack since their original purpose in injection molding is somewhat different. Walls in injection-molded parts are rarely truly flat, because that makes them harder to eject from a mold. Surfaces therefore have a slight cant to them, which is called a draft. This slight angle means that press fitting parts becomes a problem, because any injection-molded hole will have slanted sides. The solution is crush ribs, which — unlike the walls — are modeled straight. The ribs are small enough that they don’t have an issue with sticking in the mold, and provide the mating surface that a press-fit piece of hardware requires. [Dan] has a short video about applying this technique to 3D printed objects, embedded below.

Continue reading “Adding Crush Ribs To 3D Printed Parts For A Better Press Fit”

Art of 3D printer in the middle of printing a Hackaday Jolly Wrencher logo

3D Printering: The World Of Non-Free 3D Models Is Buyer Beware

There are more free 3D models online than one can shake a stick at, but what about paid models? Hosting models somewhere and putting a buy button in front of the download is certainly a solved problem, but after spending some time buying and printing a variety of non-free 3D models online, it’s clear that there are shortcomings in the current system.

What the problems are and how to address them depends a little on the different ways models get sold, but one thing is clear: poorly-designed 3D models are bad for consumers, and bad for the future of pay-to-download in general. Continue reading “3D Printering: The World Of Non-Free 3D Models Is Buyer Beware”

Fail Of The Week: Bright Idea For LED Signs Goes Bad

Typically when we select a project for “Fail to the Week” honors, it’s because something went wrong with the technology of the project. But the tech of [Leo Fernekes]’ innovative LED sign system was never the problem; it was the realities of scaling up to production as well as the broken patent process that put a nail in this promising project’s coffin, which [Leo] sums up succinctly as “The Inventor’s Paradox” in the video below.

The idea [Leo] had a few years back was pretty smart. He noticed that there was no middle ground between cheap, pre-made LED signs and expensive programmable signboards, so he sought to fill the gap. The result was an ingenious “LED pin”, a tiny module with an RGB LED and a microcontroller along with a small number of support components. The big idea is that each pin would store its own part of a display-wide animation in flash memory. Each pin has two terminals that connect to metal cladding on either side of the board they attach to. These two conductors supply not only power but synchronization for all the pins with a low-frequency square wave. [Leo]’s method for programming the animations — using a light sensor on each pin to receive signals from a video projector — is perhaps even more ingenious than the pins themselves.

[Leo]’s idea seemed destined for greatness, but alas, the cruel realities of scaling up struck hard. Each prototype pin had a low part count, but to be manufactured economically, the entire BOM would have to be reduced to almost nothing. That means an ASIC, but the time and expense involved in tooling up for that were too much to bear. [Leo] has nothing good to say about the patent game, either, which his business partners in this venture insisted on playing. There’s plenty of detail in the video, but he sums it up with a pithy proclamation: “Patents suck.”

Watching this video, it’s hard not to feel sorry for [Leo] for all the time he spent getting the tech right only to have no feasible way to get a return on that investment. It’s a sobering tale for those of us who fancy ourselves to be inventors, and a cautionary tale about the perils of participating in a patent system that clearly operates for the benefit of the corporations rather than the solo inventor. It’s not impossible to win at this game, as our own [Bob Baddeley] shows us, but it is easy to fail.

Continue reading “Fail Of The Week: Bright Idea For LED Signs Goes Bad”

Marketing And Selling Hardware Hack Chat

Join us Wednesday at noon Pacific time for the Marketing and Selling Hardware Hack Chat with Shawn Hymel!

It may not be every hardware hacker’s dream, but a fair number of us harbor fantasies of thinking up the Next Big Thing and kissing the day job goodbye forever. It’s an understandable dream and a laudable goal, but as they say, a goal is a dream with a plan and a deadline. What’s your plan for turning your project into a marketable product? Chances are good you don’t have one, and if you ever expect to get to your goal you’re going to need one.

Shawn Hymel is an engineer who led several marketing campaigns for Spark Fun and recently shared his thoughts on marketing with attendees of the first-ever KiCon conference in Chicago. He’ll be dropping by the Hack Chat to talk about everything you ever wanted to know about marketing your hardware projects but were afraid to ask.

join-hack-chat

Our Hack Chats are live community events in the Hackaday.io Hack Chat group messaging. This week we’ll be sitting down on Wednesday, May 8 at noon Pacific time. If time zones have got you down, we have a handy time zone converter.

Click that speech bubble to the right, and you’ll be taken directly to the Hack Chat group on Hackaday.io. You don’t have to wait until Wednesday; join whenever you want and you can see what the community is talking about.

Planned Obsolescence Isn’t A Thing, But It Is Your Fault

The common belief is that big companies are out to get the little people by making products that break after a short period, or with substantially new features or accessories that make previous models obsolete, requiring the user to purchase a new model. This conspiracy theory isn’t true; there’s a perfectly good explanation for this phenomenon, and it was caused by the consumers, not the manufacturers.

When we buy the hottest, shiniest, smallest, and cheapest new thing we join the wave of consumer demand that is the cause of what often gets labelled as “Planned Obsolescence”. In truth, we’re all to blame for the signals our buying habits send to manufacturers. Dig in and get your flamewar fingers fired up.

Continue reading “Planned Obsolescence Isn’t A Thing, But It Is Your Fault”