The time for putting up festive lights all around your house is nigh, and this is a very popular time for those of us who use the holiday season as an excuse to buy a few WiFi chips and Arduinos to automate all of our decorations. The latest in this great tradition is [Real Time Logic]’s cloud-based Christmas light setup.
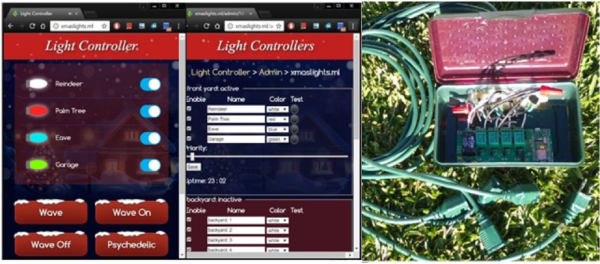
In order to give public access to the Christmas light setup, a ESP8266 WiFi Four Relay board was configured with NodeMCU. This allows for four channels for lights, which are controlled through the Light Controller Server software. Once this is setup through a domain, all anyone has to do to change the lighting display is open up a web browser and head to the website. The creators had homeowners, restaurants, and church displays in mind, but it’s not too big of a leap to see how this could get some non-holiday use as well.
The WS2812 is an amazing piece of technology. 30 years ago, high brightness LEDs didn’t even exist yet. Now, you can score RGB LEDs that even take all the hard work out of controlling and addressing them! But as ever, we can do better.
Riffing on the ever popular Adafruit NeoPixel library, [Harm] created the WS2812FX library. The library has a whole laundry list of effects to run on your blinkenlights – from the exciting Hyper Sparkle to the calming Breathe inspired by Apple devices. The fantastic thing about this library is that it can greatly shorten development time of your garden-variety blinkables – hook up your WS2812s, pick your effect, and you’re done.
[Harm]’s gone and done the hard yards, porting this to a bevy of platforms – testing it on the Arduino Nano, Uno, Micro and ESP8266. As a proof of concept, they’ve also put together a great demonstration of the software – building some cute and stylish Christmas decorations from wood, aluminium, and hacked up Christmas light housings. Combining it with an ESP8266 & an app, the effects can be controlled from a smartphone over WiFi. The assembly video on YouTube shows the build process, using screws and nails to create an attractive frame using aluminium sheet.
This project is a great example of how libraries and modern hardware allow us to stand on the shoulders of giants. It’s quicker than ever to build amazingly capable projects with more LEDs than ever. Over the years we’ve seen plenty great WS2812 projects, like this sunrise alarm clock or this portable rave staff.
As always, blink hard, or go home. Video after the break.
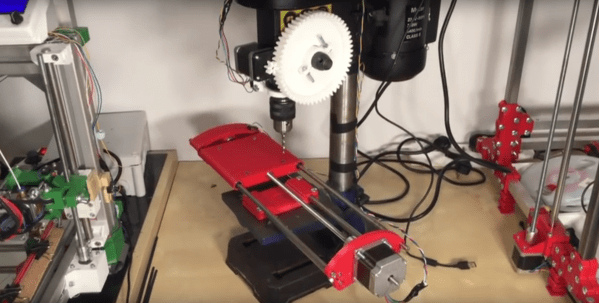
He’s a little cagey about the reasons, but [Ivan Miranda] plans to put a drill press on the internet. What could go wrong with that?
We’ll take [Ivan] at his word that there’s a method to this madness and just take a look at the build itself, in the hopes that it will inspire someone to turn their lowly drill press into a sorta-kinda 2-axis milling machine. [Ivan] makes extensive use of his 3D printer to fabricate the X-axis slide that bolts to the stock drill press table. And before anyone points out the obvious, [Ivan] already acknowledges that the slide is way too flimsy to hold up to much serious drilling, especially considering the huge mechanical advantage of the gearing he used to replace the quill handle for a powered Z-axis. The motor switch was also replaced with a solid state relay. The steppers, relay, and limit switches are all fed into a Teensy that talks to an ESP8266, which will presumably host a web interface to put this thing online.
The connected aspects of the drill press become a little more clear after the break.
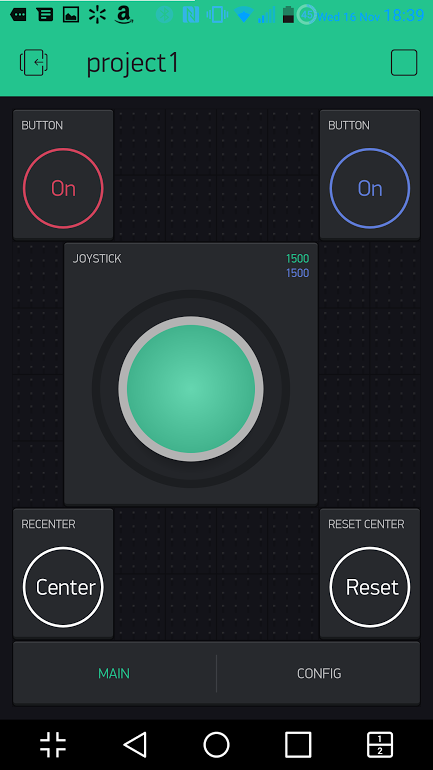
Last time, I talked about how my storage situation and my cheap nature led me to build an RC joystick controller with a cell phone app and an ESP8266. The key to making this easy was to use the GUI builder called Blynk to make a user interface for an Android or Apple phone. Blynk can communicate with the ESP8266 and makes the project relatively simple.
ESP8266 and Arduino IDE
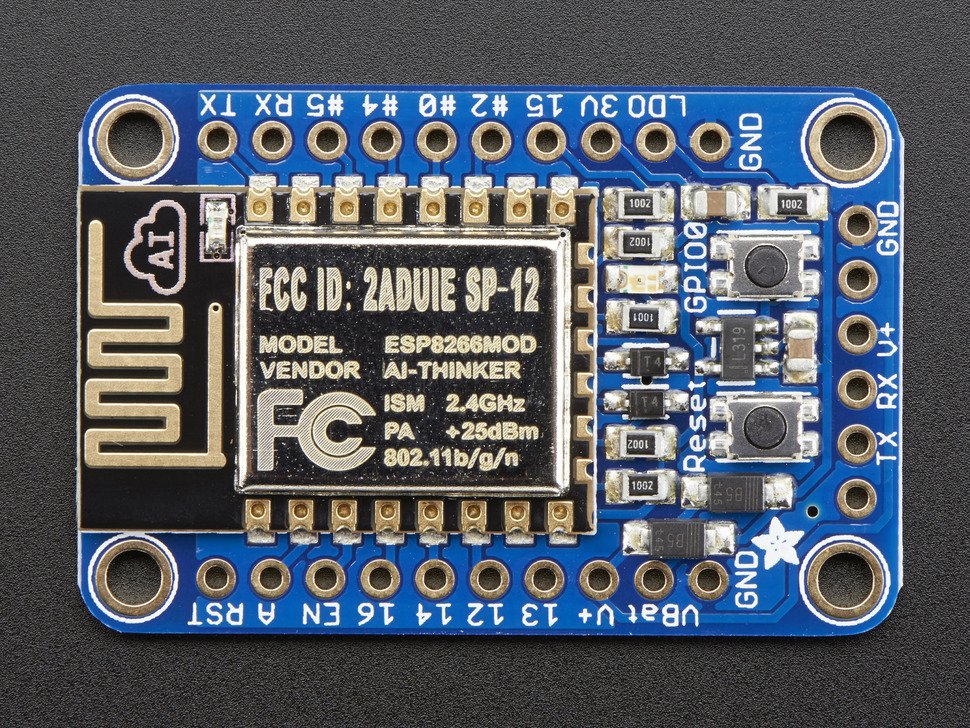
The ESP8266 Blynk code is straightforward. You do need to set up the Arduino IDE to build for the ESP8266. That can vary by board, but here’s the instructions for the board I was using (from Adafruit; see below).
Depending on the type of ESP8266 device you are using, you may need a 3.3 V serial cable or some other means of getting the firmware into the device. For the Adafruit device I had, it has a 5 V-tolerant serial connection so a standard USB to serial dongle plugs right in. There’s also two switches on my device. To get into bootload mode, you have to push the one button down, hold it, and then press the reset button. Once you release the reset button you can release the other button. The red LED half-glows and the device is then waiting for a download. Continue reading “Blynk With Joy”→
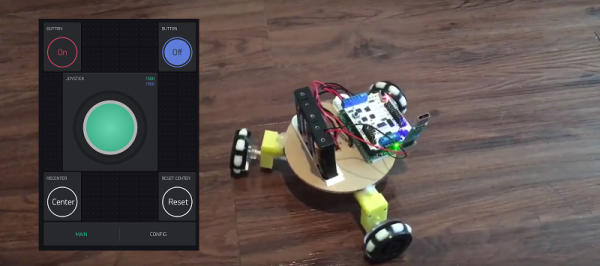
I’ll admit it. I can be a little cheap. I also find it hard to pass up a bargain. So when I saw a robot kit at the local store that had been originally $125 marked down to $20, I had to bite. There was only one problem. After I got the thing home, I found they expected you to supply your own radio control transmitter and receiver.
Normally, that wouldn’t be a problem but lately… let’s just say a lot of my stuff is in storage and I didn’t have anything handy. I certainly didn’t want to go buy something that would double the cost of this robot that I really didn’t need to begin with.
However, I did have a few ESP8266 modules handy. Good ones, too, from Adafruit with selected 5 V I/O compatibility and an onboard regulator. I started thinking about writing something for the ESP8266 to pick up data from, say, a UDP packet and converting it into RC servo commands.
Seemed like a fair amount of work and then I remembered that I wanted to try Blynk. If you haven’t heard of Blynk, it is a user interface for Android and Apple phones that can send commands to an embedded system over the Internet. You usually think of using Blynk with an Arduino, but you can also program the embedded part directly on an ESP8266. I quickly threw together a little prototype joystick. Continue reading “The Joy Of The ESP8266 And Blynk”→
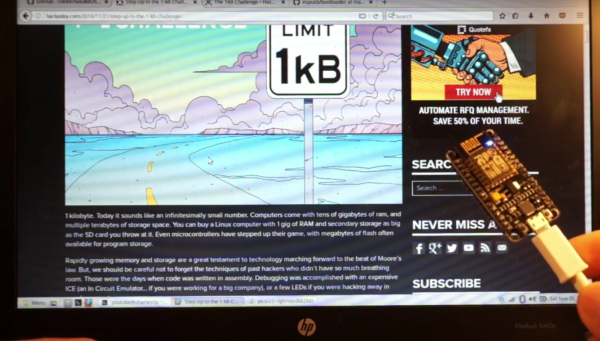
The ESP8266 is officially checking into the Hackaday 1kB Challenge. Doing something meaningful in 1kB of compiled code is tricky; modern SDKs like the ones often used for ESP8266 compile even the simplest programs to nearly that size. If you want to use this hardware in your 1kB Challenge entry, I have a solution for you!
The ESP8266 now has a barebones build environment focused on minimizing code size, as little as 131 bytes to boot up and blink an LED. It also “supports” some new, insane clock rates (like 346 MHz) and crazy development cycle speeds. The WiFi is stuck in “airplane mode,” but it will be worth your time to consider the ESP for the next non-WiFi project you’ll be doing.
Far too often, we follow design patterns that ‘just work’ instead of looking for the ones that are optimal because we’re afraid of wasting time. The benefits of keeping code tight and small are frequently overlooked. When code is small and environments minimal, RAM and FLASH become easier to come by, compiled binaries shrink and time wasted by compiling and flashing can decrease by an order of magnitude! We rarely see just how much value is added when we become a good engineer: being done only when there’s nothing left to remove from a design. Nosdk8266 will let you see what it’s like to test out code changes several times a minute.
Just a month ago, when preparing the ESP8266 for a USB bootloader, I had to make a stripped-down environment for it. It’s not based on the Official Non-OS SDK or the RTOS sdk, but an environment that can boot up and blink an LED. Not just blink an LED, but tweak the clock in some totally unexpected ways and even run the I2S bus (used for espthernet and Color NTSC Broadcast Video). If you’re not at the submission phase for your 1kB challenge, you can even use the mask ROM for printf! Now you can tweak your code and — in under 2 seconds — see what the new code does!
Even in PICO mode, the part still has to use the mask ROM to be loaded, but thankfully, the 1kB Challenge has added an exception for unavoidable bootloaders. No longer bound by the shackles of WiFi, I can’t wait to see what you’ll do with the ESP8266. Just beware that the processor may not work reliably when overclocked at 346 MHz (332.5%,) and you’ll certainly be voiding any warranties you may have. Sounds like fun, right?
Editorial Note: This is a guest article from Charles Lohr, aka [CNLohr]. Although he has written a few other guest articles, he is not a regular contributor to Hackaday and therefore, this article does not disqualify him from entering the 1kB Challenge. We felt it more fair to publish this article which shares the tools he’s using to make code smaller, rather than to keep them to himself for fear of disqualification. While we have your attention, we wanted to mention one of Charles’ articles which was published on April 1st — we still think there’s a lot of people who don’t realize it wasn’t a prank.
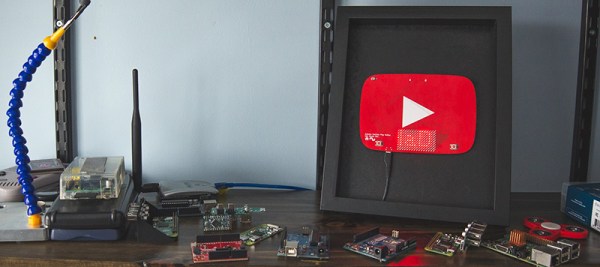
The only thing that matters in this world is the likes you get on social media platforms. To that end, YouTube has been sending out silver and gold play buttons to their most valuable creators. [Sean] hasn’t screamed into a microphone while playing Minecraft long enough to earn one of these play buttons, so he decided to build his own.
This play button isn’t just a bit of pot metal ensconced in a frame brought to you by Audible dot com; this YouTube play button actually does something useful. It’s a PCB with 144 LEDs working together as a display. There’s an Atmel SAMD21 microcontroller on board to drive the LEDs, and an ESP8266 to pull data down from the Internet. What data is worthy enough to go on an Arduinofied YouTube play button? The subscriber count for [Sean]’s channel, of course. Go subscribe, it might crash his Play button.
Admittedly, there were a few problems with this Play button PCB. Firstly, the ESP8266 can’t directly communicate with the YouTube API to pull down the subscriber count. That problem was fixed with a Raspberry Pi that could connect to the API, and programming the ESP to pull the data from the Pi. Second, this was [Sean]’s first experiment with double-sided SMD boards reflowed in a toaster oven. The first side to be assembled was easy, but to get the second side on, [Sean] turned to low-temp bismuth solder paste. Except for a small error in assembling the board, everything worked as planned.
It’s a great project, and if you want to check out what the better parts of YouTube look like, check out [Sean]’s video below. Don’t forget to rate, comment, like, unlike, or subscribe.