Infill Injection Experiment Makes Stronger Parts

[JanTec Engineering] was fascinated by the idea of using a 3D printer’s hot end to inject voids and channels in the infill with molten plastic, leading to stronger prints without the need to insert hardware or anything else. Inspiration came from two similar ideas: z-pinning which creates hollow vertical channels that act as reinforcements when filled with molten plastic by the hot end, and VoxelFill (patented by AIM3D) which does the same, but with cavities that are not uniform for better strength in different directions. Craving details? You can read the paper on z-pinning, and watch VoxelFill in (simulated) action or browse the VoxelFill patent.

With a prominent disclaimer that his independent experiments are not a copy of VoxelFill nor are they performing or implying patent infringement, [JanTec] goes on to use a lot of custom G-code (and suffers many messy failures) to perform some experiments and share what he learned.

Using an airbrush nozzle as a nozzle extension gains about 4 mm of extra reach.

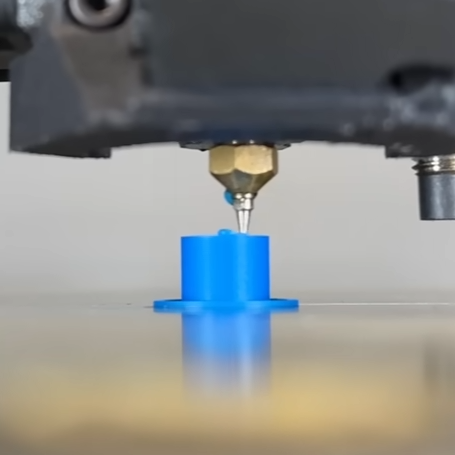
One big finding is that one can’t simply have an empty cylinder inside the print and expect to fill it all up in one go. Molten plastic begins to cool immediately after leaving a 3D printer’s nozzle, and won’t make it very far down a deep hole before it cools and hardens. One needs to fill a cavity periodically rather than all in one go. And it’s better to fill it from the bottom-up rather than from the top-down.

He got better performance by modifying his 3D printer’s hot end with an airbrush nozzle, which gave about 4 mm of extra length to work with. This extra long nozzle could reach down further into cavities, and fill them from the bottom-up for better results. Performing the infill injection at higher temperatures helped fill the cavities more fully, as well.

Another thing learned is that dumping a lot of molten plastic into a 3D print risks deforming the print because the injected infill brings a lot of heat with it. This can be mitigated by printing the object with more perimeters and a denser infill so that there’s more mass to deal with the added heat, but it’s still a bit of a trouble point.

[JanTec] put his testing hardware to use and found that parts with infill injection were noticeably more impact resistant than without. But when it came to stiffness, an infill injected part resisted bending only a little better than a part without, probably because the test part is very short and the filled cavities can’t really shine in that configuration.

These are just preliminary results, but got him thinking there are maybe there are possibilities with injecting materials other than the one being used to print the object itself. Would a part resist bending more if it were infill injected with carbon-fibre filament? We hope he does some follow-up experiments; we’d love to see the results.

Continue reading “Infill Injection Experiment Makes Stronger Parts”

Impractical Switches For The Bored Maker

Cabin fever: the inability to socialize with other humans does weird things to the human brain. Then again some of us are born to stand out, and one such amazing maker, [Lee], is spending time making weird switches from basically anything.

So what would you consider weird? How about using a piece of pasta? How about using the conductivity of an empty sink? There is even an experiment with breakfast cereal, though we do not recommend it for production use. [Lee] continues to pour experiments into Twitter and recently has gotten some conductive tape. Stick some on a game joystick and you got yourself an instant switch on a switch.

These experiments prove that there is a lot you can do with the stuff you have around your house and the other end of the circuit doesn’t necessarily need to be a humble LED. You could get more interesting results with adding the likes of a microcontroller like an ATtiny. Coupling it with a DIY LED badge would be a great idea and we’d love to see what you come up with.

Putting Sand, Water, And Metal Into A 3D Print

[Adam] over at Makefast Workshop writes about some of the tests they’ve been running on their 3D printer. They experimented with pausing a 3D print midway and inserting various materials into the print. In this case, sand, water, and metal BBs.

The first experiment was a mixture of salt and water used to make a can chiller for soda or beer (the blue thing in the upper right). It took some experimentation to get a print that didn’t leak and was strong. For example, if the water was too cold the print could come off the plate or delaminate. If there was too much water it would splash up while the printer was running and cause bad layer adhesion.

They used what they learned to build on their next experiment, which was filling the print with sand to give it more heft. This is actually a common manufacturing process — for instance, hollow-handled cutlery often has clay, sand, or cement for heft. They eventually found that they had to preheat the sand to get the results they wanted and managed to produce a fairly passable maraca.

The final experiment was a variation on the popular ball bearing prints. Rather than printing plastic balls they designed the print to be paused midway and then placed warmed copper BBs in the print. The printer finished its work and then they spun the BB. It worked pretty well! All in all an interesting read.

Bring Doping, Microfluidics, Photovoltaics, And More Into The Home

Can you make a spectrometer for your home lab all from materials you have sitting around? We might not believe it from a less credible source, but this MIT course does indeed build a spectrometer from foam board using two razor blades as the silt cover and a writable CD as the diffraction grating. The coolest part is removing the metal backing of the CD.

mit_experiments_thumbHackaday reader [gratian] tipped us off about the course available from MIT courseware called Nanomaker. It boils down some fairly complicated experiments to the kind one can do in the home lab without involving thousands of dollars of lab equipment. The whole point is to demystify what we think of as complicated devices and topics surrounding photovoltaics, organic photovoltaics, piezoelectricity and thermoelectricity.


Spectrometers are used to analyze the wavelengths of a light source. Now that you have a measurement tool in hand it’s time to build and experiment with some light sources of your own. Here you can see an LED that is the topic of one of the course labs.

If you have a bit of background in chemistry this is a good step-by-step guide for getting into these types of experiments at home. It reminds us of some of the really cool stuff [Jeri Ellsworth] was doing in her garage lab, like making her own EL panels.

Continue reading “Bring Doping, Microfluidics, Photovoltaics, And More Into The Home”

Measuring How Components React To Extremely Cold Temperatures

[Shahriar Shahramian] is playing with some liquid nitrogen in order to see how various components react to extremely low temperatures. After the break you will find forty-one minutes of video in which he conducts and explains each experiment. This does have practical applications. If you’re designing hardware for use in space you definitely need to know how the hardware will be affected. We’ve actually seen test rigs built for this very purpose.

During the presentation he doesn’t water down the concepts observed, including the equations governing each reaction to temperature change. If you’re in the mood for a little bit lighter faire you should check out some of the liquid nitrogen cooking hacks like this super-cold cocktail pops project.


Continue reading “Measuring How Components React To Extremely Cold Temperatures”

Hackaday Links: November 24, 2011

Finally an Arduino shield that does nothing

The folks at Evil Mad Scientist labs have finally created the Googly Eye Shield for Arduinos. With it’s pass-through .100 headers, it adds googly eyes to your Arduino projects. Of course, instead of in addition to the googly eyes you could add a breadboard, making it somewhat useful. A million fake internet points goes to the first person to implement Xeyes on this thing.

Phat beats from kids toys

[Ville] couldn’t afford an Akai MPC for laying down some beats. Wanting a real tactile interface, he hacked this kid’s toy. It’s just an RCA cable attached to the tiny chip inside the toy. The new line out goes to his mixers where he does some pretty impressive stuff.

Mona Lisa is Vigo the Carpathian

What did we just say about real-life Xeyes? [Geert] just made a print of the Mona Lisa follow you around the room with her eyes (Dutch, translation). The build is a pair of servos and a DIY motion capture app running on a laptop. Now we need to find a print of Vigo…

Quantifying heat sink efficiencies

[Mike] is an experimenter at heart. He was wondering about the efficiency of small, clip-on heat sinks versus the ones we use to defrost frozen food. The results are exactly as you would expect, but he did find something interesting – his experimental technique didn’t find much of a difference between thermal paste/grease/pads and no thermally conductive material.

Mini-fig sized R/C LEGO car

The guys at Brickmodder.net took a car from a LEGO set and made it remote control. The drive train and steering both use servos controlled by the smallest 3-channel receiver they could find.

Balloon Based Satellite

balloonsat

This project provides an opportunity to conduct near space experiments. The flight computer, BalloonSat Extreme, is controlled by a BASIC Stamp 2pe. The complete BOM with PCB artwork is provided. There is enough hardware to control cameras, servos, a Gps, and five digital I/O. The computer is also equipped with a 12 bit ADC to log experiment results. The device seems limited to 30KB of storage. Though the author suggests this memory limitation is more than adequate, we are wondering if an implementation of the Nyquist sampling theorem is in use at all. For further reading the author has provided information regarding Amateur Radio High Altitude Ballooning.

[via adafruit]