You want to learn assembly language. After all, understanding assembly unlocks the ability to understand what compilers are doing and it is especially important for time-critical code. But most tutorials are — well — boring. So you can print “Hello World” super fast. Who cares?
But decoding video data is something where assembly can really pay off, so why not study a real project like FFmpeg to see how they do things? Sounds like a pain, but thanks to the FFmpeg asm-lessons repository, it’s actually quite accessible.
According to the repo, you should already understand C — especially C pointers. They also expect you to understand some basic mathematics. Most of the FFmpeg code that uses assembly uses the single instruction multiple data (SIMD) opcodes. This allows you to do something like “add 5 to these 200 data items” very quickly compared to looping 200 times.
One of the more interesting cultural phenomena is the ‘bleep’ that replaces certain words in broadcasts, something primarily observed in the US. Although ostensibly applied to prevent susceptible minds from being exposed to the unspeakable horrors of naughty words, the applied 1 kHz censoring tone is decidedly loud and obnoxious enough that its entertainment level falls somewhere between ‘truck backing up’ and ‘loud claxon in busy traffic’. There is thus a definite argument to be made to censor the censoring beep to preserve one’s sanity, which is the goal of [Oona Räisänen]’s Bleep-be-gone project on GitHub.
Using a Perl-based wrapper, the versatile ffmpeg framework is used to filter a provided video that was afflicted with bleepitus, before outputting a pristine version where the infernal noise is replaced with blissful silence. This use of silence for censoring naughty words is incidentally becoming more commonplace over an ear-piercing beep, but a tool like Bleep-be-gone can be used to hasten the demise of its terror. Considering that the point of the 1 kHz back-up alarm beep is to draw a person’s attention to a piece of heavy equipment moving about, there is clearly no good reason why the replacement of a naughty word should warrant a similar drawing of attention.
If you’re looking to manipulate video, FFmpeg is one of the most powerful tools out there. But with this power comes a considerable degree of complexity, and a learning curve that looks suspiciously like a brick wall. To try and make this incredible tool a bit less obtuse, [Sam Lavigne] has developed a web interface that lets you play around with FFmpeg’s vast collection of audio and video filters.
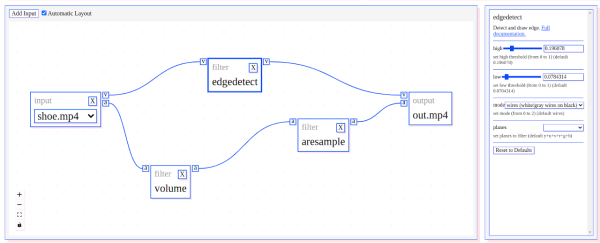
To try out a filter, you just need to select one from the window on the left and it will pop up in the central workspace. Here, the input, output, and any enabled filters will show up as boxes that can be virtually “wired” together. Selecting a filter will populate its options on the right hand side, with sliders and input boxes that allow you to play around with their parameters. When you want to see the final result, just click “Render Preview” and wait a bit.
If there was any downside, it seems like whatever box the site is running on the overhead of running in the browser doesn’t provide it a lot of horsepower. Even with the relatively low resolution of the demo videos available, the console output at the top of the page shows FFmpeg sometimes flirts with a processing speed measured in single-digit frames per second. Still, for a filter playground, it gets the job done. Perhaps the best part of the whole tool is that you can then copy your properly formatted command right out of the browser window and into your terminal so you can put it to work on your local files.
While low-contrast, blue-on-slightly-less-blue 16-character by 2-line LCDs are extremely popular, they really are made specifically for alphanumeric use. They do an admirable job of displaying a few characters, but they don’t exactly spring to mind as a display for non-character purposes. But displaying video on a 16×2 LCD is possible, as long as you’re willing to stretch the definition of “video” a bit and use some imagination while watching.
Normally, a 16×2 display can only display a single character in each spot, chosen from a fixed character set. But [arduinocelantano] was able to leverage the eight custom character slots the display allows to build up images from arbitrary 5×8 pixel bitmaps. After using ffmpeg to scale the original video to a viewport of eight characters, a Python program was used to turn every frame of the scaled video into code to generate the custom bitmaps for each chunk of the viewport. Even with the low refresh rate of the display and the shrunken frame size, the result is a recognizable video, helped no doubt by the choice of the shadow-puppet Bad Apple!! video. Check it out after the break to see how it looks.
We saw a similar rendering of the same video on LCD a while back; that effort was amazing in that it was an EEPROM-only implementation, along with a somewhat bigger LCD with better contrast. That project served as inspiration for [arduinocelantano]’s build here, which in some ways we think looks a bit better — perhaps it’s the inverted pixels. Either way, hats off to both builders for pushing past the normal constraints and teaching us something interesting.
Back in 2018 we covered a project that would break a video down into its individual frames and slowly cycle through them on an e-paper screen. With a new image pushed out every three minutes or so, it would take thousands of hours to “watch” a feature length film. Of course, that was never the point. The idea was to turn your favorite movie into an artistic conversation piece; a constantly evolving portrait you could hang on the wall.
[Manuel Tosone] was recently inspired to build his own version of this concept, and now thanks to several years of e-paper development, he was even able to do it in color. Ever the perfectionist, he decided to drive the seven-color 5.65 inch Waveshare panel with a custom STM32 board that he estimates can wring nearly 300 days of runtime out of six standard AA batteries, and wrap everything up in a very professional looking 3D printed enclosure. The end result is a one-of-a-kind Video Frame that any hacker would be proud to display on their mantle.
The Hackaday.IO page for this project contains a meticulously curated collection of information, covering everything from the ffmpeg commands used to process the video file into a directory full of cropped and enhanced images, to flash memory lifetime estimates and energy consumption analyses. If you’ve ever considered setting up an e-paper display that needs to run for long stretches of time, regardless of what’s actually being shown on the screen, there’s an excellent chance that you’ll find some useful nuggets in the fantastic documentation [Manuel] has provided.
We always love to hear about people being inspired by a project they saw on Hackaday, especially when we get to bring things full circle and feature their own take on the idea. Who knows, perhaps the next version of the e-paper video frame to grace these pages will be your own.
Lacking a DVD drive, [jg] was watching a TV series in the form of a bunch of .avi video files. Of course, when every episode contains a full intro, it is only a matter of time before that gets too annoying to sit through.
Chapter breaks reliably inserted around the intro, even when it doesn’t always occur in the same place.
The usual method of skipping the intro on a plain video file is a simple one:
Manually drag the playback forward past the intro.
Oops that’s too far, bring it back.
Ugh reversed it too much, nudge it forward.
Okay, that’s good.
[jg] was certain there was a better way, and the solution was using audio fingerprinting to insert chapter breaks. The plain video files now have a chapter breaks around the intro, allowing for easy skipping straight to content. The reason behind selecting this method is simple: the show intro is always 52 seconds long, but it isn’t always in the same place. The intro plays somewhere within the first two to five minutes of an episode, so just skipping to a specific timestamp won’t do the trick.
The first job is to extract the audio of an intro sequence, so that it can be used for fingerprinting. Exporting the first 15 minutes of audio with ffmpeg easily creates a wav file that can be trimmed down with an audio editor of choice. That clip gets fed into the open-source SoundFingerprinting library as a signature, then each video has its audio track exported and the signature gets identified within it. SoundFingerprinting therefore detects where (down to the second) the intro exists within each video file.
Marking out chapter breaks using that information is conceptually simple, but ends up being a bit roundabout because it seems .avi files don’t have a simple way to encode chapters. However, .mkv files are another matter. To get around this, [jg] first converts each .avi to .mkv using ffmpeg then splices in the chapter breaks with mkvmerge. One important element is that the reformatting between .avi and .mkv is done without completely re-encoding the video itself, so it’s a quick process. The result is a bunch of .mkv files with chapter breaks around the intro, wherever it may be!
The script is available here for anyone to play with, and the project page is a good learning reference because [jg] kindly provides all the command-line options used for each tool. Interested in using audio fingerprinting in your own projects? Remember to also check out Olaf, the Overly Lightweight Acoustic Fingerprinting method that can be implemented in embedded systems and web browsers.
How much would you enjoy a movie that took months to finish? We suppose it would very much depend on the film; the current batch of films from the Star Wars franchise are quite long enough as they are, thanks very much. But a film like Casablanca or 2001: A Space Odyssey might be a very different experience when played on this ultra-slow-motion e-paper movie player.
The idea of displaying a single frame of a movie up for hours rather than milliseconds has captivated [Tom Whitwell] since he saw [Bryan Boyer]’s take on the concept. The hardware [Tom] used is similar: a Raspberry Pi, an SD card hat with a 64 GB card for the movies, and a Waveshare e-paper display, all of which fits nicely in an IKEA picture frame.
[Tom]’s software is a bit different, though; a Python program uses FFmpeg to fetch and dither frames from a movie at a configurable rate, to customize the viewing experience a little more than the original. Showing one frame every two minutes and then skipping four frames, it has taken him more than two months to watch Psycho. He reports that the shower scene was over in a day and a half — almost as much time as it took to film — while the scene showing [Marion Crane] driving through the desert took weeks to finish. We always wondered why [Hitch] spent so much time on that scene.
With the proper films loaded, we can see this being an interesting way to really study the structure and flow of a good film. It’s also a good way to cut your teeth on e-paper displays, which we’ve seen pop up in everything from weather stations to Linux terminals.