Replace Legacy CNC PCs With A Gerbil

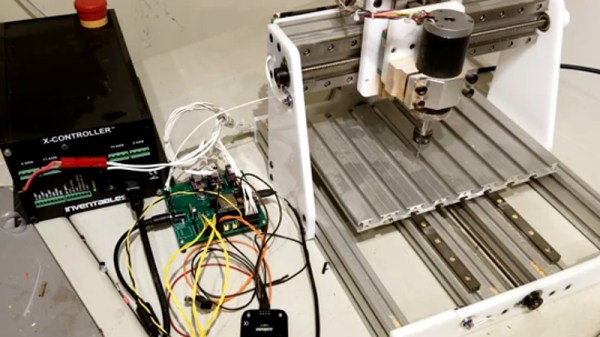
There are lots of laser cutters and other CNC machines available for a decent price online, but the major hurdle to getting these machines running won’t be the price or the parts. It’s usually the controller PC, which might be running Windows XP or NT if you’re lucky, but some of them are still using IBM XT computers from the ’80s. Even if the hardware in these machines is working, it might be impossible to get the software, and even then it will be dated and lacking features of modern computers. Enter the Super Gerbil.

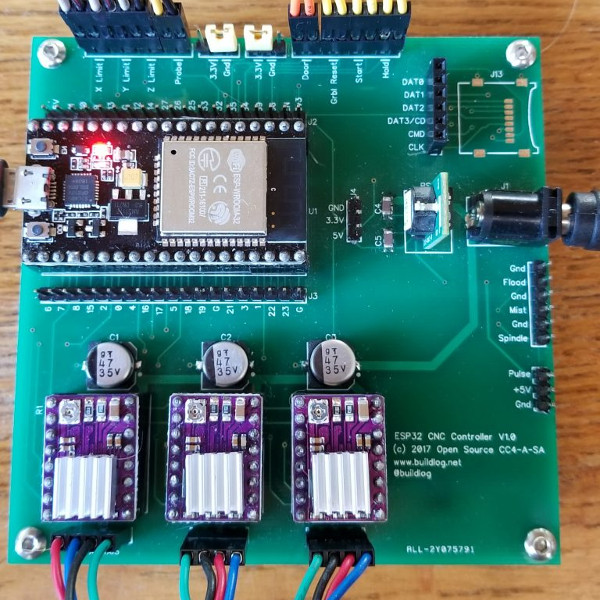
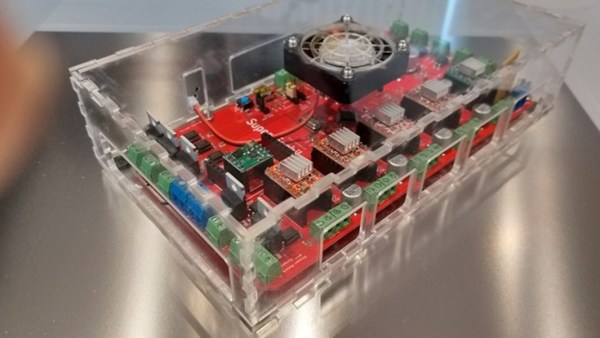
[Paul] was able to find a laser cutter with one of these obsolete controllers, but figured there was a better way to getting it running again. As the name suggests, it uses GRBL, a G-Code parser and CNC controller software package that was originally made to run on an 8-bit AVR microcontroller, but [Paul] designed the Super Gerbil to run on a 32 bit ARM platform. He also added Z-axis control to it, so it now sports more degrees of freedom than the original software.

By way of a proof of concept, once he was finished building the Super Gerbil he ordered a CNC machine from China with an obsolete controller and was able to get it running within a day. As an added bonus, he made everything open so there are no license fees or cloud storage requirements if you want to use his controller. [Paul] also has a Kickstarter page for this project as well. Hopefully controllers haven’t been the only thing stopping you from getting a CNC machine for your lab, though, but if they have you now have a great solution for a 3040 or 3020 CNC machine’s controller, or any other CNC machine you might want to have. Continue reading “Replace Legacy CNC PCs With A Gerbil”

CNC Embroidery Machine Punches Out Designs A Stitch At A Time

It’s doubtful that the early pioneers of CNC would have been able to imagine the range of the applications the technology would be used for. Once limited to cutting metal, CNC machines can now lance through materials using lasers and high-pressure jets of water, squirt molten plastic to build up 3D objects, and apparently even use needle and thread to create embroidered designs.

It may not seem like a typical CNC application, but [James Kolme]’s CNC embroidery machine sure looks familiar. Sitting in front of one of the prettiest sewing machines we’ve ever seen is a fairly typical X-Y gantry system. The stepper-controlled gantry moves an embroidery hoop under the needle of the sewing machine, which is actually the Z-axis of the machine. With the material properly positioned, a NEMA 23 stepper attached to the sewing machine through a sprocket and drive chain makes a stitch, slowly building up a design. Translating an embroidery pattern to G-code is done through Inkstitch, and extension to Inkscape. [James]’ write-up is great, and the video below shows it in action.

We’ve seen a CNC embroidery machine or two before, but our conspicuously non-embroidered hat is off to [James] on this one for its build quality and documentation. And the embroidered Jolly Wrencher doesn’t hurt either.

Continue reading “CNC Embroidery Machine Punches Out Designs A Stitch At A Time”

DrawBot Badge Represents The CNC World In Badge Design

Badges come in all shapes and sizes, but a badge that draws on a stack of Post-It notes is definitely a new one. The design uses three of the smallest, cheapest hobby servos reasonably available and has a drawing quality that creator [Bart Dring] describes as “adorably wiggly”. It all started when he decided that the CNC and mechanical design world needed to be better represented in the grassroots demo scene that is the badge world, and a small drawing machine that could be cheaply made from readily available components seemed just the ticket.

Two arms control the position of a pen, and a third motor lifts the assembly in order to raise or lower the pen to the drawing surface. Gravity does most of the work for pen pressure, so the badge needs to be hanging on a lanyard or on a tabletop in order to work. An ESP32 using [Bart]’s own port of Grbl does the work of motion control, and a small stack of Post-It notes serves as a writing surface. Without the 3D printed parts, [Bart] says the bill of materials clocks in somewhere under $12.

We’ve seen similar designs doing things like writing out the time with a UV LED, but a compact DrawBot on a badge is definitely a new twist and the fact that it creates a physical drawing that can be peeled off the stack also sets it apart from others in the badgelife scene.

Turning A Cheap Engraver Into A Decent PCB Mill

We know, we know. Getting PCBs professionally fabricated anymore is so cheap and easy that making them in-house is increasingly becoming something of a lost art. Like developing your own film. Or even using a camera that has film, for that matter. But when you’re in Brazil and it takes months for shipments to arrive like [Robson Couto] is, sometimes you’re better off sticking with the old ways.

[Robson] writes in to tell us how he decided to buy a ~$150 CNC “engraver” kit from an import site, in hopes that it would allow him to prototype his designs without having to use breadboards all the time. The kit turned out to be decent, but with a series of modifications and a bit of trial and error, he’s improved the performance significantly and is now putting out some very nice looking boards.

The primary hardware issues [Robson] ran into were in the Z axis, as some poor component selections made the stock configuration wobble a bit too much. He replaced some flimsy standoffs as well as swapping in some bushings he salvaged from dead inkjet printers, and the movement got a lot tighter.

Despite the fact that the version of Grbl flashed onto the engraver’s cloned Arduino Uno supports Z leveling, it’s not actually enabled out of the box. [Robson] just needed to add some extra wiring to use the spindle’s bit as a probe on the copper clad board. He also went ahead and updated to the latest version of Grbl, as the one which ships with the machine is fairly old.

He wraps up the post by going through his software workflow on GNU/Linux, which is useful information even if you’ve taken the completely DIY route for your PCB mill. If you’d like to know more about the ins and outs of milling your own boards, check out this excellent primer by [Adil Malik].

Continue reading “Turning A Cheap Engraver Into A Decent PCB Mill”

Grbl Ported To The ESP32

If you’re building a CNC or laser, there’s an excellent chance you’ll be using Grbl to get moving. It’s also a pretty safe bet you’d end up running it on some variation of the Arduino sitting in a motor controller breakout board. It’s cheap, easy to setup and use, and effectively the “industry” standard for DIY machines so there’s no shortage of information out there. What’s not to love?

Well, quite a few things in fact. As [bdring] explains, Grbl pushes the capability of the Arduino to the very limit; making it something of a dead-end for future development. Plus the Arduino needs to be plugged into the host computer via USB to function, a rather quaint idea to many in 2018. These were just some of the reasons he decided to port Grbl to the ESP32 board.

Price wise the Arduino and ESP32 are around the same, but the ESP does have the advantage of being much more powerful than the 8-bit Italian Stallion. Its got way more flash and RAM as well, and perhaps most importantly, includes Wi-Fi and Bluetooth out of the box. It still needs to be plugged into a board to hold the motor drivers like the Arduino, but beyond that [bdring] opines the ESP32 is about as close to the perfect Grbl platform as you can get.

[bdring] reports that porting the code over to the ESP32 wasn’t terrible, but it wasn’t exactly a walk in the park either. The bulk of the code went by without too much trouble, but when it came to the parts that needed precise timing things got tricky. The ESP32 makes use of a Real Time Operating System (RTOS) that’s not too happy about giving up control of the hardware. Turning off the RTOS was an option, but that would nuke Bluetooth and Wi-Fi so obviously not an ideal solution. Eventually he figured out how to get interrupts more or less playing nicely with the RTOS, but mentions there’s still some more work to be done before he’s ready to release the firmware to the public.

If you’ve been browsing Hackaday for a while you may remember [bdring]. He’s got a real knack for making things move, and has created a number of fantastic little CNC machines recently which have definitely caught our eye.

[Thanks to Jon and Craig for the tip.]

Continue reading “Grbl Ported To The ESP32”

Soundproofing A CNC Mill Conversion

The Proxxon MF70 is a nice desktop sized milling machine with a lot of useful add-on accessories available for it, making it very desirable for a hacker to have one in his or her home workshop. But its 20000 rpm spindle can cause quite the racket and invite red-faced neighbors. Also, how do you use a milling machine in your home-workshop without covering the whole area in metal chips and sawdust? To solve these issues, [Tim Lebacq] is working on Soundproofing his CNC mill conversion.

To meet his soundproof goal, he obviously had to first convert the manual MF70 to a CNC version. This is fairly straightforward and has been done on this, and similar machines, in many different ways over the years. [Tim] stuck with using the tried-and-tested controller solution consisting of a Raspberry Pi, an Arduino Uno and a grbl shield sandwich, with stepper motor drivers for the three NEMA17 motors. The electronics are housed inside the reclaimed metal box of an old power supply. Since the Proxxon MF70 is already designed to accept a CNC conversion package, mounting the motors and limit switches is pretty straightforward making it easy for [Tim] to make the upgrade.

Soundproofing the box is where he faced unknown territory. The box itself is made from wooden frames lined with particle board. A pair of drawer slides with bolt-action locks is used for the front door which opens vertically up. He’s also thrown in some RGB strips controlled via the Raspberry-Pi for ambient lighting and status indications. But making it soundproof had him experimenting with various materials and techniques. Eventually, he settled on a lining of foam sheets topped up with a layer of — “bubble wrap” ! It seems the uneven surface of the bubble wrap is quite effective in reducing sound – at least to his ears. Time, and neighbours, will tell.

Maybe high density “acoustic foam” sheets would be more effective (the ones similar to “egg crate” style foam sheets, only more dense)? Cleaning the inside of the box could be a big challenge when using such acoustic foam, though. What would be your choice of material for building such a sound proof box? Let us know in the comments below. Going back many years, we’ve posted about this “Portable CNC Mill” and a “Mill to CNC Conversion” for the Proxxon MF70. Seems like a popular machine among hackers.

Gorgeous NickelBot Serves Up Lasered Wooden Nickels

[bdring] just recently completed his absolutely fantastic NickelBot, which is a beautifully made unit that engraves small wooden discs with a laser like some kind of on demand vending machine, and it’s wonderful. NickelBot is small, but a lot is going on inside. For example, there’s a custom-designed combination engraving platform and hopper that takes care of loading a wooden nickel from a stack, holding it firm while it gets engraved by a laser, then ejects it out a slot once it’s done.

NickelBot is portable and can crank out an engraved nickel within a couple of minutes, nicely fulfilling its role of being able to dish out the small items on demand at events while looking great at the same time. NickelBot’s guts are built around a PSoC5 development board, and LaserGRBL is used on the software side to generate G-code for the engraving itself. Watch it work in the video embedded below.

Continue reading “Gorgeous NickelBot Serves Up Lasered Wooden Nickels”