Guitar Game Plays With Enhanced Realism

There’s a lot more to learning how to play the guitar than just playing the right notes at the right time and in the right order. To produce any sound at all requires learning how to do completely different things with your hands simultaneously, unless maybe you’re a direct descendant of Eddie Van Halen and thus born to do hammer ons. There’s a bunch of other stuff that comes with the territory, like stringing the thing, tuning it, and storing it properly, all of which can be frustrating and discouraging to new players. Add in the calluses, and it’s no wonder people like Guitar Hero so much.

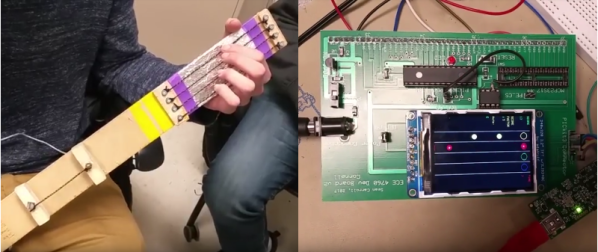
[Jake] and [Jonah] have found a way to bridge the gap between pushing candy colored buttons and developing fireproof calluses and enough grip strength to crush a tin can. For their final project in [Bruce Land]’s embedded microcontroller design class, they made a guitar video game and a controller that’s much closer to the experience of actually playing a guitar. Whether you’re learning to play for real or just want to have fun, the game is a good introduction to the coordination required to make more than just noise.

Continue reading “Guitar Game Plays With Enhanced Realism”

Adaptive guitar: pick board and controller

Hackaday Prize Entry: Adaptive Guitar

Due to a skiing accident, [Joe]’s new friend severed the motor nerves controlling her left arm. Sadly she was an avid musician who loved to play guitar — and of course, a guitar requires two hands. Or does it? Pressing the string to play the complex chords is more easily done using fingers, but strumming the strings could be done electromechanically under the control of a foot pedal. At least that’s the solution [Joe] implemented so beautifully when his friend’s family reached out for help.

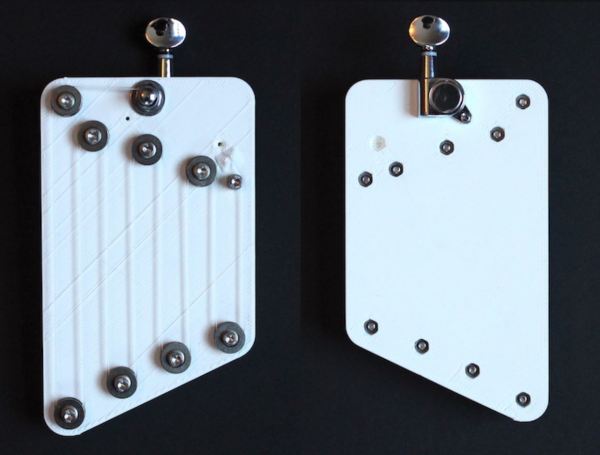
There are just so many things to enjoy while reading through [Joe]’s project logs on his hackaday.io page, which he’s entered into the Hackaday Prize. He starts out with researching how others have solved this problem. Then he takes us through his first attempts and experiments. For example, an early discovery is how pressing the strings on the fretboard pulls the string down where the picks are located, causing him to rethink his initial pick design. His criteria for the pick actuators leads him to make his own. And the actuators he made are a thing of beauty: quiet, compact, and the actuator body even doubles as part of a heat sink for his custom controller board. During his pick design iterations he gets great results using spring steel for flexibility leading up to the pick, but thinking of someday going into production, he comes up with his own custom-designed, laser-cut leaf springs, different for each string.  Needing Force Sensitive Resistors (FCRs) for the foot pedal, he iterates to making his own, laying out the needed interlinked traces on a PCB (using an Eagle script) and putting a piece of conductive rubber over it all. And that’s just a sample of the adventure he takes us on.

In terms of practicality, he’s made great efforts to make it compact and easy to set up. The foot pedal even talks to the control board on the guitar wirelessly. Non-damaging adhesives attach magnets and velcro to the guitar so that the control board and pick bridge can be precisely, yet easily, attached single-handedly. The result is something easy to manage by someone with only one working hand, both for set-up and actual playing. See it for yourself in the video below.

Continue reading “Hackaday Prize Entry: Adaptive Guitar”

Hackaday Prize Entry: You Can Tune A Guitar, But Can You Reference REO Speedwagon?

Just for a second, let’s perform a little engineering-based thought experiment. Let’s design a guitar tuner. First up, you’ll need a 1/4″ input, and some op-amps to get that signal into a microcontroller. In the microcontroller, you’re going to be doing some FFT. If you’re really fancy, you’ll have some lookup tables and an interface to switch between A440, maybe A430, and if you’re a huge nerd, C256. The interface is simple enough — just use a seven-segment display and a few LEDs to tell the user what note they’re on and how on-pitch they are. All in all, the design isn’t that hard.

Now let’s design a tuner for blind musicians. This makes things a bit more interesting. That LED interface isn’t going to work, and you’ve got to figure out a better way of telling the musician they’re on-pitch. This is the idea of [Pepijn]’s Accessible Guitar Tuner. It’s a finalist in The Hackaday Prize Assistive Technology round, and a really interesting problem to solve.

Most of [Pepijn]’s tuner is what you would expect — microcontrollers and FFT. The microcontroller is an ATMega, which is sufficient enough for a simple guitar tuner. The real trick here is the interface. [Pepijn] modulating the input from the guitar against a reference frequency. The difference between the guitar and this reference frequency is then turned into clicks and played through headphones. Fewer clicks mean the guitar is closer to being in tune.

This is one of those projects that’s a perfect fit for the Hackaday Prize Assistive Technology round. It’s an extremely simple problem to define, somewhat easy to build, and very useful. That doesn’t mean [Pepijn] isn’t having problems — he’s having a lot of trouble with the signal levels from a guitar. He’s looking for some help, so if you have some insights in reading signals that range from tiny piezos to active humbuckers, give him a few words of advice.

GuitarBot Brings Together Art And Engineering

Not only does the GuitarBot project show off some great design, but the care given to the documentation and directions is wonderful to see. The GuitarBot is an initiative by three University of Delaware professors, [Dustyn Roberts], [Troy Richards], and [Ashley Pigford] to introduce their students to ‘Artgineering’, a beautiful portmanteau of ‘art’ and ‘engineering’.

The GuitarBot It is designed and documented in a way that the three major elements are compartmentalized: the strummer, the brains, and the chord mechanism are all independent modules wrapped up in a single device. Anyone is, of course, free to build the whole thing, but a lot of work has been done to ease the collaboration of smaller, team-based groups that can work on and bring together individual elements.

Some aspects of the GuitarBot are still works in progress, such as the solenoid-activated chord assembly. But everything else is ready to go with Bills of Materials and build directions. An early video of a strumming test proof of concept used on a ukelele is embedded below.

Continue reading “GuitarBot Brings Together Art And Engineering”

12-Foot Guitar Takes The Stage

Musical festivals are fun and exciting. They are an opportunity for people to perform and show-off their art. The Boulevardia event held this June in Kansas City was one such event, where one of the interactive exhibits was a 12-foot guitar that could be played. [Chris Riebschlager] shares his experience making this instrument which was intended to welcome the visitors at the event.

The heart of this beautiful installation is a Bare Conductive board which is used to detect a touch on the strings. This information is sent over serial communication to a Raspberry Pi which then selects corresponding WAV files to be played. Additional arcade buttons enable the selection of playable chords from A through G, both major and minor and also give the option to put the guitar in either clean or dirty mode.

The simplicity of construction is amazing. The capacitive touch board is programmed using the Arduino IDE and the code is available as a Gist. The Raspberry Pi runs a Python script which makes the system behave like an actual guitar i.e. touching and holding the strings silences it while releasing the strings produces the relevant sound. The notes being played were exported guitar notes from Garage Band for better consistency.

The physical construction is composed of MDF and steel with the body and neck of the guitar milled on a CNC machine. Paint, finishing and custom decals give the finished project a rocking appearance. Check out the videos below for the fabrication process along with photos of the finished design.

This project is a great example of art enabled by technology and if you love guitars, then go ahead and check out Brian May’s Handmade Guitar. Continue reading “12-Foot Guitar Takes The Stage”

The Red Special: Brian May’s Handmade Guitar

Guitarists are a special breed, and many of them have a close connection with the instruments they play. It might be a specific brand of guitar, or a certain setup required to achieve the sound they’re looking for. No one has a closer bond with an instrument than Brian May to his Red Special. The guitar he toured with and played through his career with Queen and beyond had very humble beginnings. It was built from scratch by Brian and his father Harold May.

A young Brian May playing the brand new Red Special. Note the disk magnets of the original handmade pickups

It was the early 1960’s and a young teenaged Brian May wanted an electric guitar. The problem was that the relatively new instruments were still quite expensive — into the hundreds of dollars. Well beyond the means of the modest family’s budget. All was not lost though. Brian’s father Harold was an electrical engineer and a hacker of sorts. He built the family’s radio, TV, and even furniture around the house. Harold proposed the two build a new electric guitar from scratch as a father-son project. This was the beginning of a two-year odyssey that resulted in the creation of one of the world’s most famous musical instruments.

Brian was already an accomplished guitarist, learning first on his dad’s George Formby Banjo-ukulele, and graduating to an Egmond acoustic guitar. Brian’s first forays into electric guitars came from experimenting with that Egmond. If you look close, you can even see the influence it had on the final design of the Red Special.

Continue reading “The Red Special: Brian May’s Handmade Guitar”

How To Play The Bass With Marbles

Stringed instruments make noise from the vibrations of tuned strings, using acoustic or electronic means to amplify those vibrations to the point where they’re loud enough to hear. The strings are triggered in a variety of ways – piano strings are hit with hammers, guitar strings are plucked, while violin strings are bowed. Meanwhile, [Martin] from the band [Wintergatan] is using marbles to play a bass guitar.

[Martin] starts out with a basic setup. The bass guitar is placed on the workbench, while a piece of wood is taped to a tripod. The wood has a hole drilled through it, and marbles are dropped through the aperture in an attempt to get them to land on the string. Plastic containers are used to easily alter the angle the bass guitar sits at, relative to the bench, while an acrylic guide sits around the string to try to guide the marbles in the desired direction. These guides are important to make sure the marbles hit the top of the string, and bounce cleanly in the desired direction afterwards.

The initial setup is too inconsistent, so [Martin] places a notch in the wood and builds a lever system to hold the marbles and then release them in a controlled manner. [Martin] then checks that the system works by analysing footage of the marble drop with slow motion video.

The video covers the CAD design of an eight-slot guide so the four strings of the bass can be played more rapidly than in their previous build. Two guides per string allow each string to play two notes in quick succession without having to worry about marble collisions from playing too quickly.

It’s a great build, and we’ve seen [Wintergatan]’s work before – namely, the incredible build that was the original Marble Machine.

Thanks to [Tim Trzepacz] for the tip!