A photo of the HAT with the LoRa module and relay visible on the top

LoRaSense Pi Hat Aims To Kick Start IoT Projects

[Avi Gupta] recently sent in their LoRaSense RGB Pi HAT project. This “HAT” (Hardware Attached to Top) is for any Raspberry Pi with 40-pin header. The core of the build is the custom printed circuit board which houses the components and interconnects. The components include an SHT31 temperature and humidity sensor, an SX1278 LoRa module, and a 10 amp 220 VAC relay. The interconnects include support for UART, I2C, SPI, and WS2812B RGB LED interfaces as well as a stackable header for daisy chaining HATs.

The attached components in combination support a wide range of use cases. Possible uses for this Raspberry Pi HAT include smart home systems, agricultural projects, industrial monitoring, smart greenhouse, remote weather stations, or alerting systems. You can detect weather conditions, send and receive information, switch mains powered loads, and use RGB LEDs for status and alerting.

If you’re interested in LoRa technology be sure to read about the Yagi antenna that sends LoRa signals farther.

Instant Filament Drying Satisfies An Immediate Need

Most 3D printer filament soaks up water from the air, and when it does, the water passing through the extruder nozzle can expand, bubble, and pop, causing all kinds of mayhem and unwanted effects in the print. This is why reels come vacuum sealed. Some people 3D print so much that they consume a full roll before it can soak up water and start to display these effects. Others live in dry climates and don’t have to worry about humidity. But the rest of us require a solution. To date, that solution has been filament dryers, which are heated elements in a small reel-sized box, or for the adventurous an oven put at a very specific temperature until the reel melts and coats the inside of the oven. The downside to this method is that it’s a broad stroke that takes many hours to accomplish, and it’s inefficient because one may not use the whole roll before it gets soaked again.

In much the same way that instant water heaters exist to eliminate the need for a water heater, [3DPI67] has a solution to this problem, and it involves passing the filament through a small chamber with a heating element and fan circulating air. The length of the chamber is important, as is the printing speed, since the filament needs to have enough time in the improvised sauna to sweat out all its water weight. The temperature of the chamber can’t get above the glass transition temperature of the filament, either, which is another limiting factor for the dryer. [3DPI67] wrote up a small article on his improvised instant filament heater in addition to the video.

So far, only TPU has been tested with this method, but it looks promising. Some have suggested a larger chamber with loops of filament so that more can be exposed for longer. There’s lots of room for innovation, and it seems some math might be in order to determine the limits and optimizations of this method, but we’re excited to see the results.

A General-Purpose PID Controller

For those new to fields like robotics or aerospace, it can seem at first glance that a problem like moving a robot arm or flying an RC airplane might be simple problems to solve. It turns out, however, that control of systems like these can get complicated quickly; so much so that these types of problems have spawned their own dedicated branch of engineering. As controls engineers delve into this field, one of their initial encounters with a control system is often with the PID controller, and this open source project delivers two of these general-purpose controllers in one box.

The dual-channel PID controller was originally meant as a humidity and temperature controller and was based on existing software for an ATmega328. But after years of tinkering, adding new features, and moving the controller to an ESP32 platform, [knifter] has essentially a brand new piece of software for this controller. Configuring the controller itself is done before the software is compiled, and it includes a GUI since one of the design goals of the project was ease-of-use. He’s used it to control humidity, temperature and CO2 levels in his own work at the University of Amsterdam, but imagines that it could see further use outside of his use cases in things like reflow ovens which need simple on/off control or for motors which can be controlled through an H-bridge.

The PID controller itself seems fairly robust, and includes a number of features that seasoned controls engineers would look for in their PID controllers. There are additionally some other open-source PID controllers to take a look at like this one built for an Arduino, and if you’re still looking for interesting use cases for these types of controllers one of our favorites is this PID controller built into a charcoal grill.

Converting Bluetooth Sensors To Zigbee

With the increase in popularity of Internet of Things (IoT) devices and their need to communicate wirelessly,  there’s been a corresponding explosion of wireless protocols to chose from. Of course there’s Wi-Fi and Bluetooth, but for more specialized applications there are some other options like Z-Wave, LoRa, Sigfox, and Thread. There’s a decent amount of overlap in their capabilities too, so when [SHS] was investigating some low-cost Xiaomi sensors it was discovered that it is possible to convert them from their general purpose Bluetooth protocol over to the more IoT-specialized Zigbee protocol instead.

These combination temperature and humidity sensors have already been explored by [Aaron Christophel] who found that it’s possible to flash these devices with custom firmware. With that background, converting them from Bluetooth to Zigbee is not a huge leap. All that’s needed is the Zigbee firmware from [Ivan Belokobylskiy] aka [devbis] and to follow the steps put together by [SHS] which include a process for flashing the firmware using an over-the-air update and another using UART if the wireless updates go awry. Then it’s just a short process to pair the new Zigbee device to the network and the sensor is back up and running.

Converting from one wireless protocol to another might not seem that necessary, but using Bluetooth as an IoT network often requires proxy nodes as support devices, whereas Zigbee can communicate directly from the sensor to a hub like Home Assistant. Other Zigbee devices themselves can also act as a mesh network of sorts without needing proxy nodes. The only downside of this upgrade is that once the Bluetooth firmware has been replaced, the devices no longer has any Bluetooth functionality.

Thanks to [RoganDawes] for the tip!

Heat Pump Control That Works

Heat pumps are taking the world by storm, and for good reason. Not only are they many times more efficient than electric heaters, but they can also be used to provide cooling in the summer. Efficiency aside, though, they’re not perfectly designed devices, largely with respect to their climate control abilities especially for split-unit setups. Many of them don’t have remotely located thermostats to monitor temperature in an area, and rely on crude infrared remote controls as the only user interface. Looking to make some improvements to this setup, [Danilo] built a setup more reminiscent of a central HVAC system to control his.

Based on an ESP32 from Adafruit with an integrated TFT display, the device is placed away from the heat pump to more accurately measure room temperature. A humidity sensor is also included, as well as an ambient light sensor to automatically reduce the brightness of the display at night. A large wheel makes it quick and easy to adjust the temperature settings up or down. Armed with an infrared emitter, the device is capable of sending commands to the heat pump to more accurately control the climate of the room than the built-in controls are able to do. It’s also capable of logging data and integrating with various home automation systems.

While the device is optimized for the Mitsubishi heat pumps that [Danilo] has, only a few lines of code need to be changed to get this to work with other brands. This is a welcome improvement for those frustrated with the inaccurate climate controls of their heat pumps, and since it integrates seamlessly into home automation systems could also function in tandem with other backup heat sources, used in cold climates when it’s too cold outside to efficiently run the heat pump. And, if you don’t have a heat pump yet, you can always try and build your own.

Raspberry Pi Weather Station Features Wireless Sensor Nodes

Online weather services are great for providing generic area forecasts, but they don’t provide hyperlocal data specific to your location. [Harald Kreuzer] needed both and built a Raspberry Pi Weather Station that provides weather forecasts for the next 7 days as well as readings from local sensors. The project is completely open source and based on a Raspberry Pi base station which connects to ESP32 based sensor nodes and online services to nicely present the data on a 7″ touch screen display.

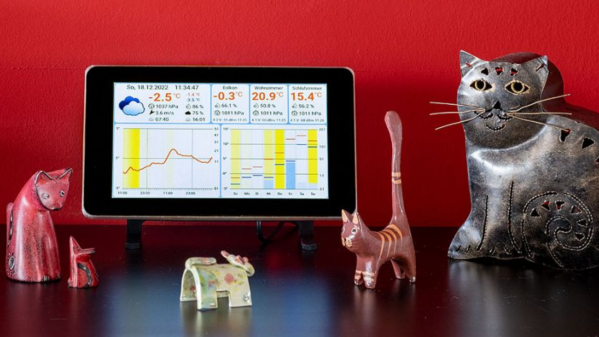
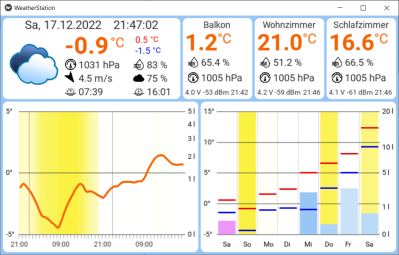
The architecture is quite straightforward. The ESP32 based sensor nodes publish their readings to an MQTT broker running on the Raspberry Pi. The Pi subscribes to these sensor node topics to pick up the relevant sensor data. This makes it easy to add additional sensor nodes in future. Weather forecast data is collected by connecting to the OpenWeatherMap API. All of the collected information is then displayed through an app built using the Kivy: open source Python app development framework. Continue reading “Raspberry Pi Weather Station Features Wireless Sensor Nodes”

Filament Dry Box Design Goes Way Over The Top

There’s a fine line between simple feature creep and going over the top when it comes to project design. It’s hard to say exactly where that line is, but we’re pretty sure that this filament dry box has at least stepped over it, and might even have erased it entirely.

Sure, we all know the value of storing 3D printer filament under controlled conditions, to prevent the hygroscopic plastics from picking up atmospheric moisture. But [Sasa Karanovic] must really, REALLY hate the printing artifacts that result. Starting with a commercially available dry box that already had a built-in heating element, [Sasa] took it to the next level by replacing the controller and display with an ESP32. He added a fan to improve air circulation inside the enclosure and prevent stratification, as well as temperature and humidity sensors. Not satisfied with simply switching the heating element on and off at specific setpoints, he also implemented a PID loop to maintain a constant temperature. And of course, there’s a web UI and an API available for third-party control and monitoring.

The video below details [Sasa]’s design thoughts and goes into some detail on construction and performance. And while we may kid that this design is over-the-top, what really comes through is that this is a showcase for design ideas not only for one application, but for hardware projects in general. There are certainly simpler heated dry box designs, and zero-cost solutions as well, but sometimes going overboard has its own value too.

Continue reading “Filament Dry Box Design Goes Way Over The Top”