Building An ESP8266 Doorbell On Hard Mode

It certainly seems as though it should be an easy enough project; all [Miguel De Andrade] wanted was to receive a notification when somebody was pressing his doorbell, and thought it would be a good project to get his feet wet in the wonderful world of ESP8266 hacking. But as fate would have it, not everything went according to plan. In the end he got it sorted out, but it’s an interesting look at how even the “easy” projects can call the gremlins out of hiding.

Arguably, the problems started when [Miguel] picked up an ESP-01 module from a local electronics retailer. While the convenience of buying the hardware in a brick and mortar store can’t be overstated, it did mean he was stuck with a slightly more spartan experience compared to the more common ESP “development boards”. Programming it externally with a Teensy ended up not being much of an obstacle, but it did mean he was stuck with only two GPIO pins.

At any rate, with ESP in hand, the next step was figuring out how the existing bell and intercom system even worked. Unfortunately, after some experimentation [Miguel] found there was a bit more going on there than he’d hoped. According to his multimeter, the one line from the intercom sits at approximately 5 VDC when it’s open, and drops down to 2.5 VDC when pressed. If that wasn’t bad enough, picking up the handset to answer the intercom sent the voltage up to a microcontroller-killing 12 VDC. To complicate maters further, the supply line for the intercom was 23 VAC, so he’d need to rectify that somehow if he wanted to avoid a separate power supply for the ESP.

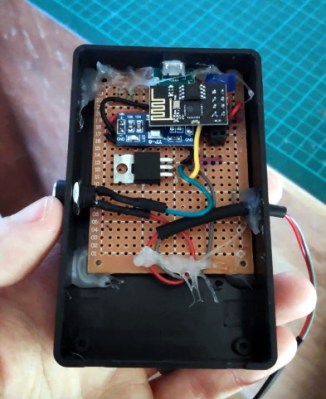
To turn this jumble of voltages into a nice clean 0 – 3.3 V signal for the ESP8266, he came up with a circuit based around the LM358 comparator that utilizes an LM117 regulator to power itself and the ESP at the same time. A couple of diodes are there to block the AC component from causing trouble, and an A2N2222A transistor is used as a buffer amplifier to boost the output of the comparator so it registers as a digital HIGH on the ESP. The circuit took a bit of fiddling to get sorted out, but in the end [Miguel] says it seems to get the job done.

You might think the problems were solved, but this is where it gets really annoying. The system would work fine for awhile, and then inexplicably go silent. In diagnosing the problem he realized that his circuit connected to GPIO_0 was inadvertently putting the ESP8266 into programming mode, since it was holding the pin LOW unless the intercom button was pressed. He assumed he could just move the circuit to the other GPIO pin, but as that one has the board’s LED on it, that caused its own problems. For now, [Miguel] hasn’t come up with a solution to this issue, and has learned to live with the fact that the system won’t come back up cleanly should it lose power for any reason.

If you’re looking for a slightly classier look than a scrap of perfboard stuck on the wall with what appears to be chewing gum, we’ve also seen the ESP8266 used in some more ornate doorbell setups. Of course if you still haven’t gotten your head wrapped around the whole Internet-connected button thing, you can always start with something a little easier.

Control Anything With A Chat Bot

In the world of Internet of Things, it’s easy enough to get something connected to the Internet. But what should you use to communicate with and control it? There are many standards and tools available, but the best choice is always to use the tools you have on hand. [Victor] found himself in this situation, and found that the best way to control an Internet-connected car was to use the Flask server he already had.

The remote controlled car was originally supposed to come with an Arduino, but the microcontroller was missing upon arrival. He had a Raspberry Pi around, and was able to set that up to replace the Arduino. He also took the opportunity to use the expanded functionality of the Pi compared to the Arduino and wrote a Flask server to control it, which is accessed as if you are communicating with a chat bot. Sending the words “go left/forward” to the Flask server will control the car accordingly, for example.

The chat bot itself contains some gems as well, and would be useful for any project that makes use of regular expressions. It also seems to be easily expandable. The project also uses voice commands, and does so by making extensive use of Mozilla’s voice recognition suite. If you want to get deep in the weeds of voice recognition on your own though, you can also explore TensorFlow at your leisure.

Forcing Amazon Alexa Compatible Stuff To Speak To Google Assistant

It took a long time, but it’s 2019, and we’re starting to get used to the concept of talking to a computer to make it control things around the house. It’s not quite as cool as it seemed when we saw it in films way back when, but that’s just real life. The problem is, there’s a multitude of different systems and standards and they don’t all necessarily work together. In [Blake]’s case, the problem is that Woods brand hardware only works with Amazon Alexa, which simply won’t do.

[Blake] went through the hassle of getting an Amazon Alexa compatible WiFi outlet to work with Google Assistant. It’s a bit of a roundabout way of doing things, but it works. A TP-Link HS-105 WiFi plug is used, which can be controlled through Google Assistant voice commands. The part consists of two PCBs – a control board that speaks WiFi, and a switching board with relays. [Blake] used the control board and hooked it up to a Raspberry Pi. When switched on by a command from Google, the HS-105 sets a pin high, which is detected by the Raspberry Pi. The Raspberry Pi then runs a software implementation of the KAB protocol used by the Woods hardware, triggering it when it receives the signal from the TP-Link hardware.

If we understand correctly, [Blake] had to go to this trouble in order to make his special outdoor-rated outlets work with his Google Home setup. Hopefully interoperability improves in years to come, but we won’t hold our breath.

We’ve seen some pretty convoluted projects in this space before, often using IFTTT — like this ESP8266 voice controlled tank.

The Umbrella That Tells You The Weather

Most people can tell you the various uses of the umbrella — it keeps the rain off, pokes sleeping train passengers awake, and can be used as an improvised defensive weapon when tension in the hot dog line reaches boiling point. A true Englishman would never deign to employ their brolly so imprudently, of course, but they might just give it an upgrade by packing in a full weather station.

Please do not message us to complain about the redundancy of a rain sensor on an umbrella.

The build uses the Particle Photon as the brains of the operation, interfacing it with several sensors. There’s a DHT11 to handle temperature and humidity measurement, an Adafruit barometric pressure sensor, along with a custom-built anemometer using a brushed motor with 3D printed wind cups. Finally, a breadboard is turned into a rain detector, based on the same principles as those used in automotive applications.


The Particle Photon uses WiFi to tether to a smartphone, deliver the collected data to the cloud via Adafruit IO. This enables the data to be collated and processed further on a PC. Yes, it’s 2018, and they have the internet on umbrellas now.

As we reach further into the depths of winter, it’s one project that could very much come in handy, and [The Gentlemen Maker] has been kind enough to share the code on Particle.io. If that’s not good enough, perhaps you could use your umbrella as a WiFi antenna. Video after the break.

Continue reading “The Umbrella That Tells You The Weather”

Weaponized Networked Printing Is Now A Thing

It’s a fairly safe bet that a Venn diagram of Hackaday readers and those who closely follow the careers of YouTube megastars doesn’t have a whole lot of overlap, so you’re perhaps blissfully unaware of the man who calls himself [PewDiePie]. As such, you might not know that a battle between himself and another YouTube channel which uploads Bollywood music videos has reached such a fever pitch that his fans have resorted to guerrilla hacking to try to sway public opinion towards their side. It’s perhaps not the dystopian future we imagined, but it just might be the one we deserve.

To briefly summarize the situation, a hacker known only by the handle [TheHackerGiraffe] decided to help out Dear Leader by launching an automated attack against 50,000 Internet connected printers. When the hack was successful, the printer would spit out a page of digital propaganda, complete with fist ASCII art, that urged the recipient to go on YouTube and pledge their support for [PewDiePie]. There’s some debate about how many of the printers [TheHackerGiraffe] targeted actually delivered their payload, but judging by reactions throughout social media, it was enough to get the message out.

While the stunt itself may have come as a surprise, the methodology wasn’t. In fact, the only surprising element to the security researchers who’ve weighed in on the situation is that this hasn’t happened more often. It certainly isn’t the first time somebody’s done it, but the fact that this time its been connected to such a high profile Internet celebrity is putting more eyes on the problem then there have been in the past. Now that the proverbial cat is out of the bag, there are even websites springing up which claim to be purveyors of “Printer Advertising”. Odds are good this won’t be the last time somebody’s printer starts running off more than TPS reports.

We here at Hackaday don’t have much interest in the battle for YouTube supremacy. We’re just pulling for Dave Jones’s EEVBlog channel to join [AvE] in breaking a million subscribers. But we’re very interested in the technology which made this attack possible, how likely it is we’re going to see more people exploit it, and what are we supposed to do now that even our own printers can be turned against us?

Continue reading “Weaponized Networked Printing Is Now A Thing”

Vibrosight Hears When You Are Sleeping. It Knows When You’re Awake.

No matter how excited you are to dive headfirst into the “Internet of Things”, you’ve got to admit that the effort and expense of going full-on Jetsons is a bit off-putting. To smarten up your home you’ve generally got to buy all new products (and hope they’re all compatible) or stick janky after-market sensors on the gear you’ve already got (and still hope they’re all compatible). But what if there was a cheap and easy way to keep tabs on all your existing stuff? The answer may lie in Cold War era surveillance technology.

As if the IoT wasn’t already Orwellian enough, Vibrosight is a project that leverages a classic KGB spy trick to keep tabs on what’s going on inside your home. Developed by [Yang Zhang], [Gierad Laput] and [Chris Harrison], the project uses retro-reflective stickers and a scanning laser to detect vibrations over a wide area. With this optical “stethoscope”, the system can glean all kinds of information; from how long you’ve been cooking something in the microwave to whether or not you washed your hands.

The project takes its inspiration from the optical eavesdropping system developed by Léon Theremin in the late 1940’s. By bouncing a beam of light off of a window, Theremin’s gadget was able to detect what people inside the room were saying from a distance. The same idea is applied here, except now it uses an automated laser scanner and machine learning to turn detected vibrations into useful information that can be plugged into a home automation system.

For Vibrosight to “listen” to objects, the user needs to place retro-reflective tags on whatever they want to include in the system. The laser will periodically scan around the room looking for these tags. Once the laser finds a new tag, will add it to a running list of targets to keeps an eye on. From there Vibrosight is able to take careful vibration measurements which can provide all sorts of information. In the video after the break, Vibrosight is shown differentiating between walking, jogging, and running on a treadmill and determining what kind of hand tools are being used on a workbench. The team even envisions a future where Vibrosight-ready devices would “hum” their IP address or other identifying information to make device setup easier.

If all this talk of remote espionage at a distance has caught your interest, we’ve covered Theremin’s unique surveillance creations in the past, and even a way to jam them if you’re trying to stay under the radar.

Continue reading “Vibrosight Hears When You Are Sleeping. It Knows When You’re Awake.”

Photon Door Lock Swaps Keys For A POST Request

At this point we’re all well aware of the fact that there is some inherent danger involved when bringing “things” onto the Internet. Nobody wants to come home to a smoldering pile of ruble because their Internet connected toaster oven decided to get stuck on “Hades.” But even with the risks, occasionally we see projects that prove at least some intrepid hackers are managing to navigate the Internet of Things to solve real-world problems.

[Daniel Andrade] writes in to tell us about the Internet controlled entry system he’s setup at his new apartment, and while we imagine it’s not for everyone, we can’t deny it seems like it has improved his quality of life. Rather than giving all of his friends a copy of his key, he’s setup a system where anyone who has the appropriate link can “buzz” themselves in through the building’s existing intercom system.

Thanks to the old-school intercom setup, the hardware for this project is simple in the extreme. All [Daniel] needed was a relay to close the circuit on the door buzzer, and a way to fire it off. For his controller he chose the Photon from Particle, which is perhaps a bit overkill, but we all tend to work with what we’re personally comfortable with.

Most of the work went into the software, as [Daniel] ended up coming with two distinct ways to control the door lock over the Internet. The first method uses Blynk, which allows you to create slick visual interfaces for mobile devices. His second version is controlled with a POST request to a specific URL, which he likes because it gives him more flexibility as to how he can interact with the lock. Currently he has a simple web page setup that lets friends and family open the door by just clicking a button.

We’ve seen a similar setup using the Photon to open a garage door, and plenty of people have taken to using Blynk to control their home automation setups. All the tools are available for you to roll your own IoT gadgets, you just need to figure out what to do with the things…